GraphQL은 페이스북이 처음 제안하고 주도한 API 조회를 위한 언어이다. 이미 많은 곳에서 GraphQL 기반의 API를 제공하고 있는데, 그 중 대표적인 곳이 깃헙이기도 하다. GraphQL은 요즘처럼 애플리케이션 개발 무게 중심이 모바일 앱을 포함한 프론트엔드 쪽으로 옮겨온 상황에서 상당히 유용하게 쓰일 수 있는 도구이다. 이 포스트를 포함한 일련의 시리즈에서는 ASP.NET Core 애플리케이션을 포함한 다양한 .NET 코어 기반의 애플리케이션에서 간단하게 GraphQL 서버와 클라이언트를 구성하는 방법에 대해 알아보기로 한다.
- ASP.NET Core 앱으로 GraphQL 서버 구축해 보기
- ASP.NET Core 앱으로 헤드리스 워드프레스를 위한 GraphQL 서버 구축해 보기
- 닷넷 기반의 애저 펑션으로 ASP.NET Core 기반의 GraphQL 서버 이전하기
- 자바스크립트 기반의 애저 펑션으로 GraphQL 서버 구축해 보기
- 블레이저 웹 어셈블리 앱으로 헤드리스 워드프레스와 GraphQL을 이용한 웹사이트 구현해 보기
이 포스트에 사용된 소스 코드는 이 깃헙 리포지토리에서 다운로드 받을 수 있다.
GraphQL이 REST API에 비해 매력적인가?
만약 내가 저 질문에 대답해야 한다면,
글쎄? 그럴지도? 잘 모르겠음.
정도가 될 것 같다. 이 포스트를 쓰는 지금도 마찬가지이긴 한데, 다만 딱 한가지 GraphQL이 갖는 장점이 눈에 띄는 것이 있다. 바로 REST API의 over-fetching, under-fetching 문제를 해결해 줄 수 있다는 점이다. REST API는 이미 스키마가 정해져 있어서 내가 특정 엔드포인트로 호출을 하면, 정해진 형태의 데이터가 돌아온다. 아래 예를 한 번 들어보자. 블로그 시스템이 하나 있어서 거기에서 제공하는 REST API가 있다고 가정을 한다면
| GET /posts | |
| GET /posts/{postId} | |
| GET /authors | |
| GET /authors/{authorId} | |
| GET /tags | |
| ... |
대략 이런 형태로 엔드포인트들이 있을 것이다. 이 때 내가 원하는 데이터를 구성하려면 보통은 API 호출 한 번으로 해결되는 경우가 없다. 예를 들어 /posts로 호출했을 때 해당 포스트의 작성자는 보통 authorId 형태로만 들어가 있기 때문이다. 따라서, 해당 포스트의 작성자 정보를 얻기 위해서는 이 authorId를 바탕으로 다시 한 번 호출을 해야 하고 그런 식으로 여러 번의 호출을 통해 내가 원하는 형태의 데이터를 구성해야 한다. 보통 이를 위해서 BFF (Backends for Frontends) 패턴 또는 Gateway Aggregation 패턴을 구현해서 작업을 하는 편인데, 이 때 가장 큰 문제점은 바로 이 "여러 번 호출"이다. 이는 앞서 언급했다시피 REST API의 스키마가 정해져 있기 때문에 호출하는 쪽에서는 이를 재구성해서 사용할 수 밖에 없기 때문이다. 위와 같은 경우를 보통 under-fetching 이라고 하는데, 내가 필요한 데이터가 다 넘어오지 않았기 때문이다.
반면에 어떤 API는 위와 같이 호출한다고 할 때 모든 데이터가 다 넘어오는 경우도 있다. 예를 들자면 /posts로 호출했는데, 그 아래 authorId만 넘어오는 것이 아니라 해당 작성자의 모든 정보가 다 넘어오게끔 구성할 수도 있다. 이런 경우를 over-fetching 이라고 하는데, 이 때는 불필요한 네트웍 자원을 낭비하는 단점이 있다. 그런데, 만약 내가 필요한 데이터만 구조적으로 호출해서 가져올 수 있다면? 데이터 구조를 구성할 권한이 프론트엔드 애플리케이션에 있다면? 이런 제어 역전 구조를 GraphQL이 구현했다는데 가장 큰 의미가 있다.
ASP.NET Core 애플리케이션으로 GraphQL 서버 만들기
GraphQL 역시도 한 형태의 API 서버이므로 어떤 프로그래밍 언어로든 구현이 가능하다. 여기서는 ASP.NET Core 애플리케이션 형태로 구현을 할 예정인데, .NET 관련 구현체가 꽤 많이 있지만, 이 중 가장 널리 알려진 graphql-dotnet을 이용해 보기로 한다.
여기서는 Glenn Block이 링크드인 러닝에 올려놓은 강의 영상을 참고로 현재 ASP.NET Core 버전에 맞춰 재구성했다.
먼저 C# 클라스 라이브러리 프로젝트를 만든다. 이 프로젝트 안에서 GraphQL 서버를 구현하는데 필요한 모든 로직을 만들 것이다.
| dotnet new classlib -n PostsQL |
그리고 아래와 같이 NuGet 패키지를 하나 설치한다. 기본적인 프로젝트 설정은 이게 전부이다. 이 글을 쓰는 현재, GraphQL 라이브러리의 최신 안정 버전은 2.4.0이다.
| dotnet add package GraphQL |
모델 정의하기
간단하게 블로그 포스트와 작성자를 나타내는 모델을 아래와 같이 만든다.
| public class Author | |
| { | |
| public Author(int id, string name) | |
| { | |
| this.Id = id; | |
| this.Name = name; | |
| } | |
| public int Id { get; set; } | |
| public string Name { get; set; } | |
| } | |
| public class Post | |
| { | |
| public Post(int id, string title, string slug, DateTimeOffset published, string authorId, PostStatus status) | |
| { | |
| this.Id = id; | |
| this.Title = title; | |
| this.Slug = slug; | |
| this.Published = published; | |
| this.AuthorId = authorId; | |
| this.Status = status; | |
| } | |
| public int Id { get; set; } | |
| public string Title { get; set; } | |
| public string Slug { get; set; } | |
| public DateTimeOffset Published { get; set; } | |
| public string AuthorId { get; set; } | |
| public PostStatus Status { get; set; } | |
| } | |
| public enum PostStatus | |
| { | |
| Created = 1, | |
| Published = 2, | |
| Deleted = 3 | |
| } |
서비스 정의하기
이번에는 데이터 저장소와 연결하는 서비스 클라스를 만들어 보자. 데이터 저장소는 무엇이든 될 수 있겠지만, 여기서는 편의상 하드코딩한 메모리 데이터를 사용하기로 한다. 두 AuthorService와 PostService는 별반 특별할 것이 없다.
| public interface IAuthorService | |
| { | |
| Task<Author> GetAuthorByIdAsync(int id); | |
| Task<List<Author>> GetAuthorsAsync(); | |
| } | |
| public class AuthorService : IAuthorService | |
| { | |
| private readonly List<Author> _authors; | |
| public AuthorService() | |
| { | |
| this._authors = new List<Author>() | |
| { | |
| new Author(1, "Natasha Romanoff"), | |
| new Author(2, "Carol Danvers"), | |
| new Author(3, "Jean Grey"), | |
| new Author(4, "Wanda Maximoff"), | |
| new Author(5, "Gamora"), | |
| }; | |
| } | |
| public async Task<Author> GetAuthorByIdAsync(int id) | |
| { | |
| return await Task.FromResult(this._authors.SingleOrDefault(p => p.Id.Equals(id))); | |
| } | |
| public async Task<List<Author>> GetAuthorsAsync() | |
| { | |
| return await Task.FromResult(this._authors); | |
| } | |
| } | |
| public interface IPostService | |
| { | |
| Task<Post> GetPostByIdAsync(int id); | |
| Task<List<Post>> GetPostsAsync(); | |
| } | |
| public class PostService | |
| { | |
| private readonly List<Post> _posts; | |
| public PostService() | |
| { | |
| this._posts = new List<Post>() | |
| { | |
| new Post(1, "Post #1", "post-1", DateTimeOffset.UtcNow.AddHours(-4), 1, PostStatus.Deleted), | |
| new Post(2, "Post #2", "post-2", DateTimeOffset.UtcNow.AddHours(-3), 2, PostStatus.Published), | |
| new Post(3, "Post #3", "post-3", DateTimeOffset.UtcNow.AddHours(-2), 3, PostStatus.Published), | |
| new Post(4, "Post #4", "post-4", DateTimeOffset.UtcNow.AddHours(-1), 4, PostStatus.Published), | |
| new Post(5, "Post #5", "post-5", DateTimeOffset.UtcNow.AddHours(0), 5, PostStatus.Created), | |
| }; | |
| } | |
| public async Task<Post> GetPostByIdAsync(int id) | |
| { | |
| return await Task.FromResult(this._posts.SingleOrDefault(p => p.Id.Equals(id))); | |
| } | |
| public async Task<List<Post>> GetPostsAsync() | |
| { | |
| return await Task.FromResult(this._posts); | |
| } | |
| } |
GraphQL 스키마 정의하기
여기까지 기본적인 데이터 조작 관련 코드였다면, 이제부터는 본격적으로 GraphQL 관련 작업을 시작해 보자. 먼저 기존의 모델 – Author, Post – 을 GraphQL 타입으로 바꿔줘야 한다. 아래 코드를 보자. AuthorType 클라스는 단순히 Author의 속성을 노출시키는 수준이어서 크게 문제가 되지 않는다. 이 때 ObjectGraphType<T> 클라스를 상속 받아 작성한다 (line #1).
| public class AuthorType : ObjectGraphType<Author> | |
| { | |
| public AuthorType() | |
| { | |
| this.Field(p => p.Id); | |
| this.Field(p => p.Name); | |
| } | |
| } |
이번에는 PostType 클라스를 만들어 보자. 마찬가지로 ObjectGraphType<T> 클라스를 상속 받는다 (line #13). 기존의 PostStatus와 같은 enum 객체는 EnumerationGraphType 클라스를 상속 받아 별도로 변환해 줘야 한다 (line #1). 또한 PostType 객체는 authorId를 통해 AuthorType을 함께 엮어서 변환하는 것으로 설계한다 (line #25). 마지막으로 방금 정의한 PostStatusEnum 클라스를 통해 기존의 PostStatus enum 값을 변환한다 (line #26).
| public class PostStatusEnum : EnumerationGraphType | |
| { | |
| public PostStatusEnum() | |
| { | |
| this.Name = "PostStatus"; | |
| this.AddValue(new EnumValueDefinition() { Name = "Created", Description = "Post was created", Value = 1 }); | |
| this.AddValue(new EnumValueDefinition() { Name = "Published", Description = "Post has been published", Value = 2 }); | |
| this.AddValue(new EnumValueDefinition() { Name = "Deleted", Description = "Post was deleted", Value = 3 }); | |
| } | |
| } | |
| public class PostType : ObjectGraphType<Post> | |
| { | |
| private readonly IAuthorService _authorService; | |
| public PostType(IAuthorService authorService) | |
| { | |
| this._authorService = authorService; | |
| this.Field(p => p.Id); | |
| this.Field(p => p.Title); | |
| this.Field(p => p.Slug); | |
| this.Field(p => p.Published); | |
| this.FieldAsync<AuthorType>("author", resolve: async c => await this._authorService.GetAuthorByIdAsync(c.Source.AuthorId)); | |
| this.Field<PostStatusEnum>("status", resolve: c => c.Source.Status); | |
| } | |
| } |
이번에는 기본적인 데이터 구조 스키마 작업이 끝났으니, 쿼리 객체와 관련한 스키마를 만들어 볼 차례이다. posts 라는 이름을 통해 위에서 정의한 전체 PostType 배열을 반환한다 (line #11-13). 그리고 post 라는 쿼리를 통해 특정 ID 값에 해당하는 PostType 객체만 반환한다 (line #15-19).
| public class PostsQuery : ObjectGraphType<object> | |
| { | |
| private readonly IPostService _postService; | |
| public PostsQuery(IPostService postService) | |
| { | |
| this._postService = postService; | |
| this.Name = "Query"; | |
| this.FieldAsync<ListGraphType<PostType>>( | |
| "posts", | |
| resolve: async c => await this._postService.GetPostsAsync()); | |
| this.FieldAsync<PostType>( | |
| "post", | |
| arguments: new QueryArguments( | |
| new QueryArgument<NonNullGraphType<IntGraphType>>() { Name = "id", Description = "Post ID" }), | |
| resolve: async c => await this._postService.GetPostByIdAsync(c.GetArgument<int>("id"))); | |
| } | |
| } |
마지막으로 GraphQL 서버로 내보낼 스키마를 정의하도록 하자. 이 부분이 실제 UI에 노출되는 부분이다. 앞서 정의한 PostsQuery 객체를 주입하고, 또한 ASP.NET Core 앱에서 주입하는 다른 의존성 객체들 역시도 IDependencyResolver를 통해 함께 주입된다.
| public class PostsSchema : Schema | |
| { | |
| public PostsSchema(PostsQuery query, IDependencyResolver resolver) | |
| { | |
| this.Query = query; | |
| this.DependencyResolver = resolver; | |
| } | |
| } |
여기까지 해서 기본적인 GraphQL 스키마 정의는 끝났다. 그러면 이제 이를 ASP.NET Core 앱으로 불러들여 UI에 표시할 차례이다.
ASP.NET Core UI 만들기
아래와 같이 아무 설정이 없는 빈 ASP.NET Core 앱 프로젝트를 만든다. 이 앱을 통해 GraphQL UI를 구현할 예정이다.
| dotnet new web -n Server.WebApp |
아래 명령어를 통해 필요한 NuGet 패키지들을 추가한다.
| dotnet add package Microsoft.AspNetCore | |
| dotnet add package GraphQL.Server.Core | |
| dotnet add package GraphQL.Server.Transports.AspNetCore | |
| dotnet add package GraphQL.Server.Transports.WebSockets |
이 때 GraphQL.Server.Core 패키지가 기본적으로 설치하는 GraphQL-Parser 패키지는 버그가 있어 잘 작동하지 않으므로 버전을 업그레이드 해야 하는데, 현재 5.x 버전은 아래 버전에 대해 호환성이 없다. 따라서 4.1.2 버전을 설치해야 한다.
| dotnet add package GraphQL-Parser -v 4.1.2 |
마지막으로 GraphQL UI를 설치하면 되는데, 다양한 UI 라이브러리가 있지만 여기서는 GraphiQL을 선택한다.
| dotnet add package GraphQL.Server.Ui.GraphiQL |
그리고 앞서 작업했던 PostsQL 프로젝트를 레퍼런스로 추가한다.
| dotnet add reference PostsQL |
이제 기본적인 프로젝트 설정 작업은 끝났고, Startup.cs 파일에 의존성 객체들을 추가하도록 하자. 먼저 ConfigureServices() 메소드에 필요한 의존성 객체들을 아래와 같이 추가한다 (line #5-11). 그리고 자동으로 GraphQL 서버에서 필요한 다른 의존성 객체들도 사용할 수 있게끔 IDependencyResolver 인스턴스 역시 의존성 객체로 추가한다 (line #13). 마지막으로 GraphQL 스키마 객체들을 추가한다 (line #15-17).
| public class Startup | |
| { | |
| public void ConfigureServices(IServiceCollection services) | |
| { | |
| services.AddSingleton<IAuthorService, AuthorService>(); | |
| services.AddSingleton<IPostService, PostService>(); | |
| services.AddSingleton<AuthorType>(); | |
| services.AddSingleton<PostType>(); | |
| services.AddSingleton<PostStatusEnum>(); | |
| services.AddSingleton<PostsQuery>(); | |
| services.AddSingleton<PostsSchema>(); | |
| services.AddSingleton<IDependencyResolver>(p => new FuncDependencyResolver(type => p.GetRequiredService(type))); | |
| services.AddGraphQL() | |
| .AddWebSockets() | |
| .AddGraphTypes(Assembly.GetAssembly(typeof(PostsSchema))); | |
| } | |
| } |
아래 Configure() 메소드는 GraphiQL UI를 추가하기 위한 부분이다 (line #15-18). 마지막으로 웹사이트를 실행시켰을 때 루트로 접속을 해도 자동으로 /ui/graphql로 리디렉션 시켜주는 로직을 추가했다 (line #11).
| public class Startup | |
| { | |
| public void Configure(IApplicationBuilder app, IWebHostEnvironment env) | |
| { | |
| ... | |
| app.UseEndpoints(endpoints => | |
| { | |
| endpoints.MapGet("/", async context => | |
| { | |
| await Task.Run(() => context.Response.Redirect("/ui/graphql", permanent: true)); | |
| }); | |
| }); | |
| app.UseWebSockets(); | |
| app.UseGraphQLWebSockets<PostsSchema>(); | |
| app.UseGraphQL<PostsSchema>(); | |
| app.UseGraphiQLServer(new GraphiQLOptions() { GraphiQLPath = "/ui/graphql", GraphQLEndPoint = "/graphql" }); | |
| } | |
| } |
여기까지 한 후 빌드를 하고 실행시켜 보자.
| dotnet run Server.WebApp |
별 문제 없이 돌아가는 것 처럼 보인다. 그러면 아래 주소를 웹 브라우저를 통해 접속해 보자.
| https://localhost:5001/ |
자동으로 https://localhost:5001/ui/graphql로 이동한다. 그런데, 에러가 하나 난다.
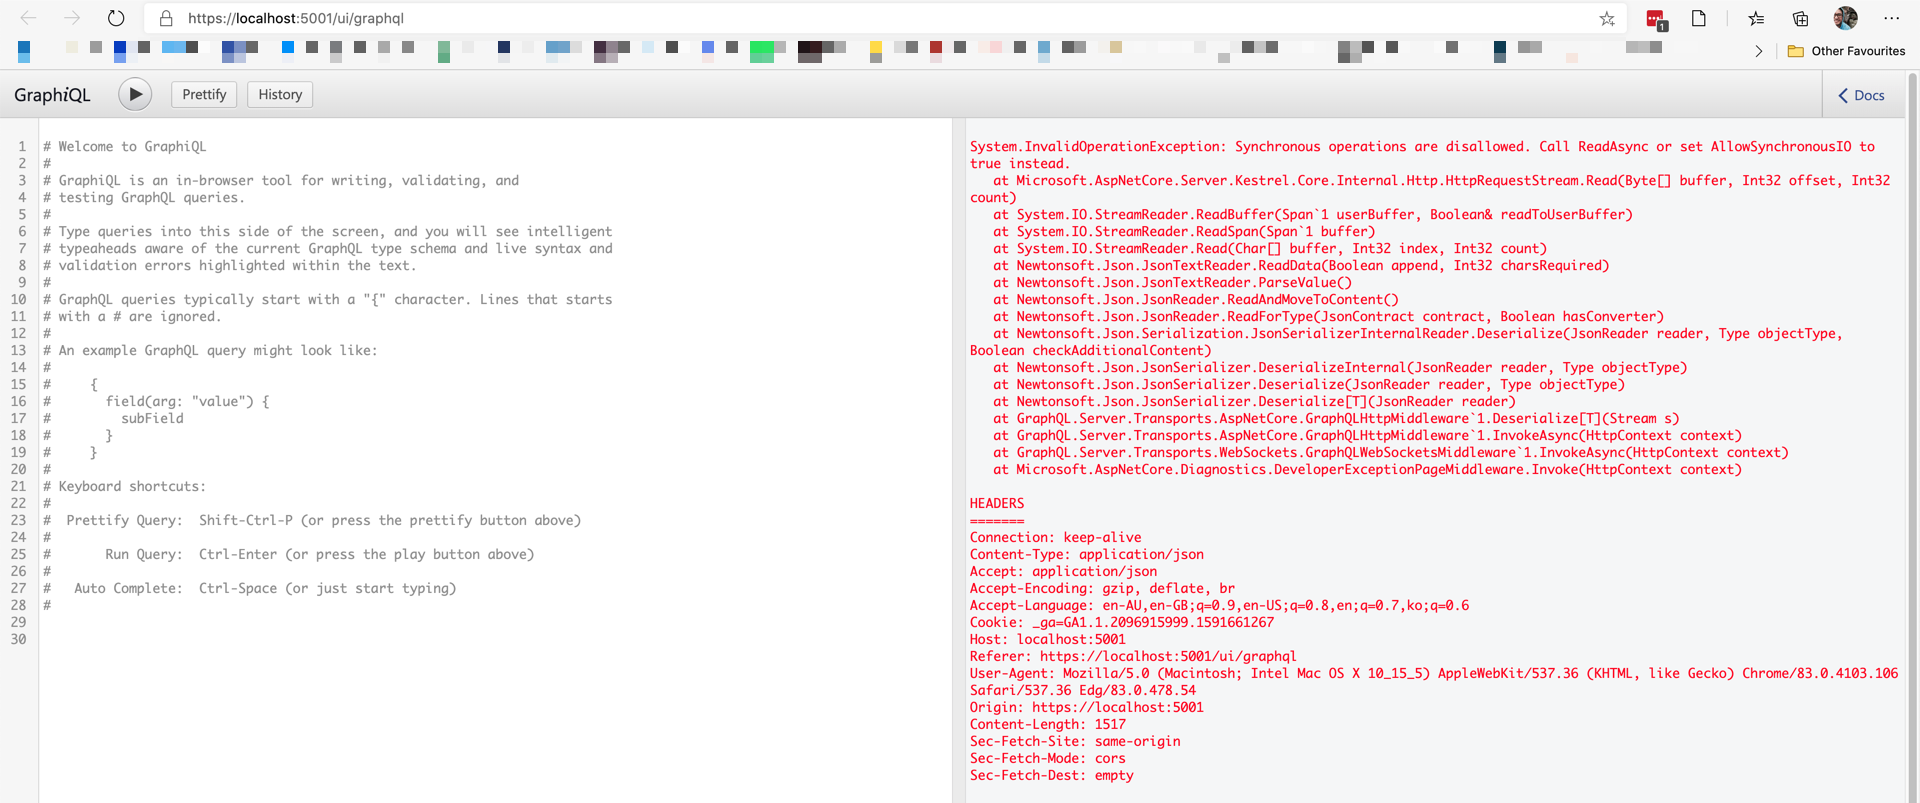
System.InvalidOperationException: Synchronous operations are disallowed. Call ReadAsync or set AllowSynchronousIO to true instead.
이것은 현재 의존성을 갖고 있는 Newtonsoft.Json 라이브러리의 제약사항으로 인해 생기는 에러이다. 이를 해결하기 위해서는 ConfigureServices() 메소드에 아래와 같이 한 줄을 더 추가해 줘야 한다. 만약 IIS 서버를 사용한다면 KestrelServerOptions 대신 IISServerOptions을 사용하면 된다 (line #3).
| public void ConfigureServices(IServiceCollection services) | |
| { | |
| services.Configure<KestrelServerOptions>(o => o.AllowSynchronousIO = true); | |
| ... | |
| } |
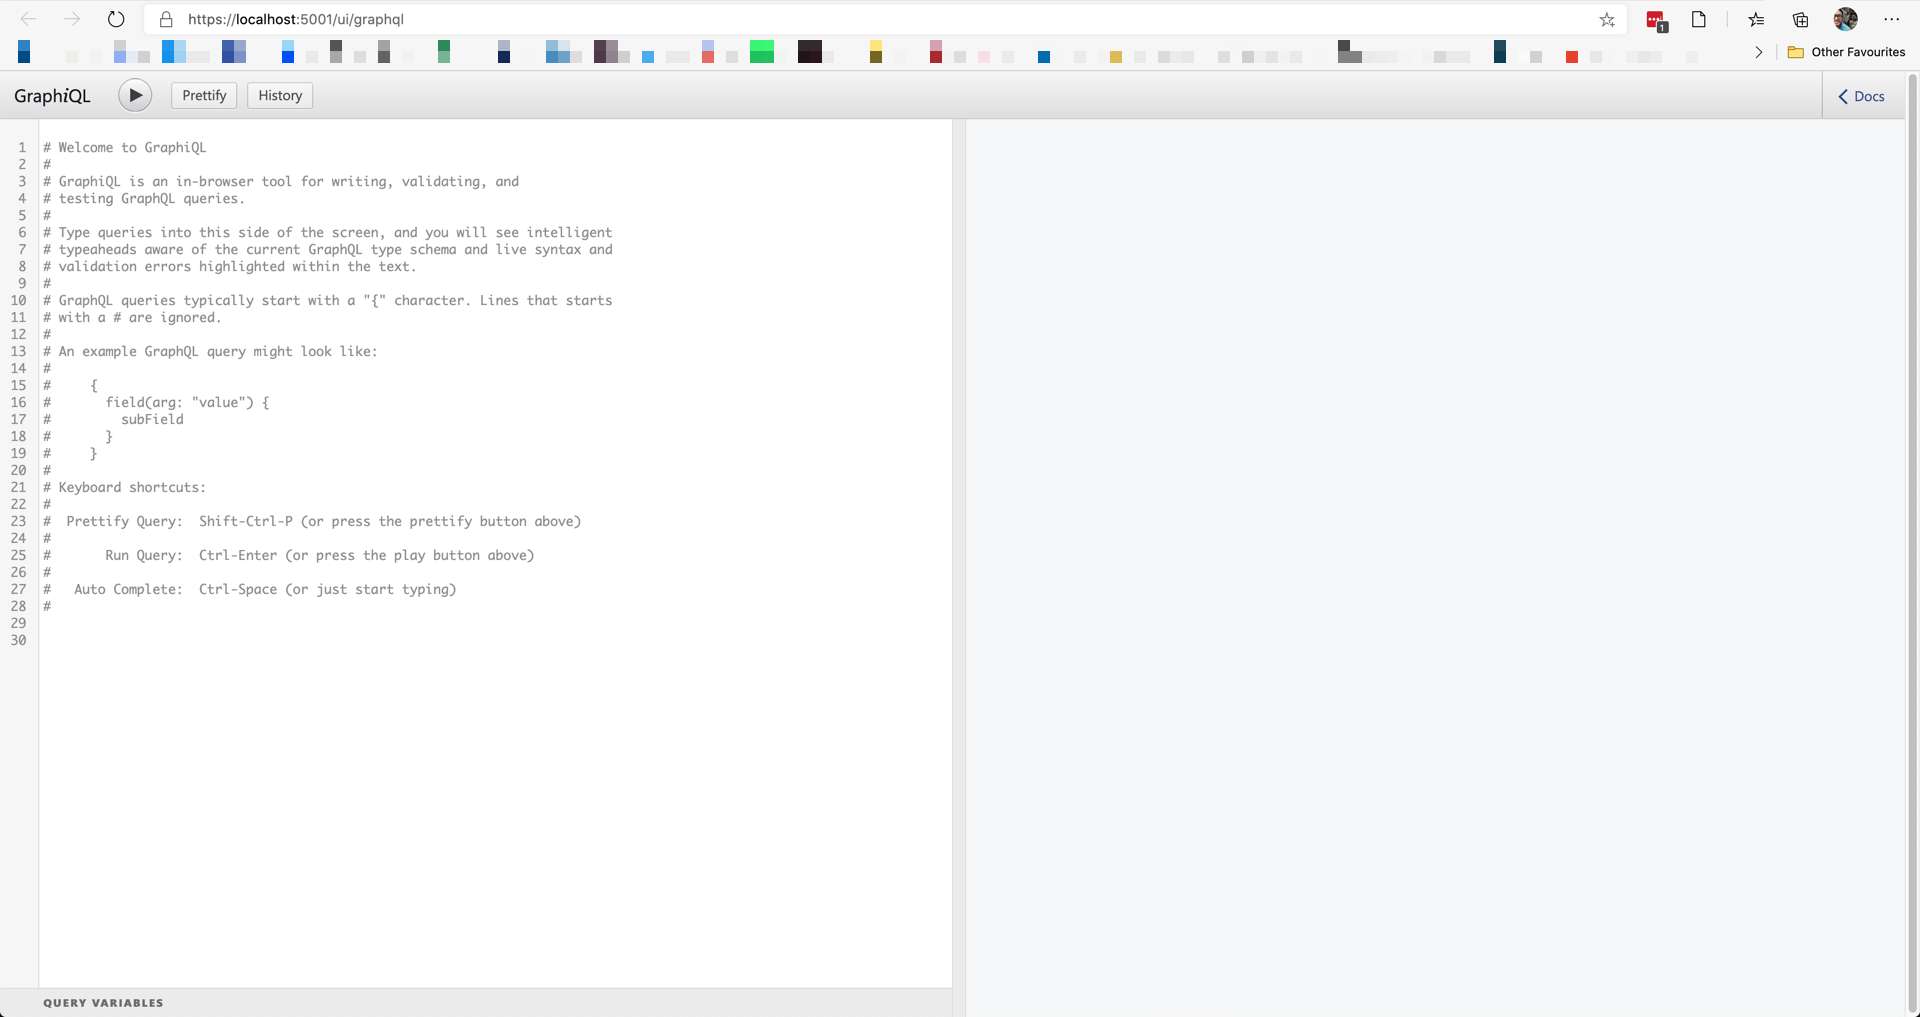
여기까지 해서 다시 컴파일 한 후, 실행시켜 보자.
| dotnet run Server.WebApp |
그리고 다시 웹 브라우저를 통해 접속해 보자.
| https://localhost:5001/ |
이제 아무 문제 없이 동작한다!
여기서 아래와 같이 쿼리를 작성하고 실행시켜 보자. 아래의 첫번째 쿼리는 3번 포스트를 가져오는데 id, title, slug, author id, author name 을 가져오는 것이라면 그 다음 쿼리는 전체 포스트를 가져올 때 id, title, published 값만 가져오라고 서버에 요청하는 것이다.
| query { | |
| post(id: 3) { | |
| id, | |
| title, | |
| slug, | |
| author { | |
| id, | |
| name | |
| } | |
| } | |
| posts { | |
| id, | |
| title, | |
| published | |
| } | |
| } |
그리고 그 결과는 아래와 같다.
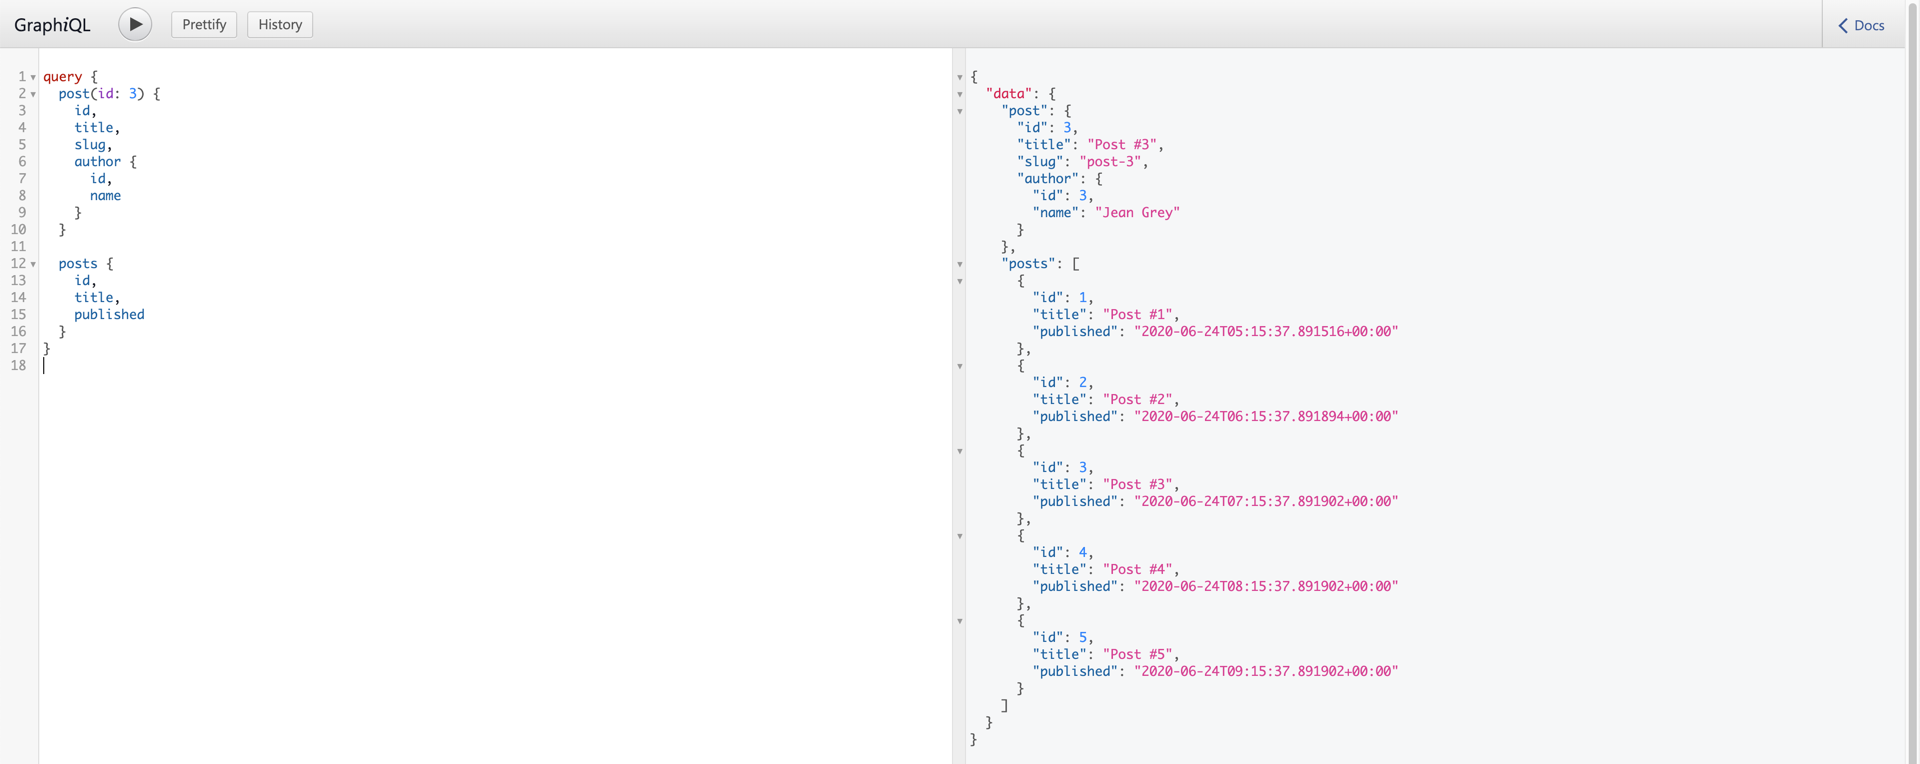
앞서 우리는 PostsQL 프로젝트에서 PostType과 AuthorType 객체를 정의했다. 하지만, 정의한 객체 형태 그대로 다 가져오는 것이 아니라, 클라이언트에서 지정한 쿼리 형식 대로 응답 객체 메시지가 구성된다. 그렇다면, 실제 쿼리 요청은 어떻게 되는 걸까? 브라우저의 개발자 도구를 열어보면 대략 아래와 같은 모양을 찾을 수 있다.
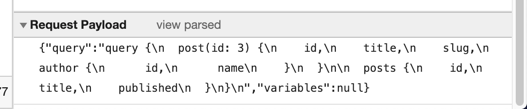
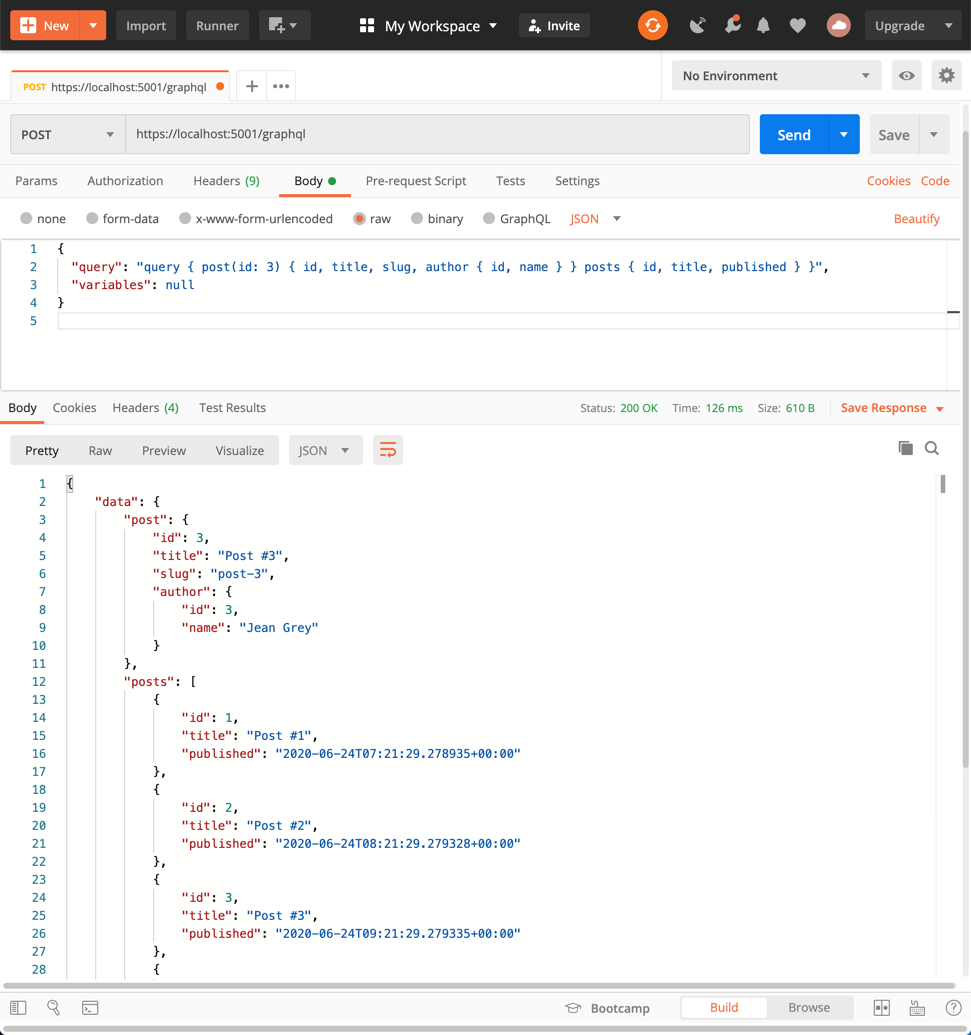
그렇다면 UI를 이용하지 않고 포스트맨과 같은 도구를 이용해서도 쿼리를 보낼 수 있을 것이다. 아래와 같이 API 요청을 보내보자.
| { | |
| "query": "query { post(id: 3) { id, title, slug, author { id, name } } posts { id, title, published } }", | |
| "variables": null | |
| } |
실제로 API 요청이 잘 작동하는 것을 알 수 있다.
지금까지 ASP.NET Core 앱을 통해 GraphQL 서버를 구현하는 방법에 대해 알아 보았다. 이미 관련 라이브러리가 존재하기 때문에 이를 이용해서 상당히 손쉽게 만들 수 있었는데, 다음 포스트에서는 이를 이용해서 REST 기반의 API를 GraphQL로 변환시켜 보는 작업을 해 보도록 하자.