애저 펑션의 보안에 관련한 전반적인 내용은 애저 펑션에 적용해야 하는 보안 최소요구사항 페이지에 잘 기술되어 있다. 이와 더불어 애플리케이션의 API 엔드포인트 각각에 대해 접근 권한을 제어할 수도 있는데, 애저 펑션 앱은 기본적으로 자체 발급한 API 키를 이용한다. 이 때 OpenAPI 확장 기능을 사용하면 API 키 뿐만 아니라 다양한 형태로 접근 권한을 정의할 수 있고 이를 Swagger UI 페이지를 통해 확인할 수도 있다. 이 포스트에서는 애저 펑션에서 사용할 수 있는 다양한 접근 제어 방법을 OpenAPI 확장 기능과 연동시켜 알아보기로 한다.
이 포스트에서 사용한 샘플 코드는 이 깃헙 리포지토리에서 다운로드 받을 수 있다.
인증 관련 OpenAPI 스펙
우선, OpenAPI 인증 관련 스펙을 간략하게 살펴보자.
type: 인증을 위한 형식이다. 현재 API key, HTTP, OAuth2, OpenID Connect 방식을 지원한다. 단, OpenAPI v2 스펙에서는 OpenID Connect 방식을 지원하지 않는다.name: 인증 키 이름이다. API Key 방식으로 사용할 때 필요하다.in: 인증 키의 위치를 지정한다. API Key 방식으로 사용할 때 필요하며,query,header,cookie중 하나가 된다.scheme: 인증 방식을 지정한다. HTTP 인증 방식으로 사용할 때 필요하며, 주로Basic또는Bearer중 하나를 사용한다.bearerFormat: HTTP 인증 방식으로 Bearer 토큰 방식을 사용할 때 지정한다. 거의 대부분의 경우에서JWT를 사용하면 된다.flows: OAuth2 방식으로 사용할 때 필요하다.implicit,password,clientCredentials,authorizationCode중 하나를 사용한다.openIdConnectUrl: OpenID Connect 방식으로 사용할 때 필요하다. OpenAPI v2 스펙 지원을 위해서는 OAuth2 방식 혹은 Bearer 토큰 방식으로 대체하는 것이 좋다.
위의 내용을 바탕으로 애저 펑션의 접근 권한을 OpenAPI 확장 기능에 정의해 보기로 하자.
쿼리스트링에 API Key 사용
애저 펑션의 기본 기능만 이용한 방법이다. 아래 코드를 한 번 보자. OpenAPI 확장 기능을 설치했다면 아래와 같이 코드를 작성하면 된다. 가장 눈여겨 봐야 할 부분은 OpenApiSecurityAttribute(...) 데코레이터인데, 아래와 같이 설정했다 (line #6-9).
Type:SecuritySchemeType.ApiKeyIn:OpenApiSecurityLocationType.QueryName:code
| public static class ApiKeyInQueryAuthFlowHttpTrigger | |
| { | |
| [FunctionName(nameof(ApiKeyInQueryAuthFlowHttpTrigger))] | |
| [OpenApiOperation(operationId: "apikey.query", tags: new[] { "apikey" }, Summary = "API Key authentication code flow via querystring", Description = "This shows the API Key authentication code flow via querystring", Visibility = OpenApiVisibilityType.Important)] | |
| [OpenApiSecurity("apikeyquery_auth", | |
| SecuritySchemeType.ApiKey, | |
| In = OpenApiSecurityLocationType.Query, | |
| Name = "code")] | |
| [OpenApiResponseWithBody(statusCode: HttpStatusCode.OK, contentType: "application/json", bodyType: typeof(Dictionary<string, string>), Summary = "successful operation", Description = "successful operation")] | |
| public static async Task<IActionResult> Run( | |
| [HttpTrigger(AuthorizationLevel.Function, "GET", Route = null)] HttpRequest req, | |
| ILogger log) | |
| { | |
| log.LogInformation("C# HTTP trigger function processed a request."); | |
| var queries = req.Query.ToDictionary(q => q.Key, q => (string) q.Value); | |
| var result = new OkObjectResult(queries); | |
| return await Task.FromResult(result).ConfigureAwait(false); | |
| } | |
| } |
이 상태에서 애저 펑션 앱을 실행하면 아래와 같은 Swagger UI 화면이 나타난다.
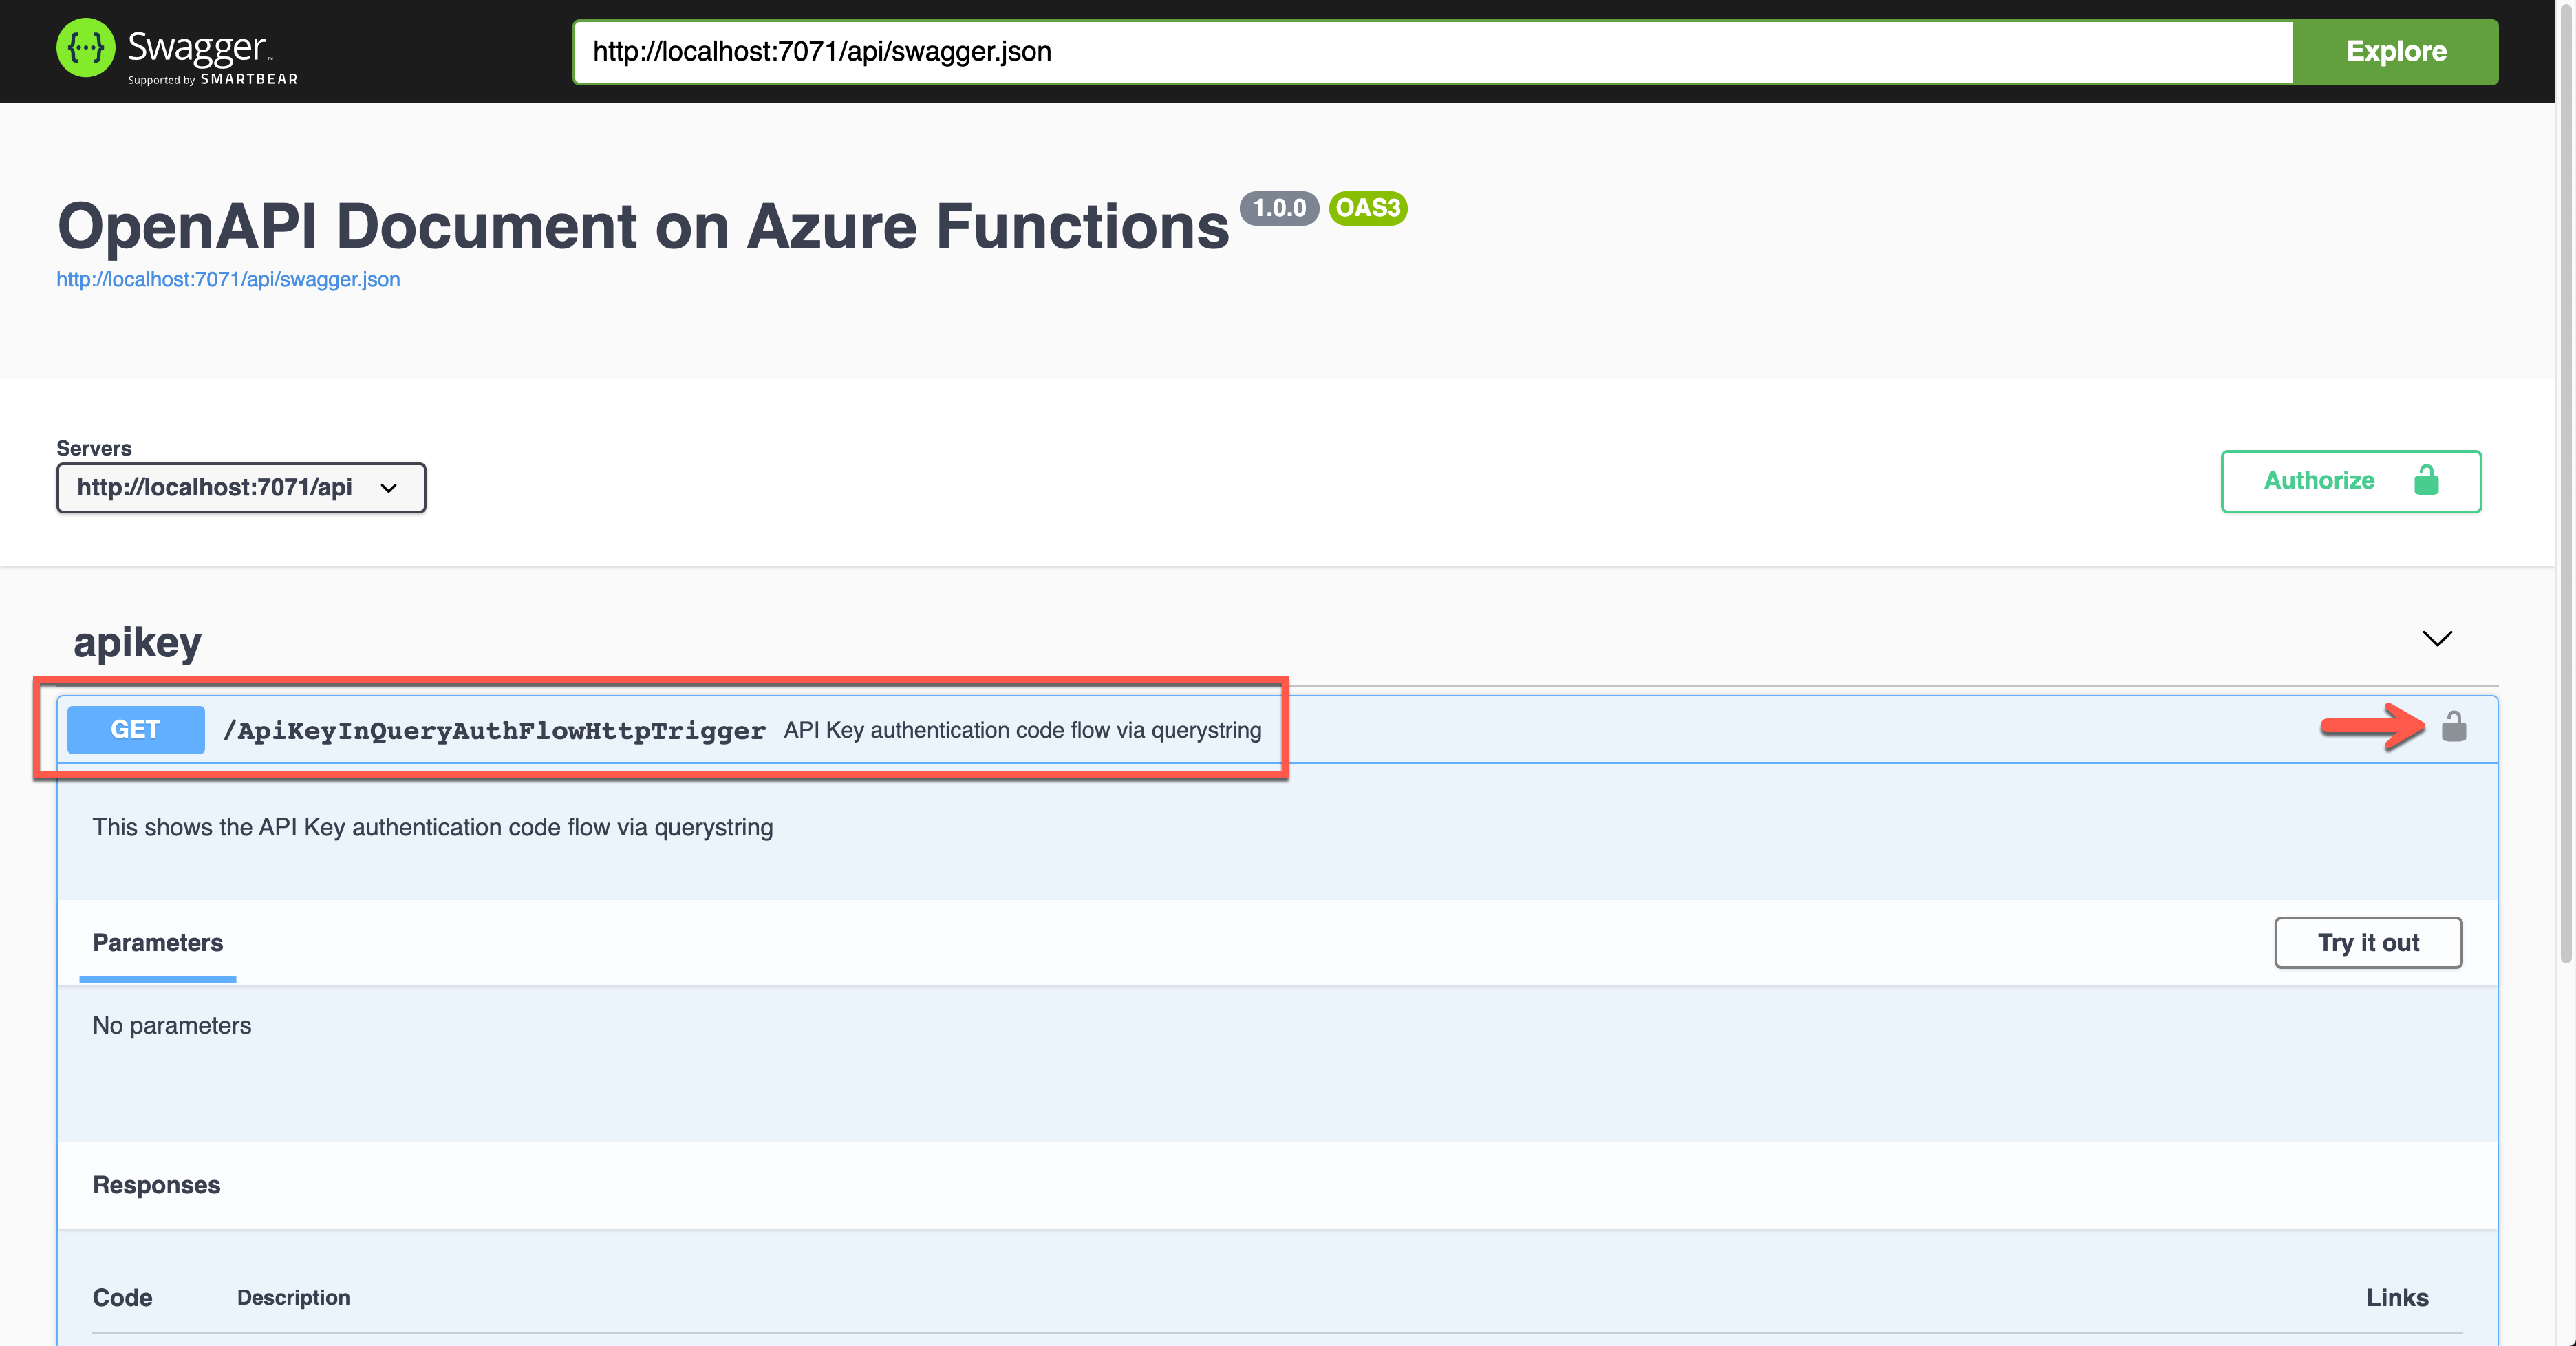
위 그림에서 자물쇠 모양을 클릭하면 아래와 같이 API Key 값을 입력하는 화면이 나오는데, 쿼리스트링의 code 파라미터로 API Key 값을 넘겨주는 것이 보인다.
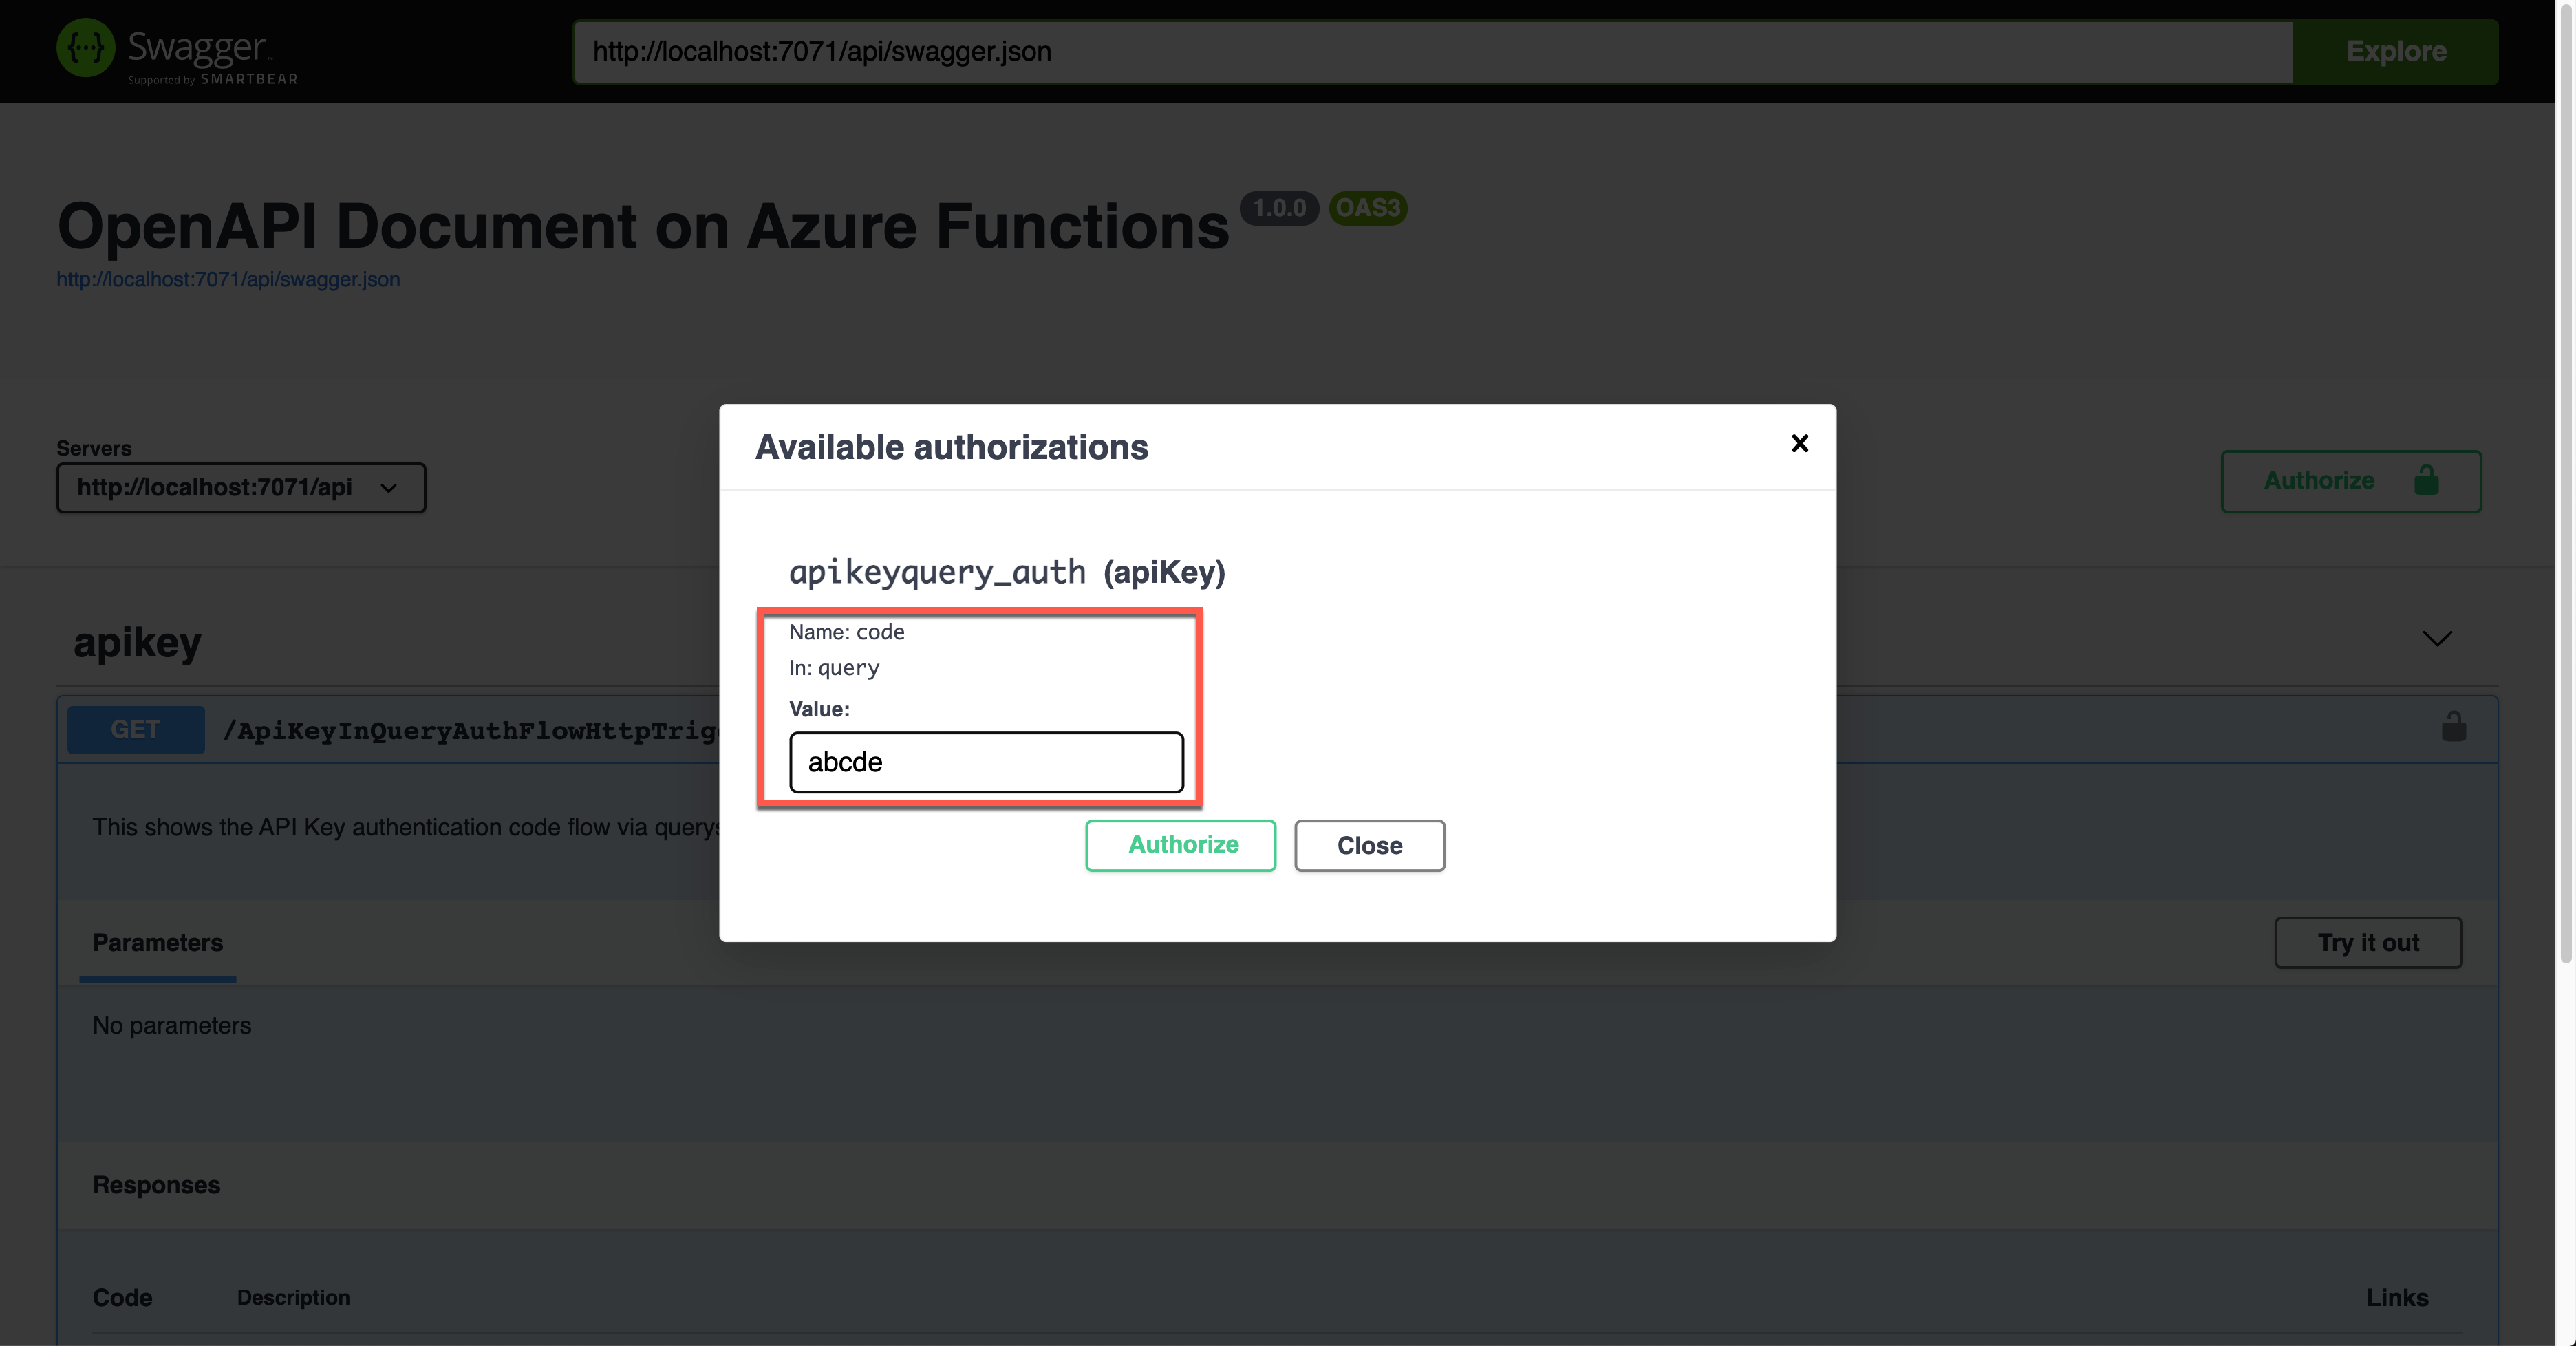
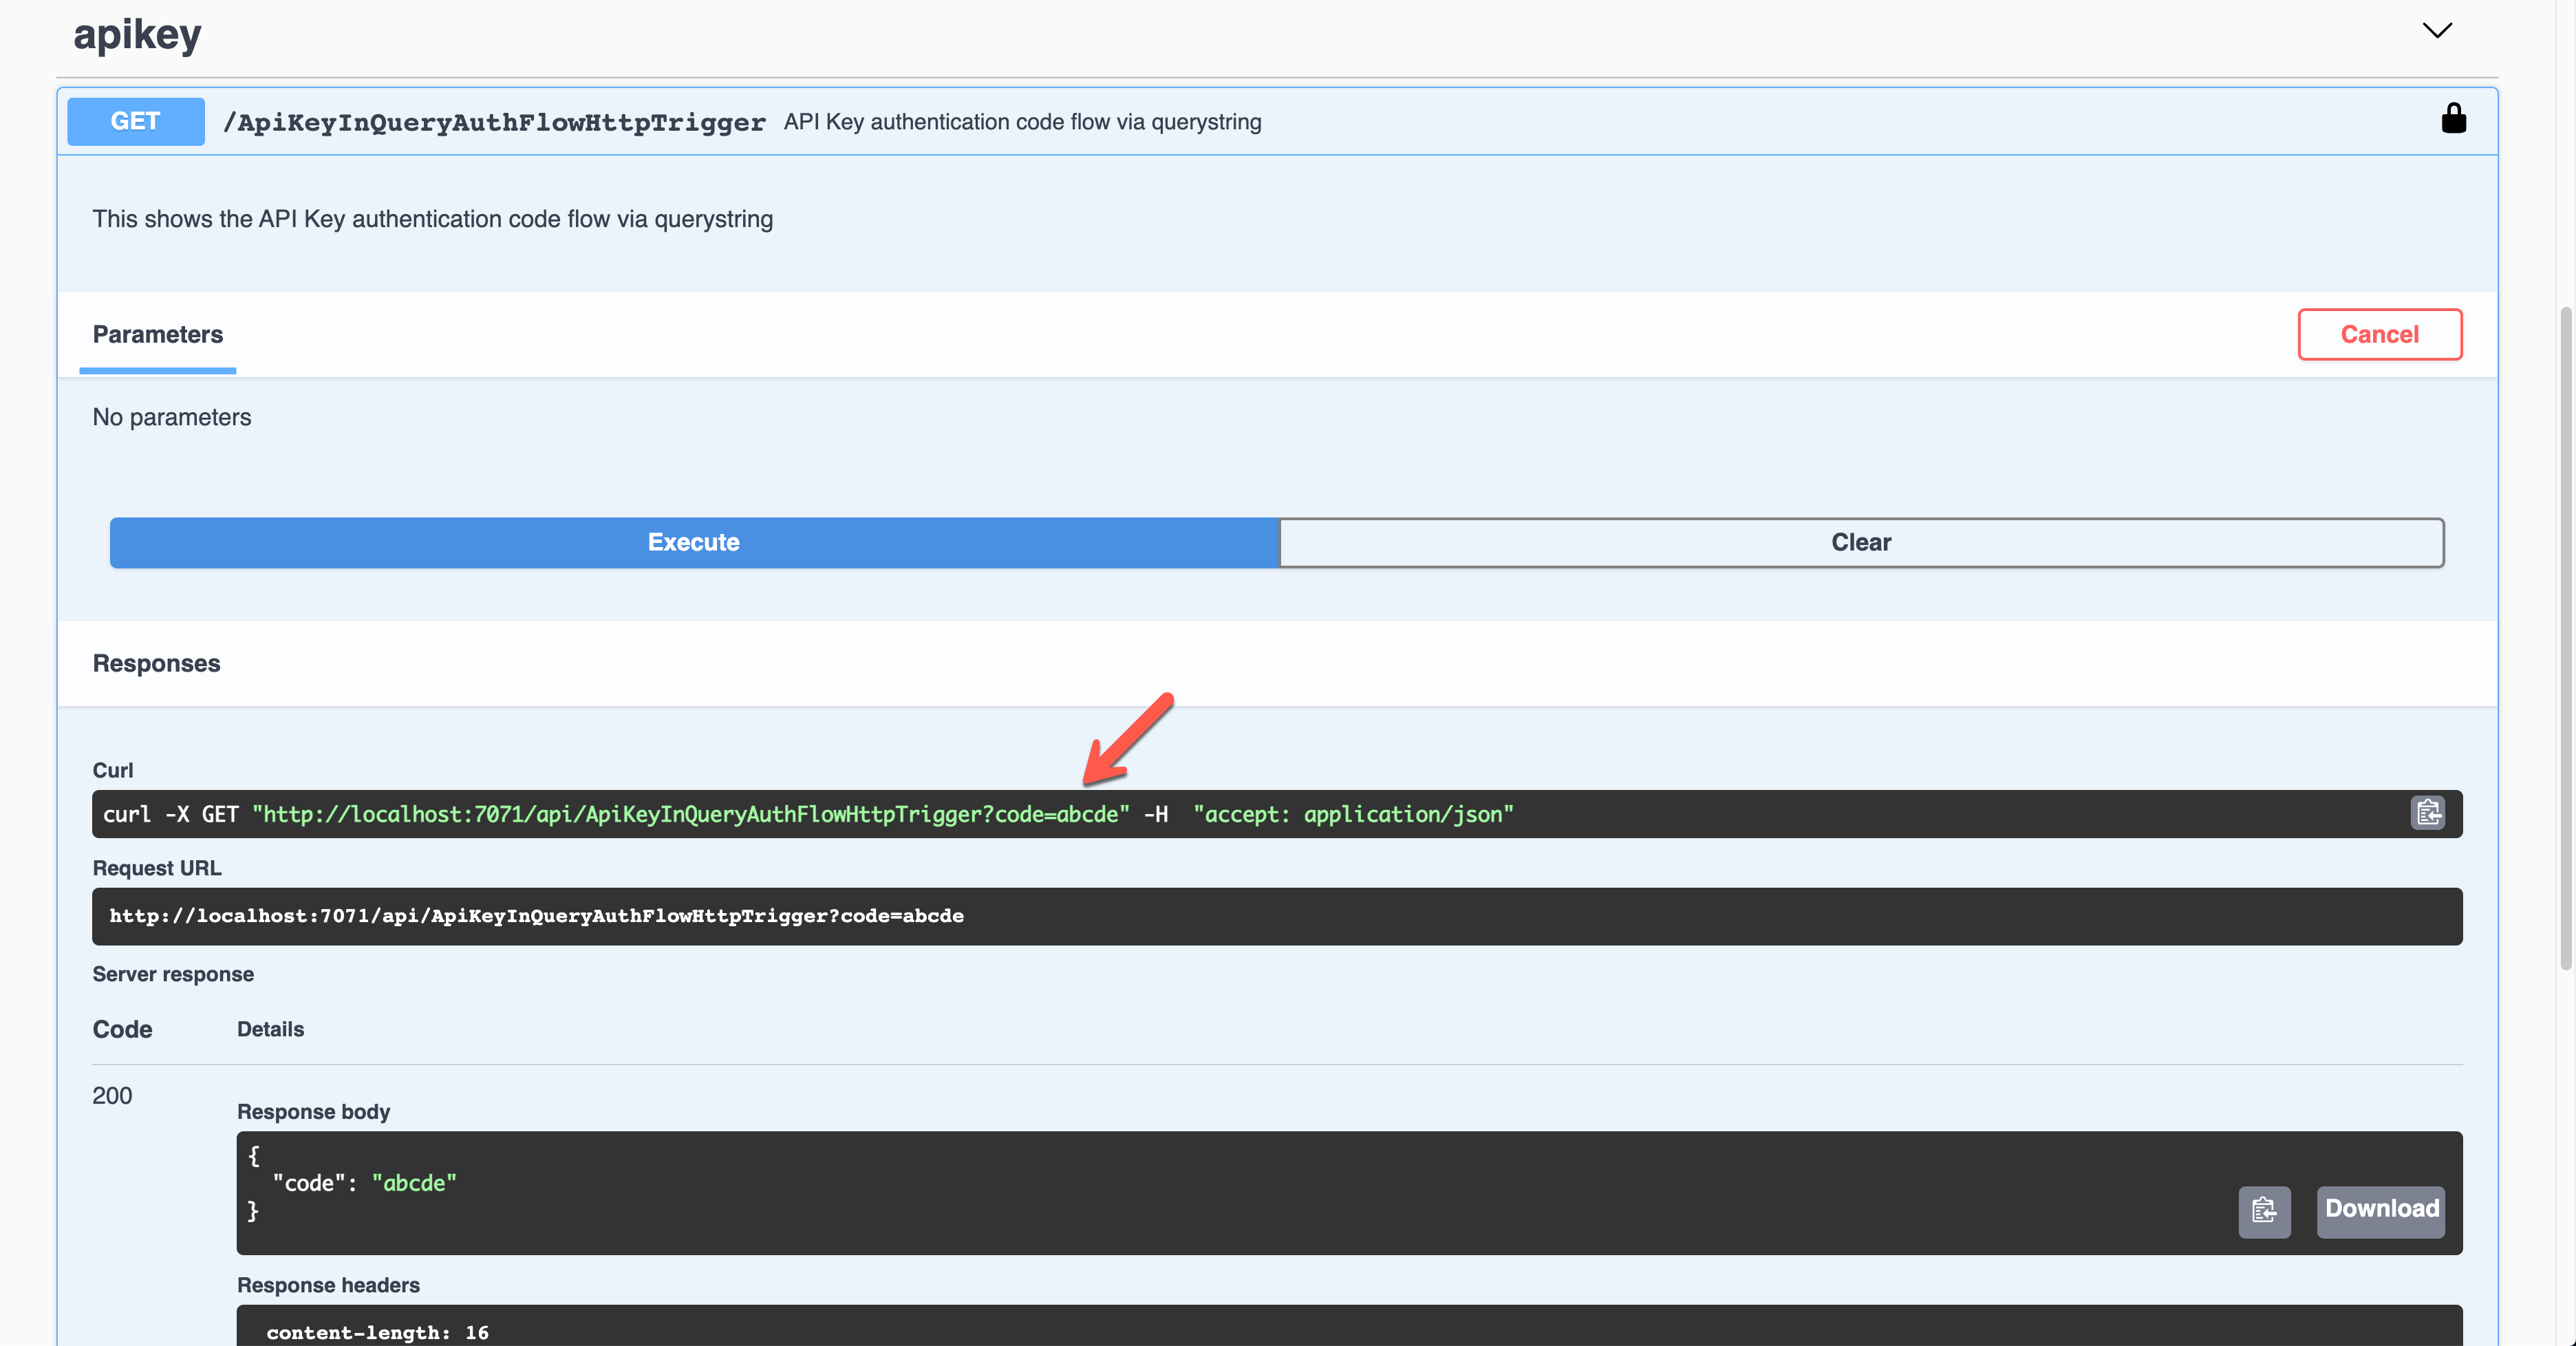
실제로 앱을 실행시키면 아래와 같이 쿼리스트링에 code 파라미터가 붙은 것이 보인다.
요청 헤더에 API Key 사용
이 역시 애저 펑션의 기본 기능이다. 이번에는 OpenApiSecurityAttribute(...) 데코레이터를 아래와 같이 지정했다 (line #6-9)
Type:SecuritySchemeType.ApiKeyIn:OpenApiSecurityLocationType.HeaderName:x-functions-key
| public static class ApiKeyInHeaderAuthFlowHttpTrigger | |
| { | |
| [FunctionName(nameof(ApiKeyInHeaderAuthFlowHttpTrigger))] | |
| [OpenApiOperation(operationId: "apikey.header", tags: new[] { "apikey" }, Summary = "API Key authentication code flow via header", Description = "This shows the API Key authentication code flow via header", Visibility = OpenApiVisibilityType.Important)] | |
| [OpenApiSecurity("apikeyheader_auth", | |
| SecuritySchemeType.ApiKey, | |
| In = OpenApiSecurityLocationType.Header, | |
| Name = "x-functions-key")] | |
| [OpenApiResponseWithBody(statusCode: HttpStatusCode.OK, contentType: "application/json", bodyType: typeof(Dictionary<string, string>), Summary = "successful operation", Description = "successful operation")] | |
| public static async Task<IActionResult> Run( | |
| [HttpTrigger(AuthorizationLevel.Function, "GET", Route = null)] HttpRequest req, | |
| ILogger log) | |
| { | |
| log.LogInformation("C# HTTP trigger function processed a request."); | |
| var headers = req.Headers.ToDictionary(q => q.Key, q => (string) q.Value); | |
| var result = new OkObjectResult(headers); | |
| return await Task.FromResult(result).ConfigureAwait(false); | |
| } | |
| } |
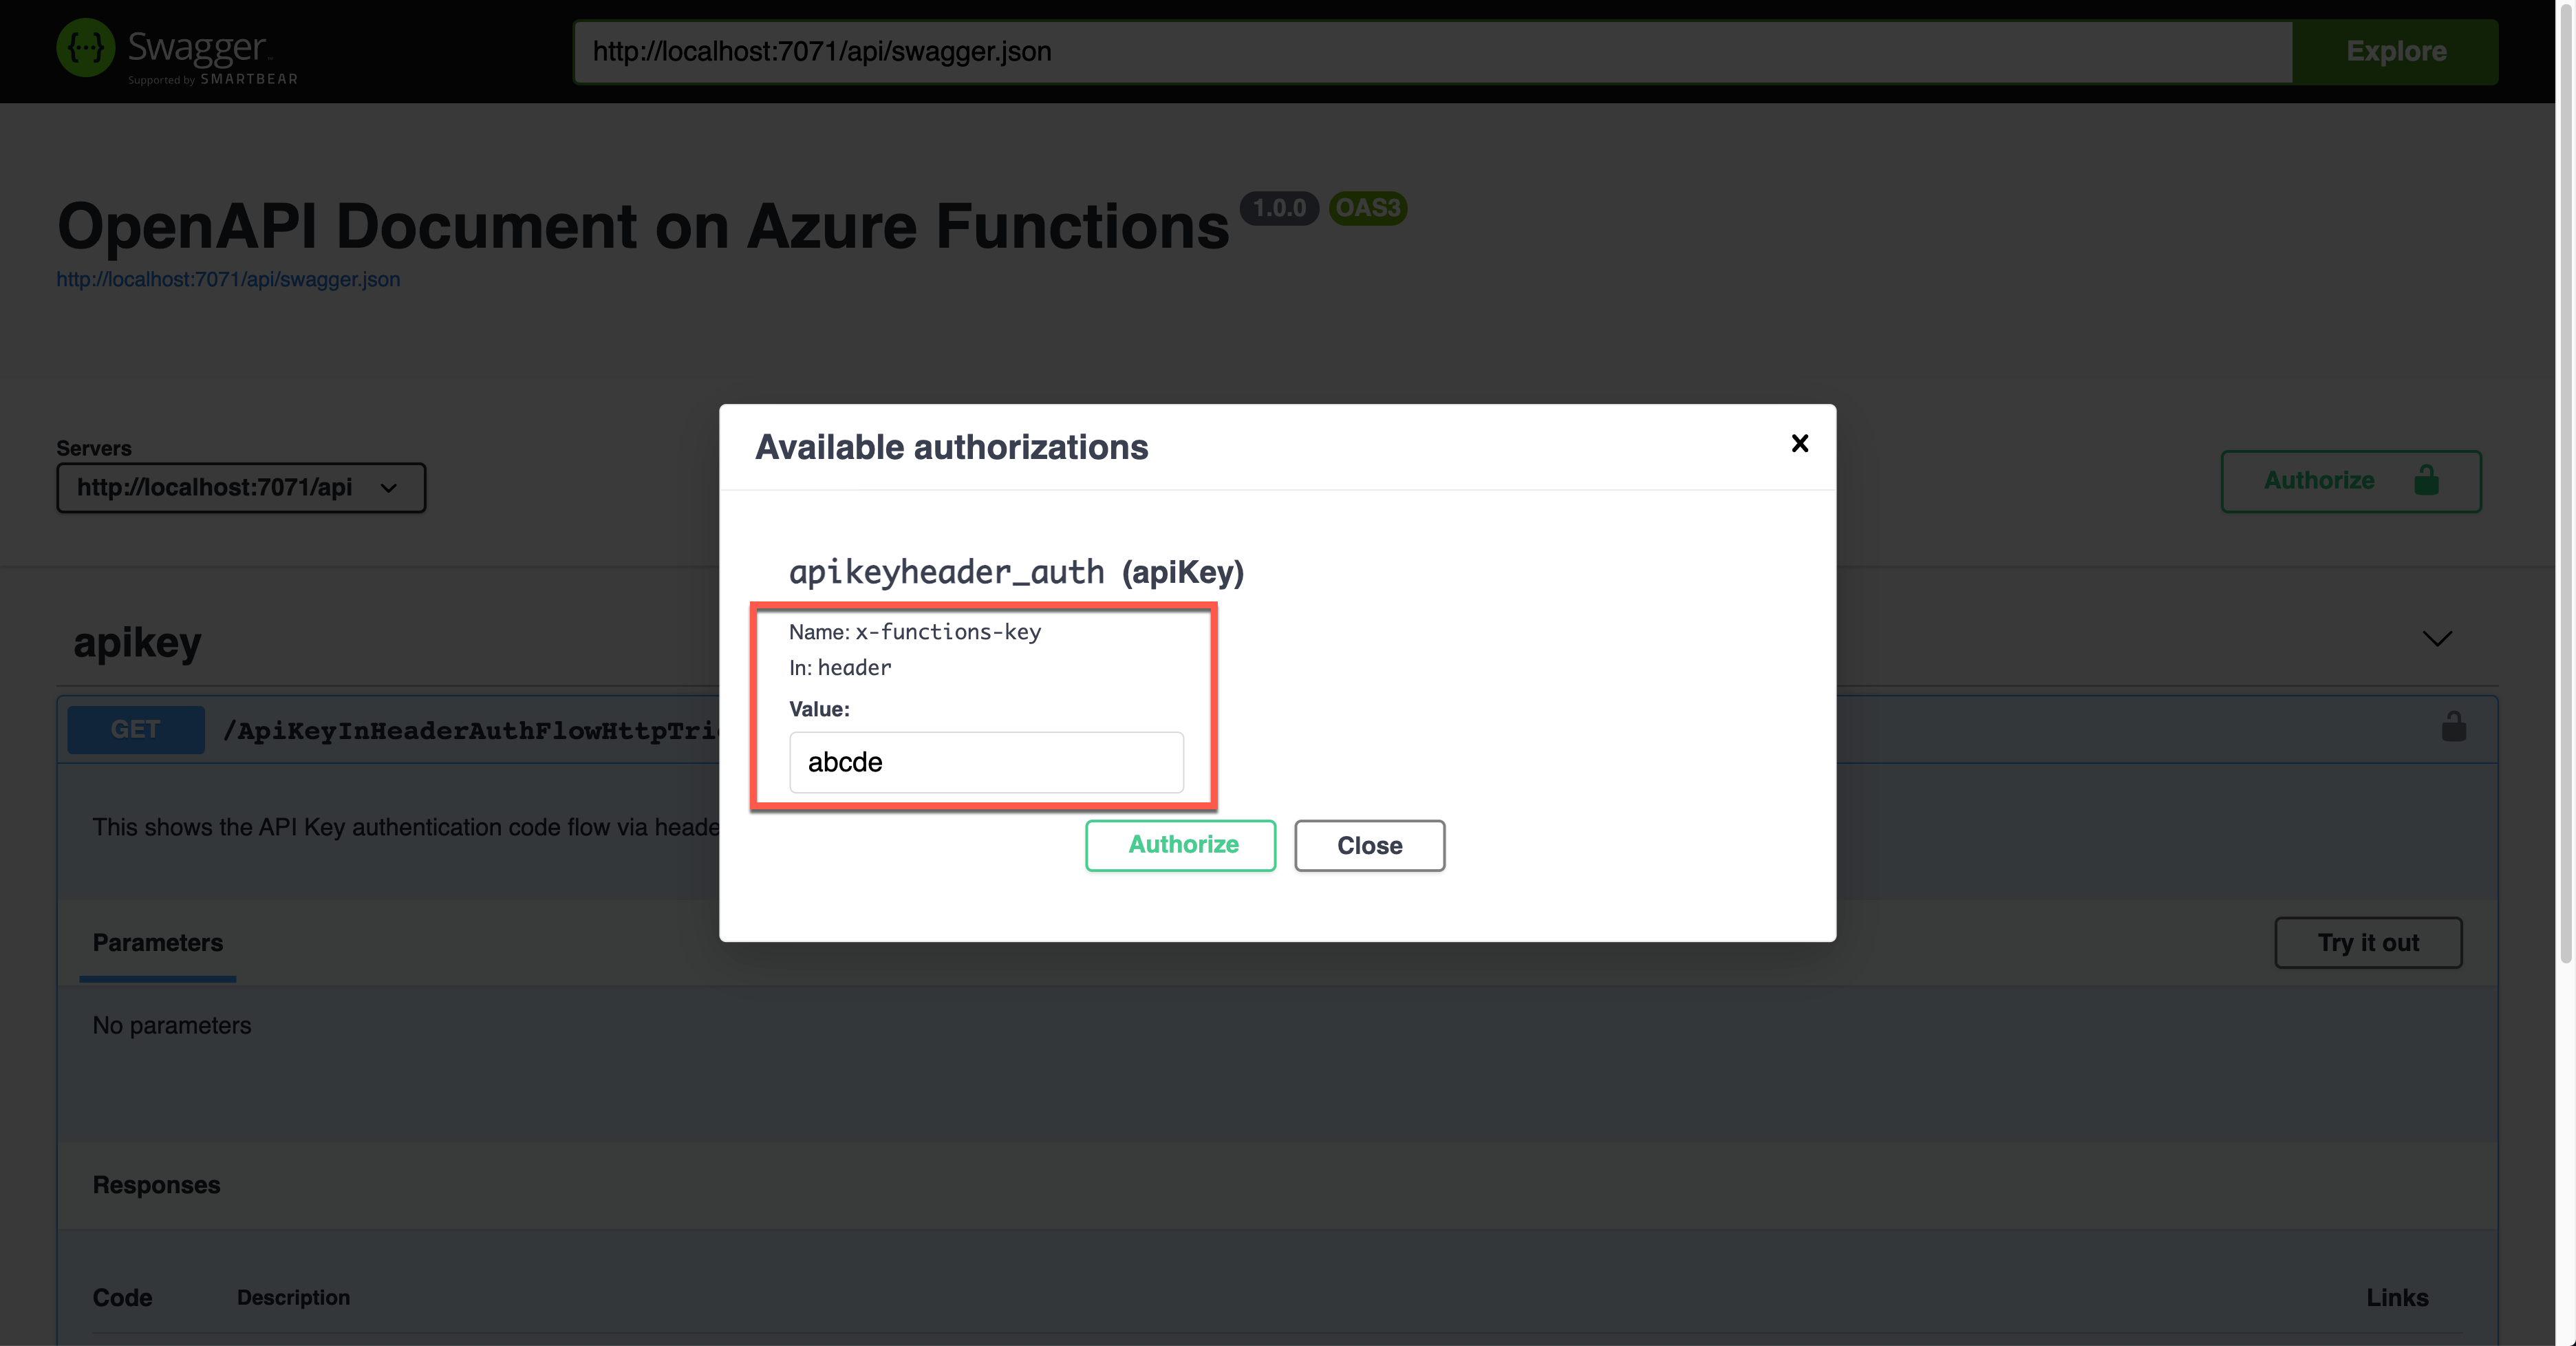
이 상태에서 애저 펑션 앱을 실행하면 아래와 같은 Swagger UI 화면이 나타난다.
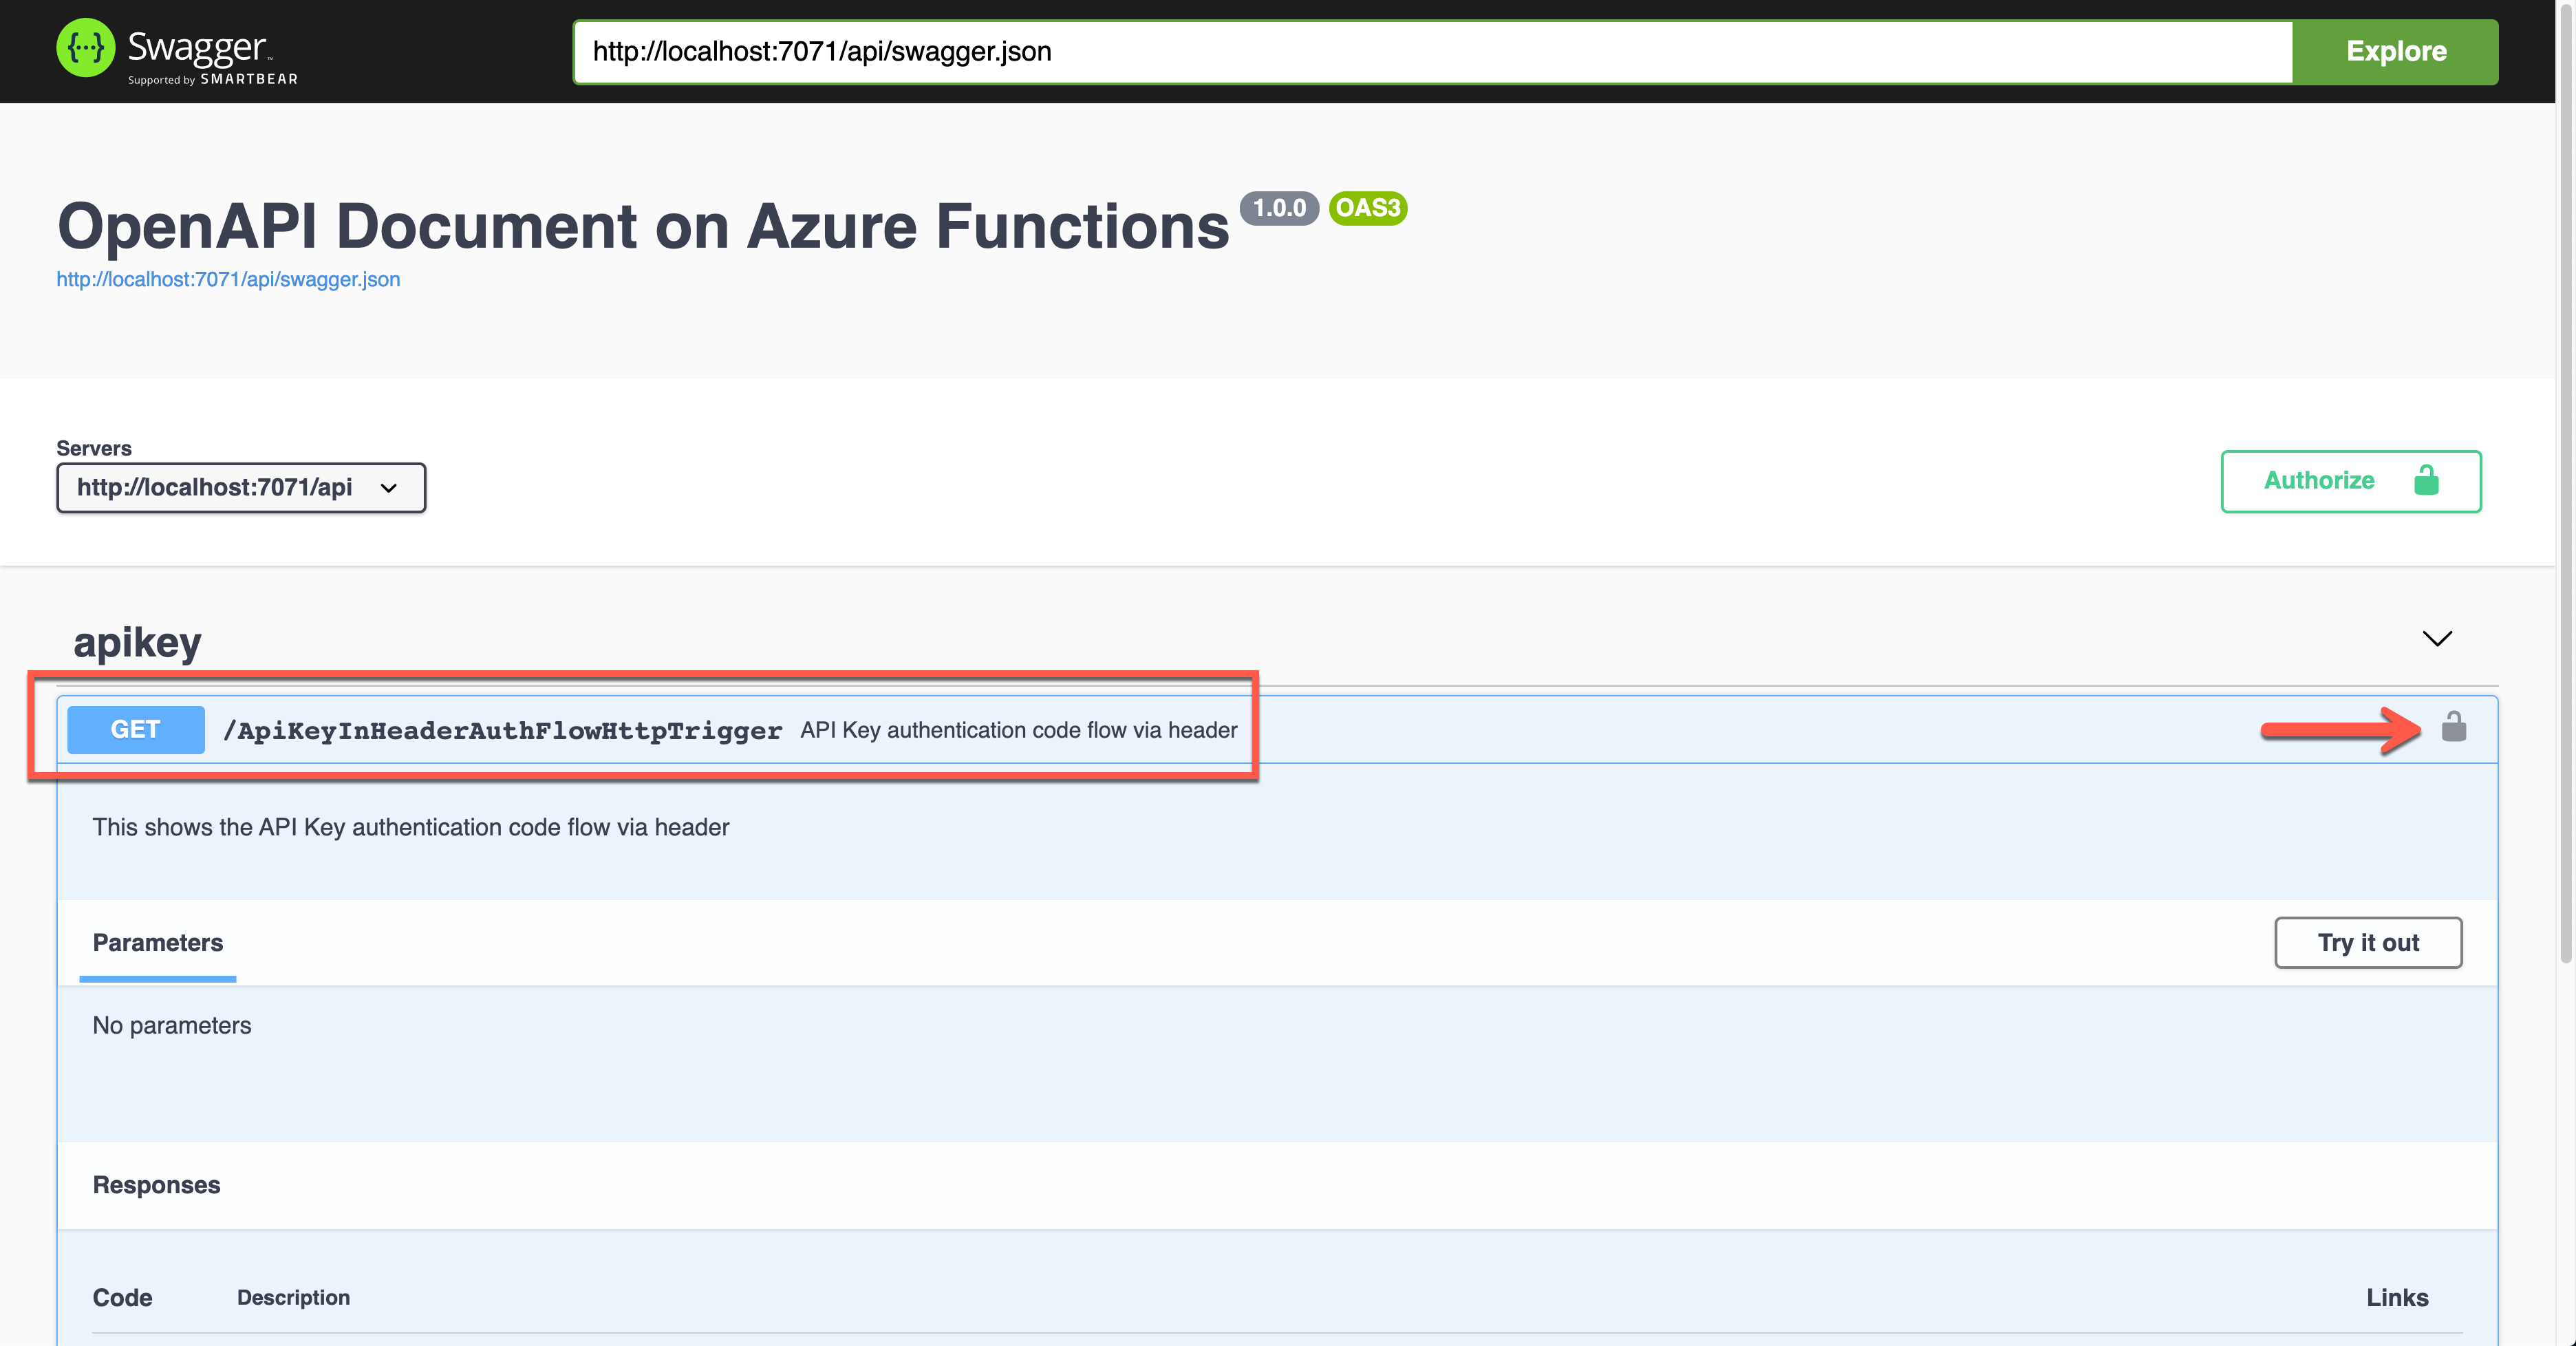
위 그림에서 자물쇠 모양을 클릭하면 아래와 같이 API Key 값을 입력하는 화면이 나오는데, 요청 헤더의 x-functions-key를 통해 API Key 값을 넘겨주는 것이 보인다.
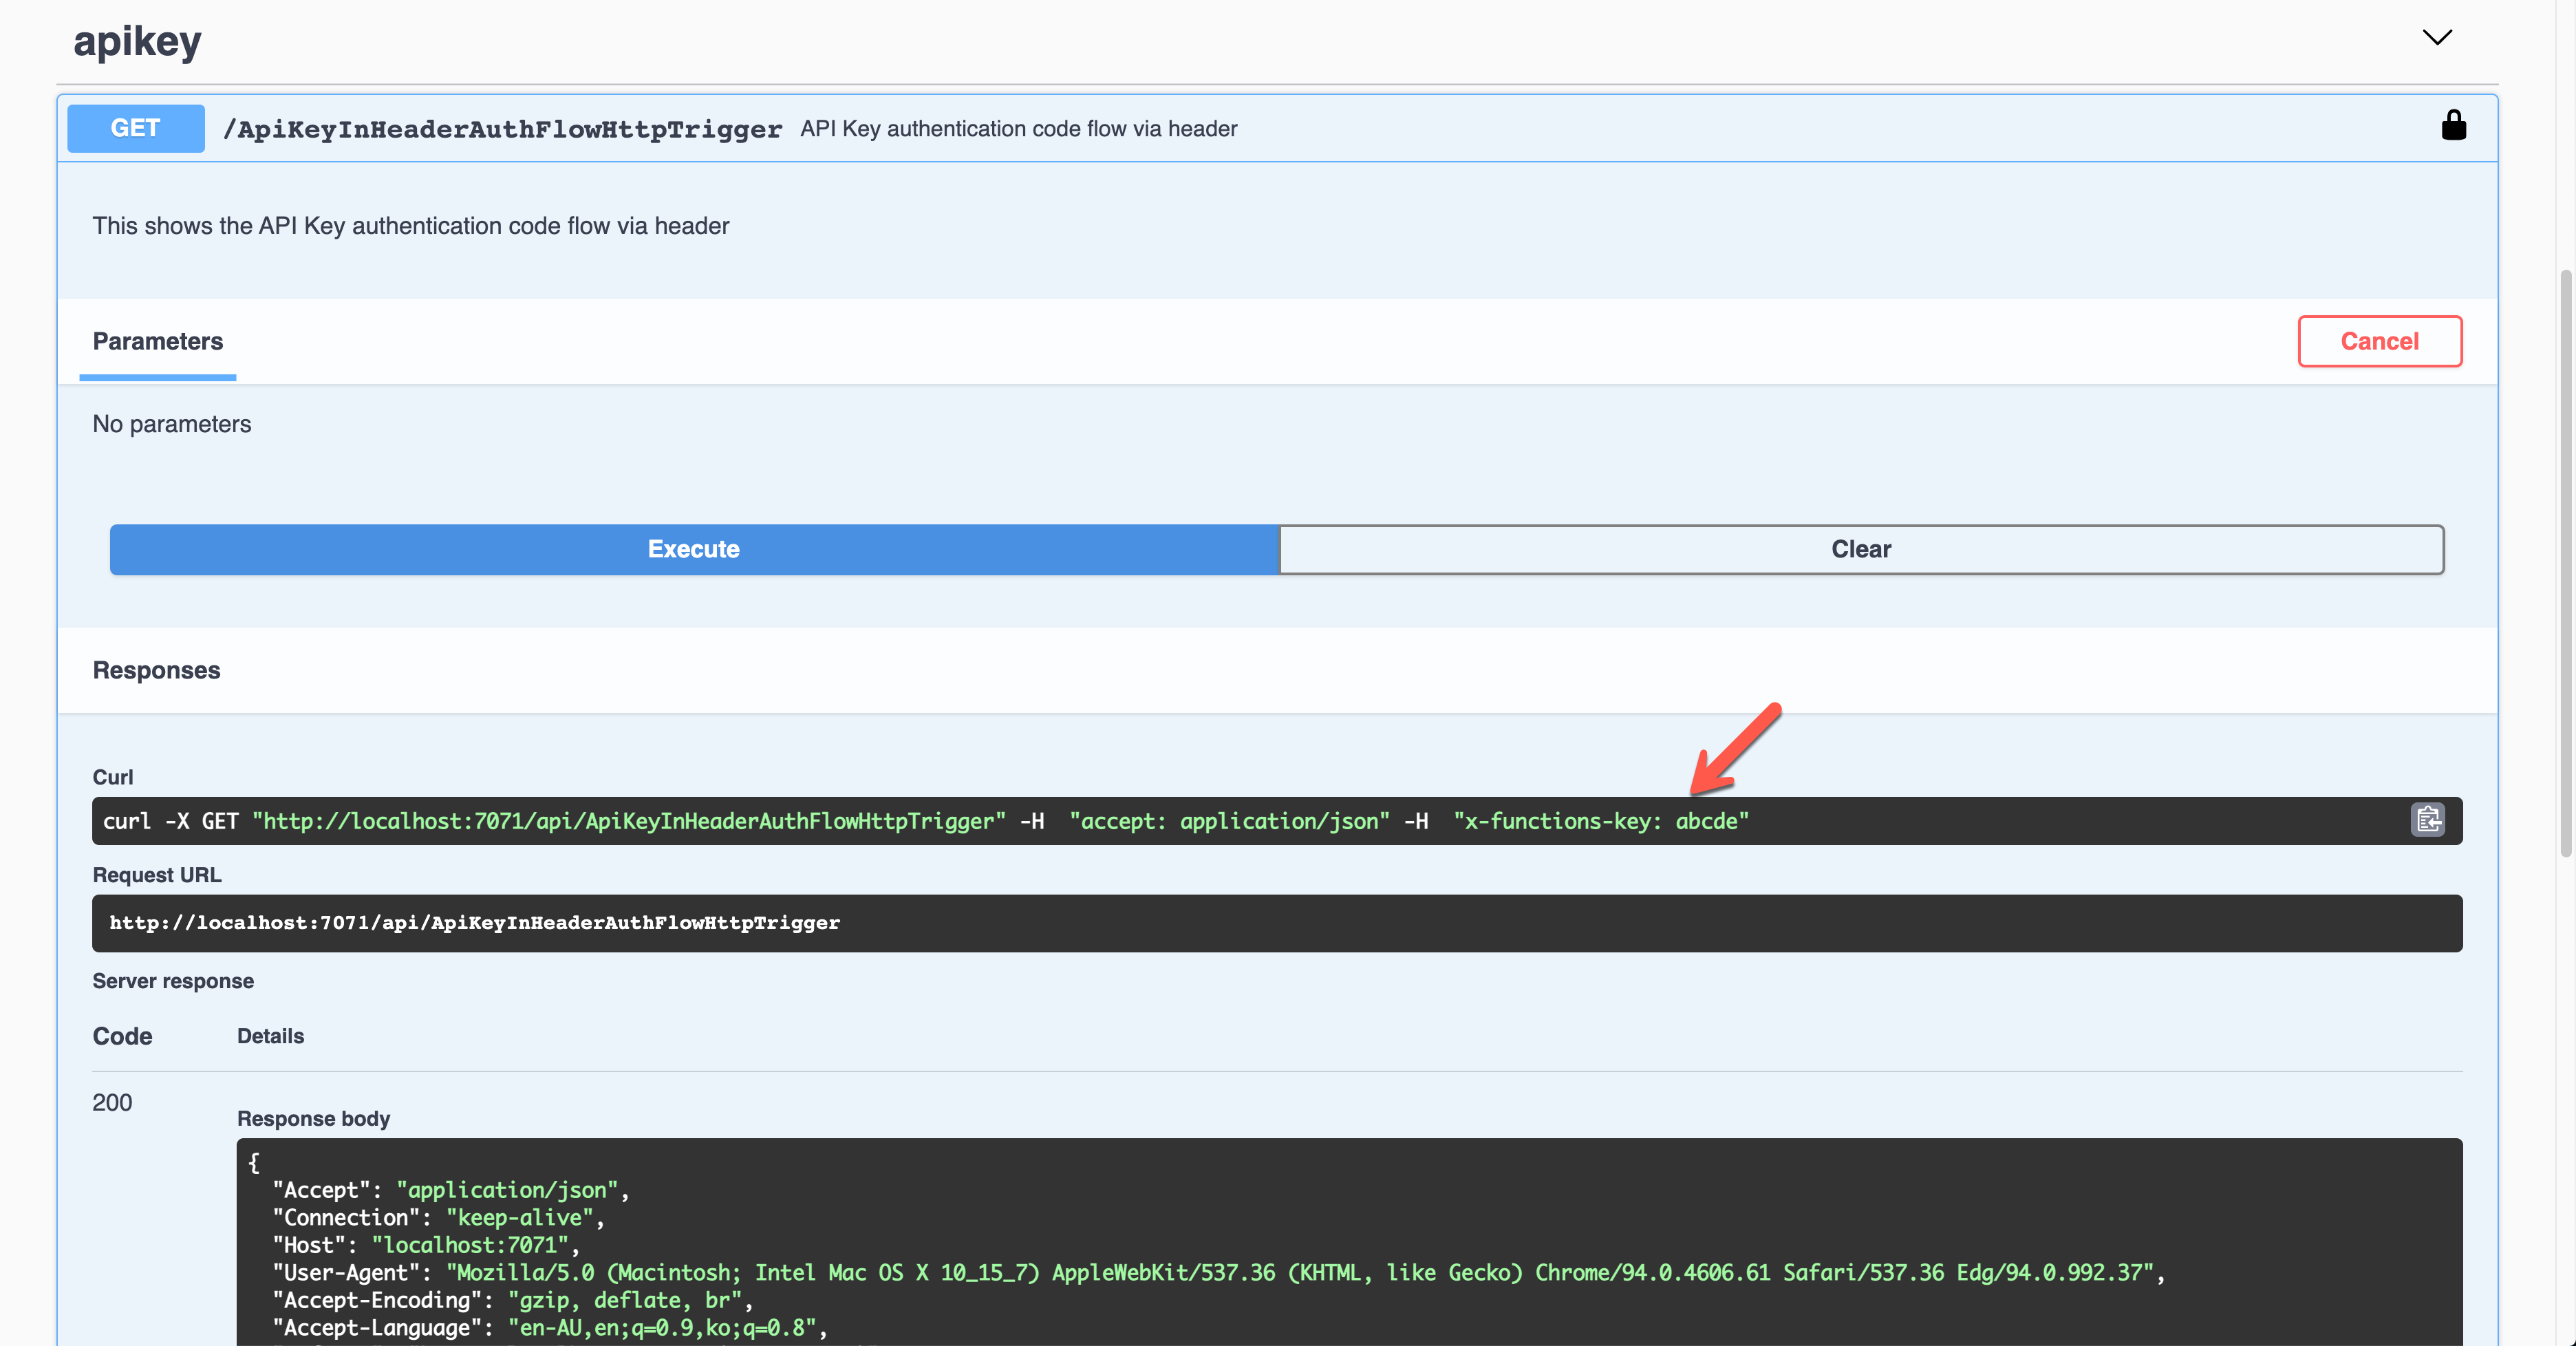
실제로 앱을 실행시키면 아래와 같이 요청 헤더를 통해 x-functions-key가 추가된 것이 보인다.
Basic 인증 토큰 사용
이번에는 Basic 인증 토큰을 사용하는 방법에 대해 알아보자. 아래와 같이 OpenApiSecurityAttribute(...) 데코레이터를 설정한다 (line #6-8).
Type:SecuritySchemeType.HttpScheme:OpenApiSecuritySchemeType.Basic
이는 애저 펑션의 기본 인증 기능에 더해 사용하거나 기본 인증 대신 사용하는 방법이기 때문에, 만약 기본 인증 기능을 사용하지 않으려면, HttpTrigger 바인딩의 AuthLevel 값을 AuthorizationLevel.Anonymous로 지정해 주는 것이 좋다 (line #12).
| public static class HttpBasicAuthFlowHttpTrigger | |
| { | |
| [FunctionName(nameof(HttpBasicAuthFlowHttpTrigger))] | |
| [OpenApiOperation(operationId: "http.basic", tags: new[] { "http" }, Summary = "Basic authentication token flow via header", Description = "This shows the basic authentication token flow via header", Visibility = OpenApiVisibilityType.Important)] | |
| [OpenApiSecurity("basic_auth", | |
| SecuritySchemeType.Http, | |
| Scheme = OpenApiSecuritySchemeType.Basic)] | |
| [OpenApiResponseWithBody(statusCode: HttpStatusCode.OK, contentType: "application/json", bodyType: typeof(Dictionary<string, string>), Summary = "successful operation", Description = "successful operation")] | |
| public static async Task<IActionResult> Run( | |
| [HttpTrigger(AuthorizationLevel.Anonymous, "GET", Route = null)] HttpRequest req, | |
| ILogger log) | |
| { | |
| log.LogInformation("C# HTTP trigger function processed a request."); | |
| var headers = req.Headers.ToDictionary(q => q.Key, q => (string) q.Value); | |
| var result = new OkObjectResult(headers); | |
| return await Task.FromResult(result).ConfigureAwait(false); | |
| } | |
| } |
이 상태에서 애저 펑션 앱을 실행하면 아래와 같은 Swagger UI 화면이 나타난다.
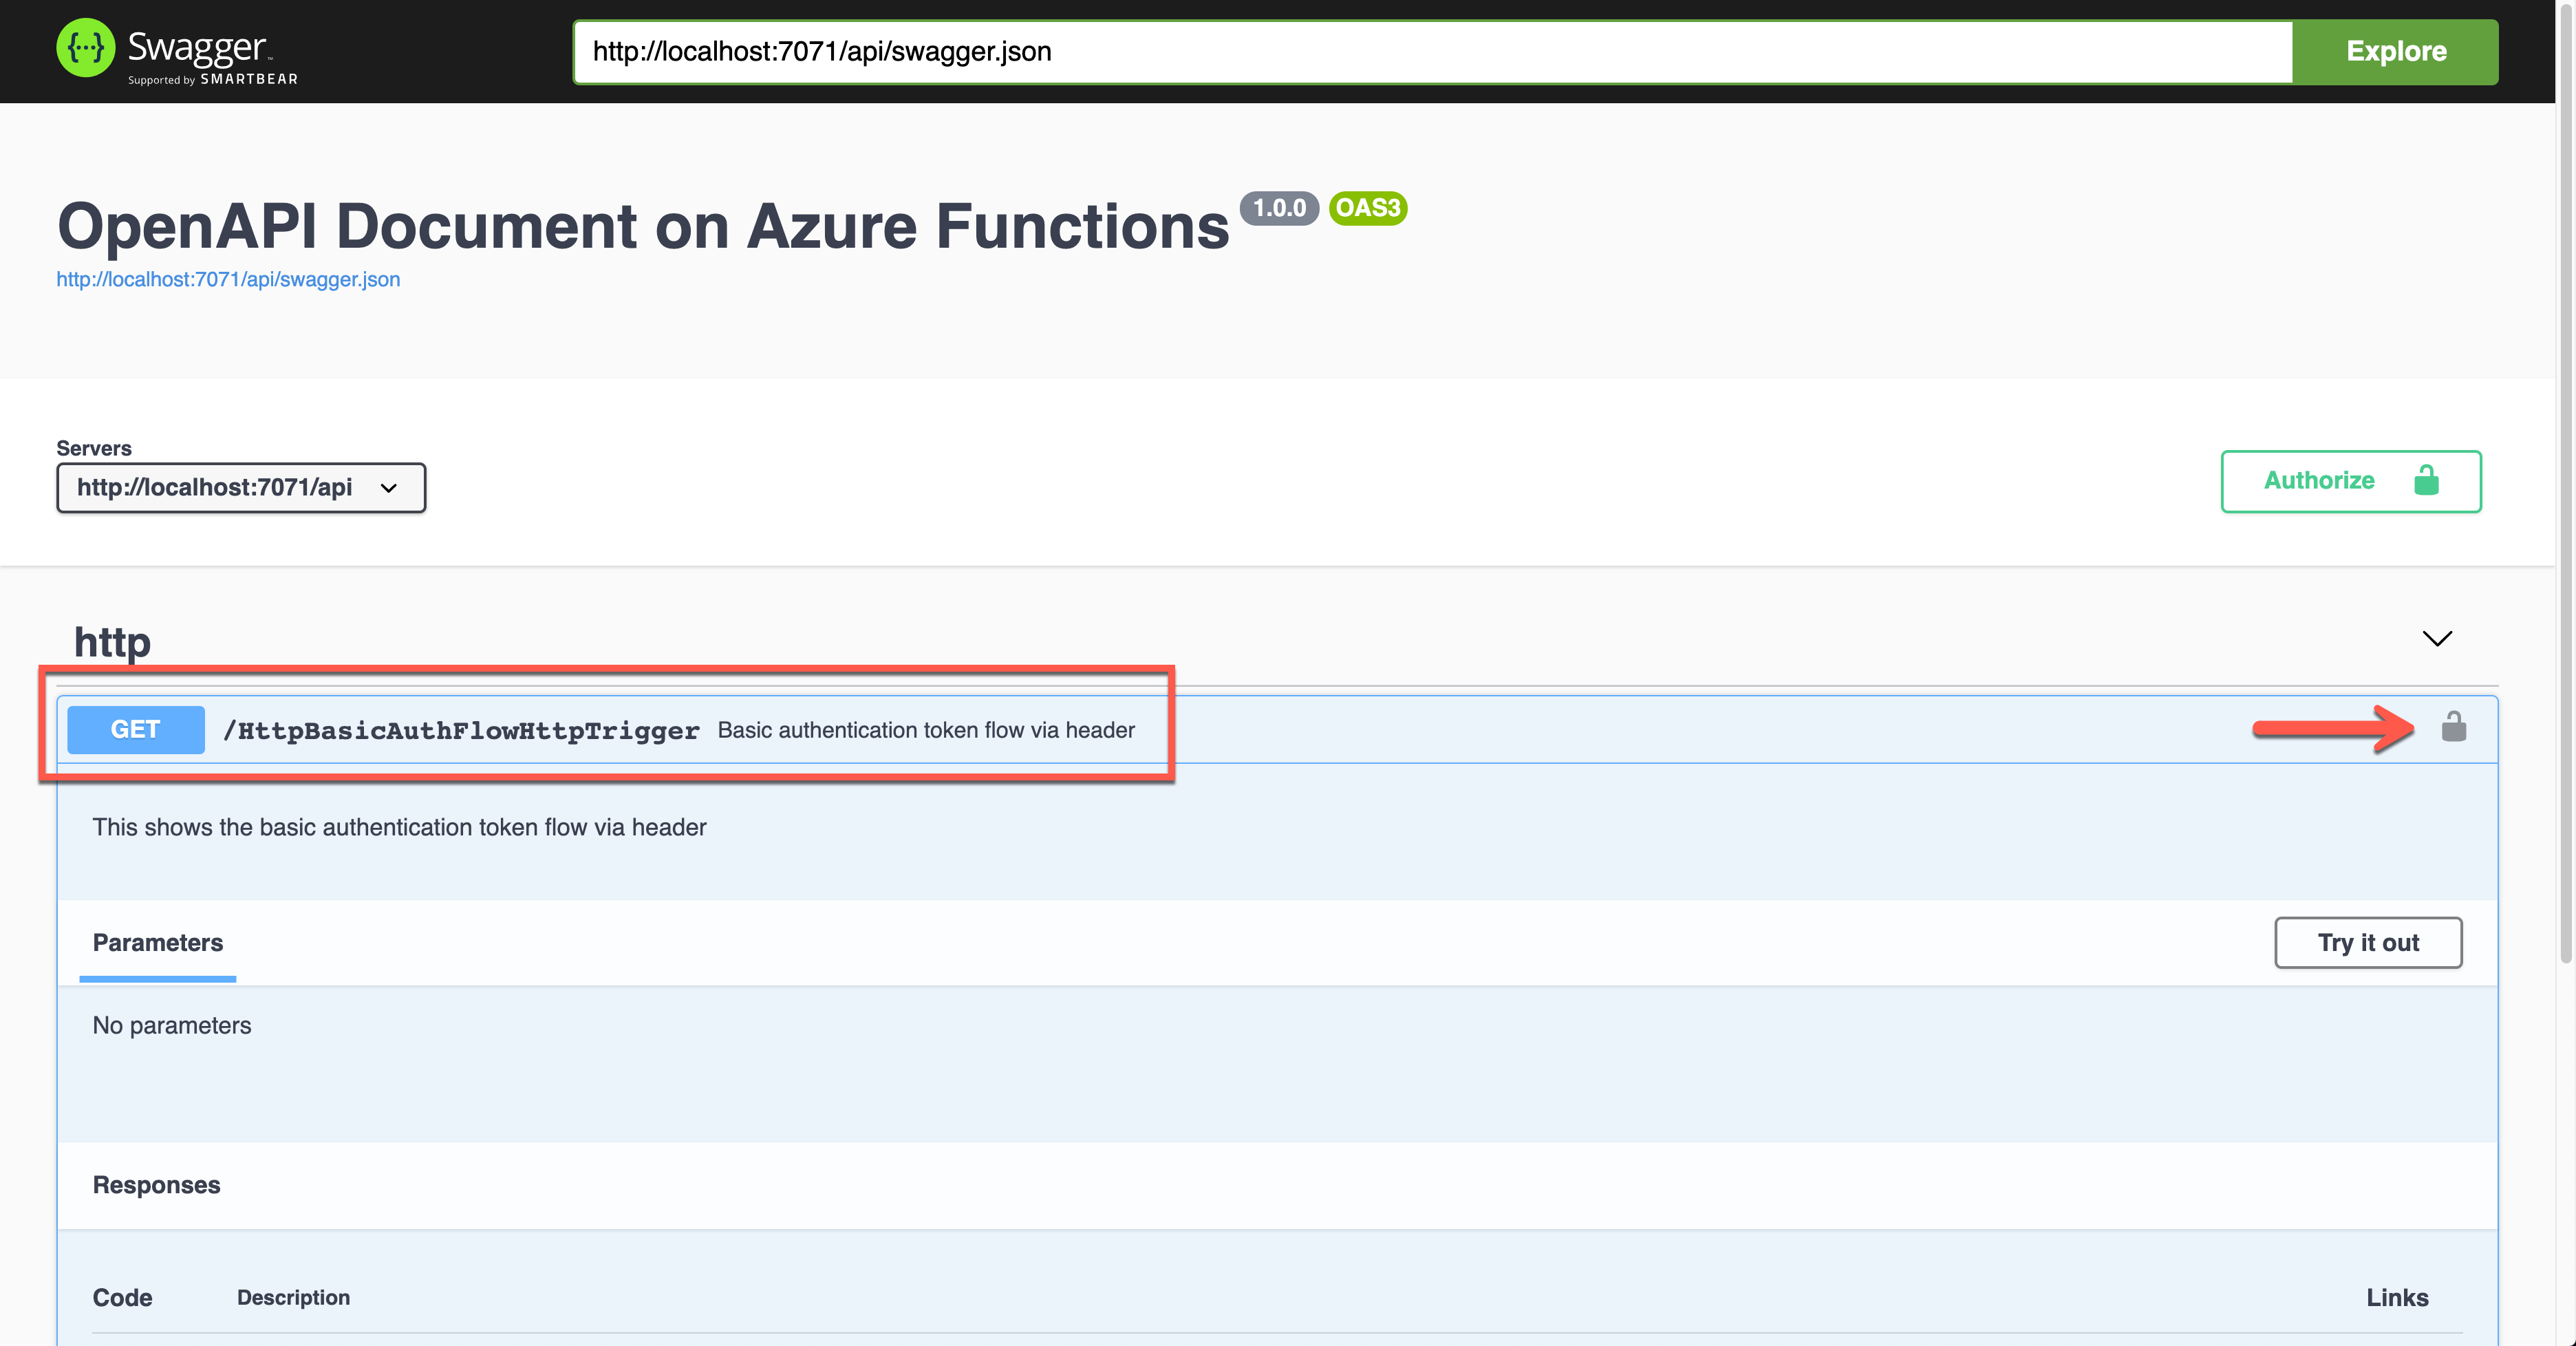
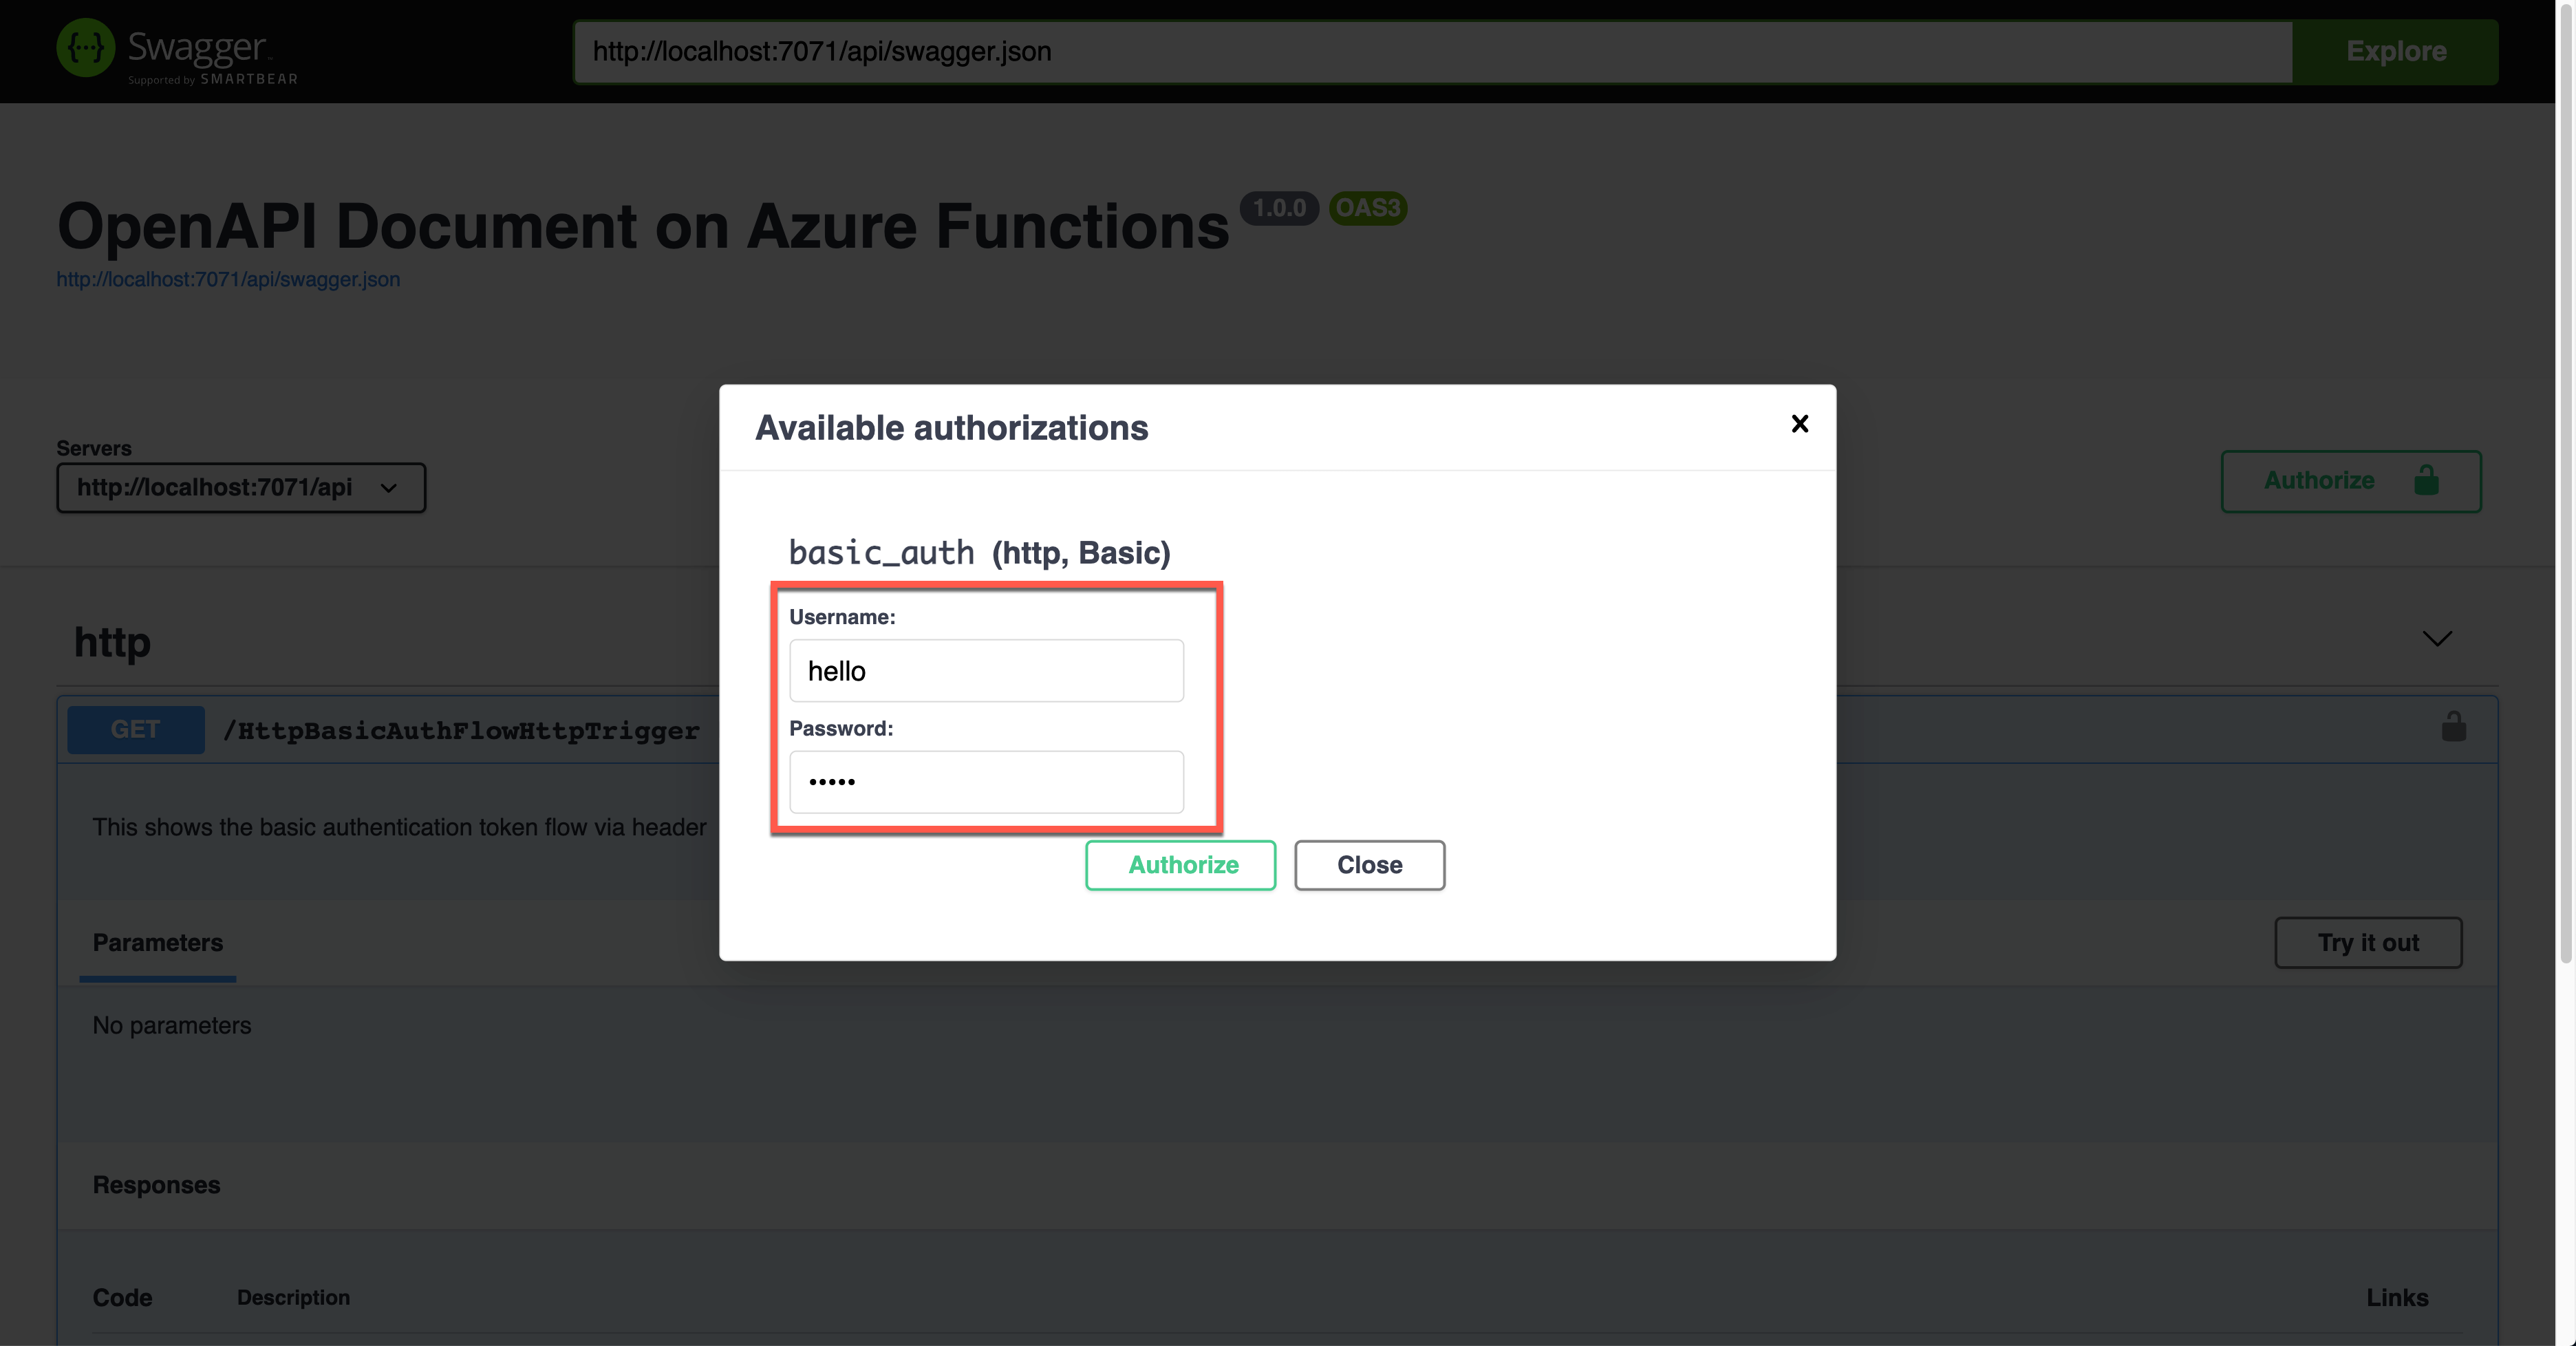
위 그림에서 자물쇠 모양을 클릭하면 아래와 같이 Username 값과 Password 값을 입력하는 화면이 나오는데, 이 값은 향후 Authorization 헤더에 추가된다.
실제로 앱을 실행시키면 아래와 같이 요청 헤더를 통해 Authorization 헤더에 Base64 인코딩 된 값으로 보내진다.
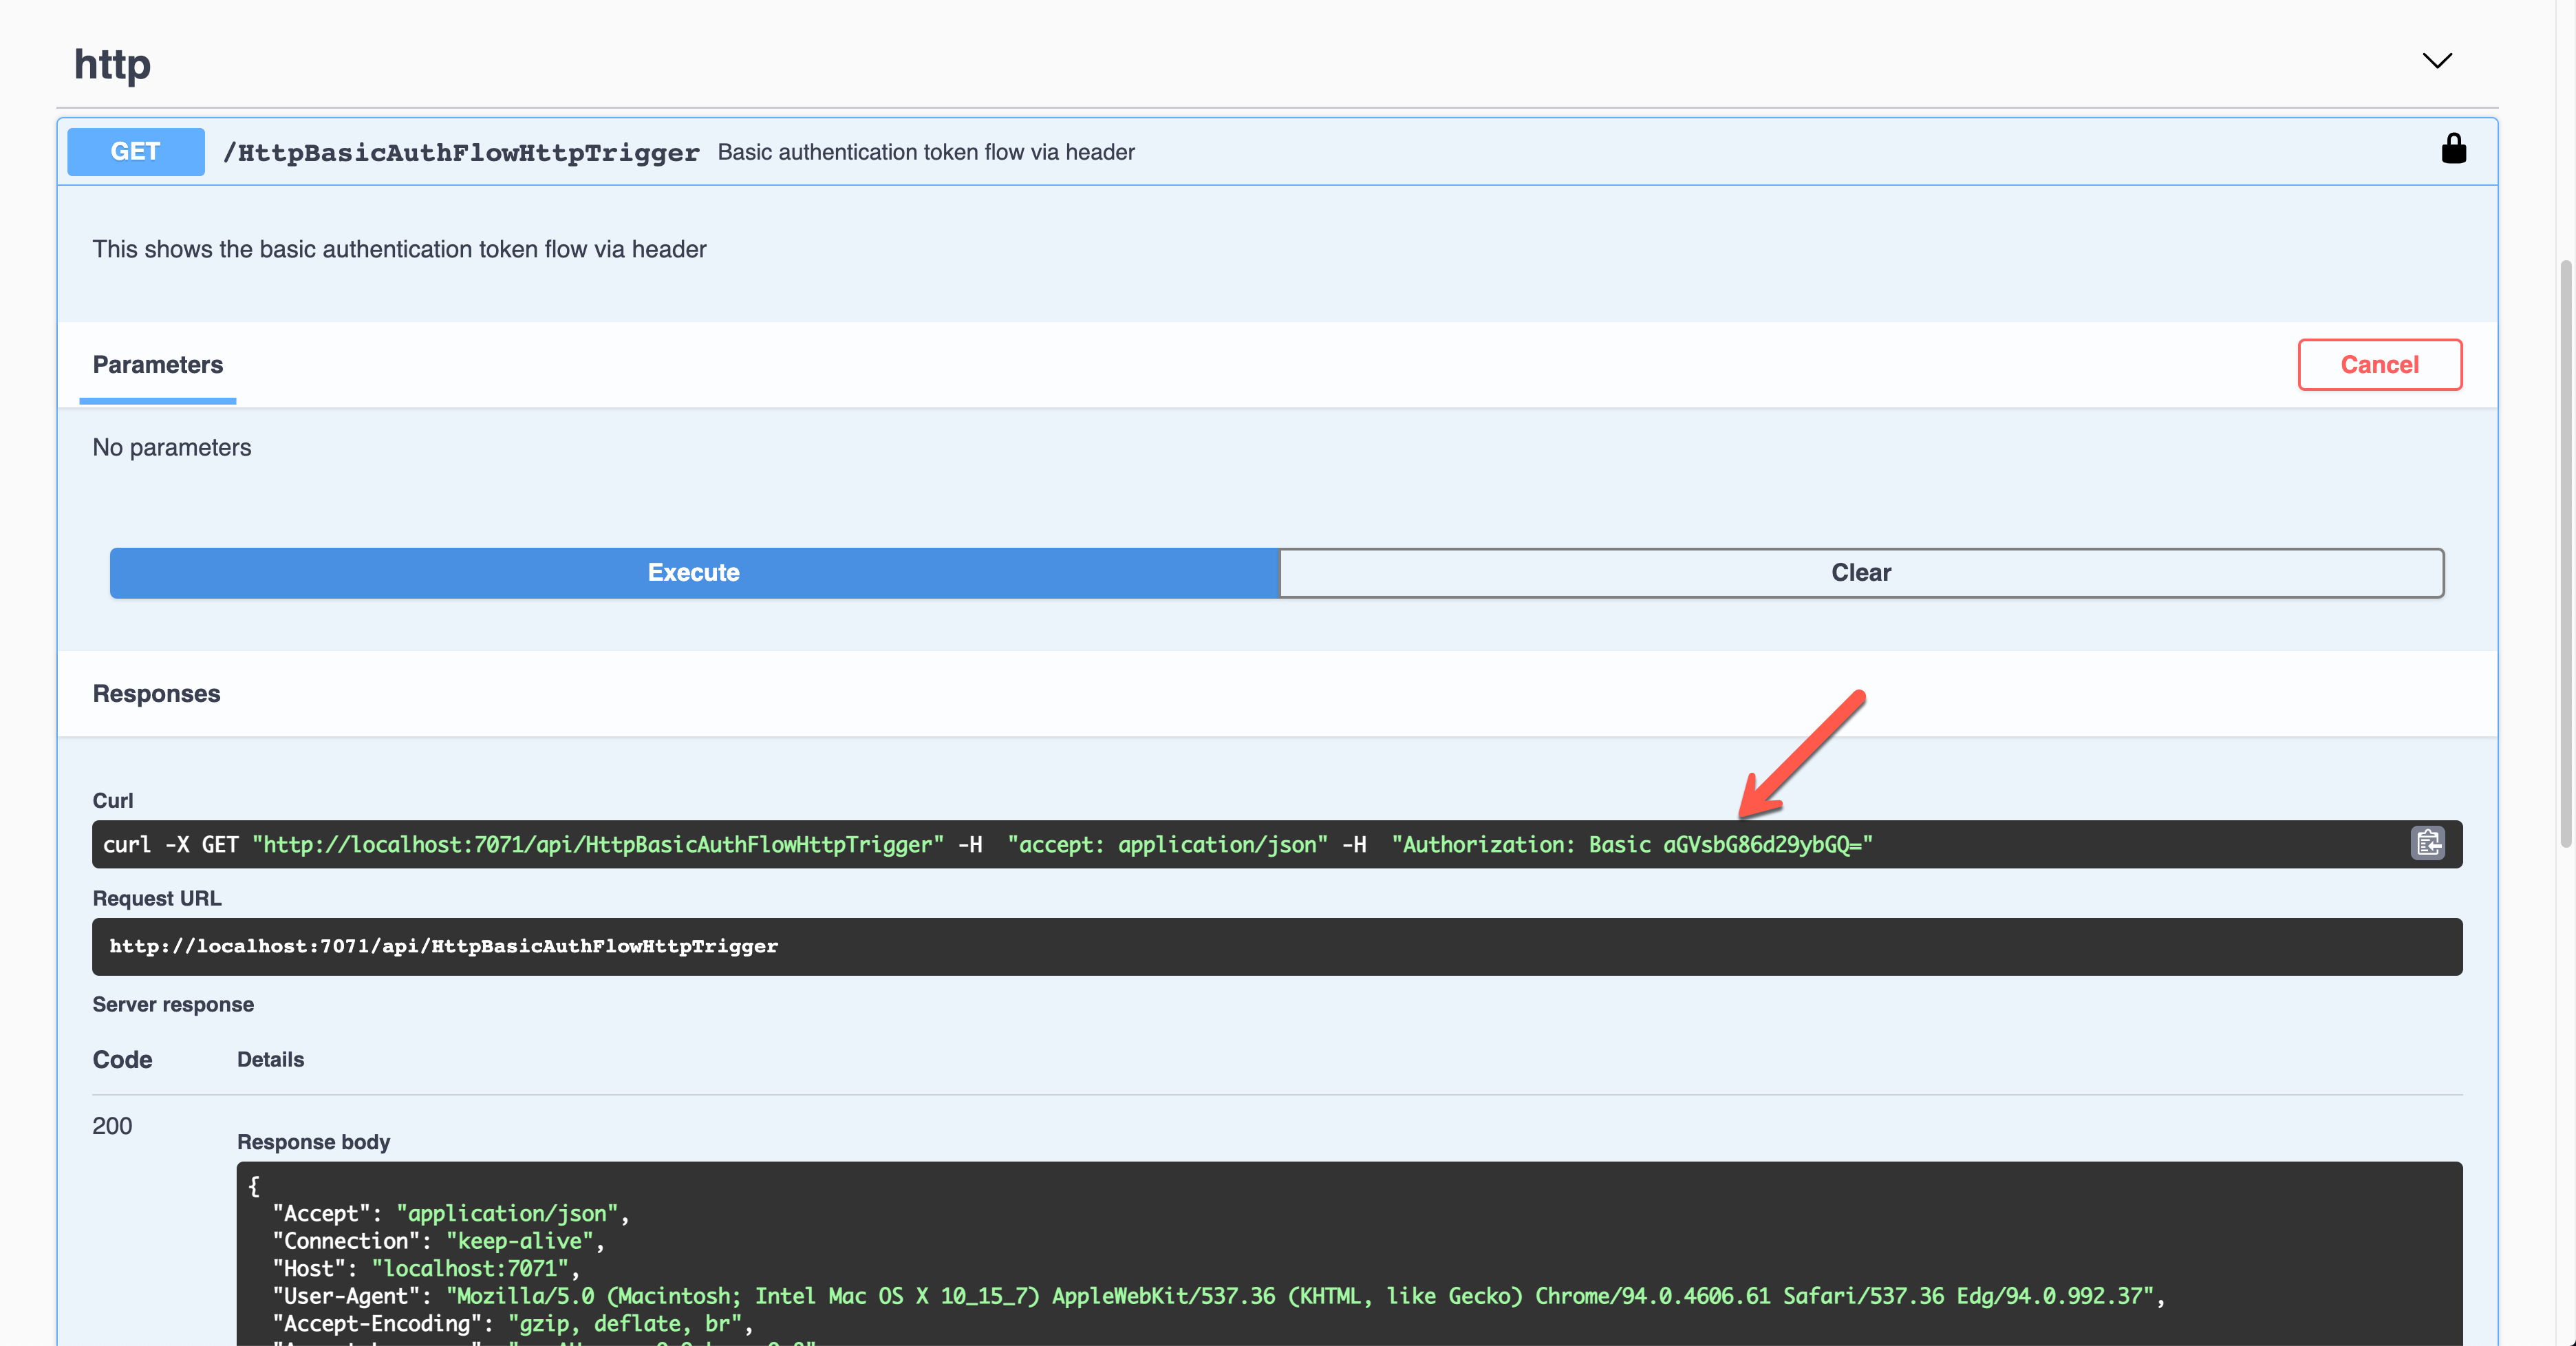
이렇게 보내진 토큰 값을 실제 인증 서버에 보내서 유효성 검사를 한 후 처리를 하면 된다.
Bearer 인증 토큰 사용
비슷한 방식으로 Bearer 인증 토큰을 사용하는 방법에 대해 알아보자. OpenApiSecurityAttribute(...) 데코레이터를 아래와 같이 지정한다 (line #5).
Type:SecuritySchemeType.HttpScheme:OpenApiSecuritySchemeType.BearerBearerFormat:JWT
마찬가지로 여기서도 기본 기능을 사용하지 않기 때문에 HttpTrigger 바인딩의 AuthLevel 값을 AuthorizationLevel.Anonymous로 지정했다 (line #13).
| public static class HttpBearerAuthFlowHttpTrigger | |
| { | |
| [FunctionName(nameof(HttpBearerAuthFlowHttpTrigger))] | |
| [OpenApiOperation(operationId: "http.bearer", tags: new[] { "http" }, Summary = "Bearer authentication token flow via header", Description = "This shows the bearer authentication token flow via header", Visibility = OpenApiVisibilityType.Important)] | |
| [OpenApiSecurity("bearer_auth", | |
| SecuritySchemeType.Http, | |
| Scheme = OpenApiSecuritySchemeType.Bearer, | |
| BearerFormat = "JWT")] | |
| [OpenApiResponseWithBody(statusCode: HttpStatusCode.OK, contentType: "application/json", bodyType: typeof(Dictionary<string, string>), Summary = "successful operation", Description = "successful operation")] | |
| public static async Task<IActionResult> Run( | |
| [HttpTrigger(AuthorizationLevel.Anonymous, "GET", Route = null)] HttpRequest req, | |
| ILogger log) | |
| { | |
| log.LogInformation("C# HTTP trigger function processed a request."); | |
| var headers = req.Headers.ToDictionary(q => q.Key, q => (string) q.Value); | |
| var handler = new JwtSecurityTokenHandler(); | |
| var token = handler.ReadJwtToken(headers["Authorization"].Split(' ').Last()); | |
| var claims = token.Claims.Select(p => p.ToString()); | |
| var content = new { headers = headers, claims = claims }; | |
| var result = new OkObjectResult(content); | |
| return await Task.FromResult(result).ConfigureAwait(false); | |
| } | |
| } |
이 상태에서 애저 펑션 앱을 실행하면 아래와 같은 Swagger UI 화면이 나타난다.
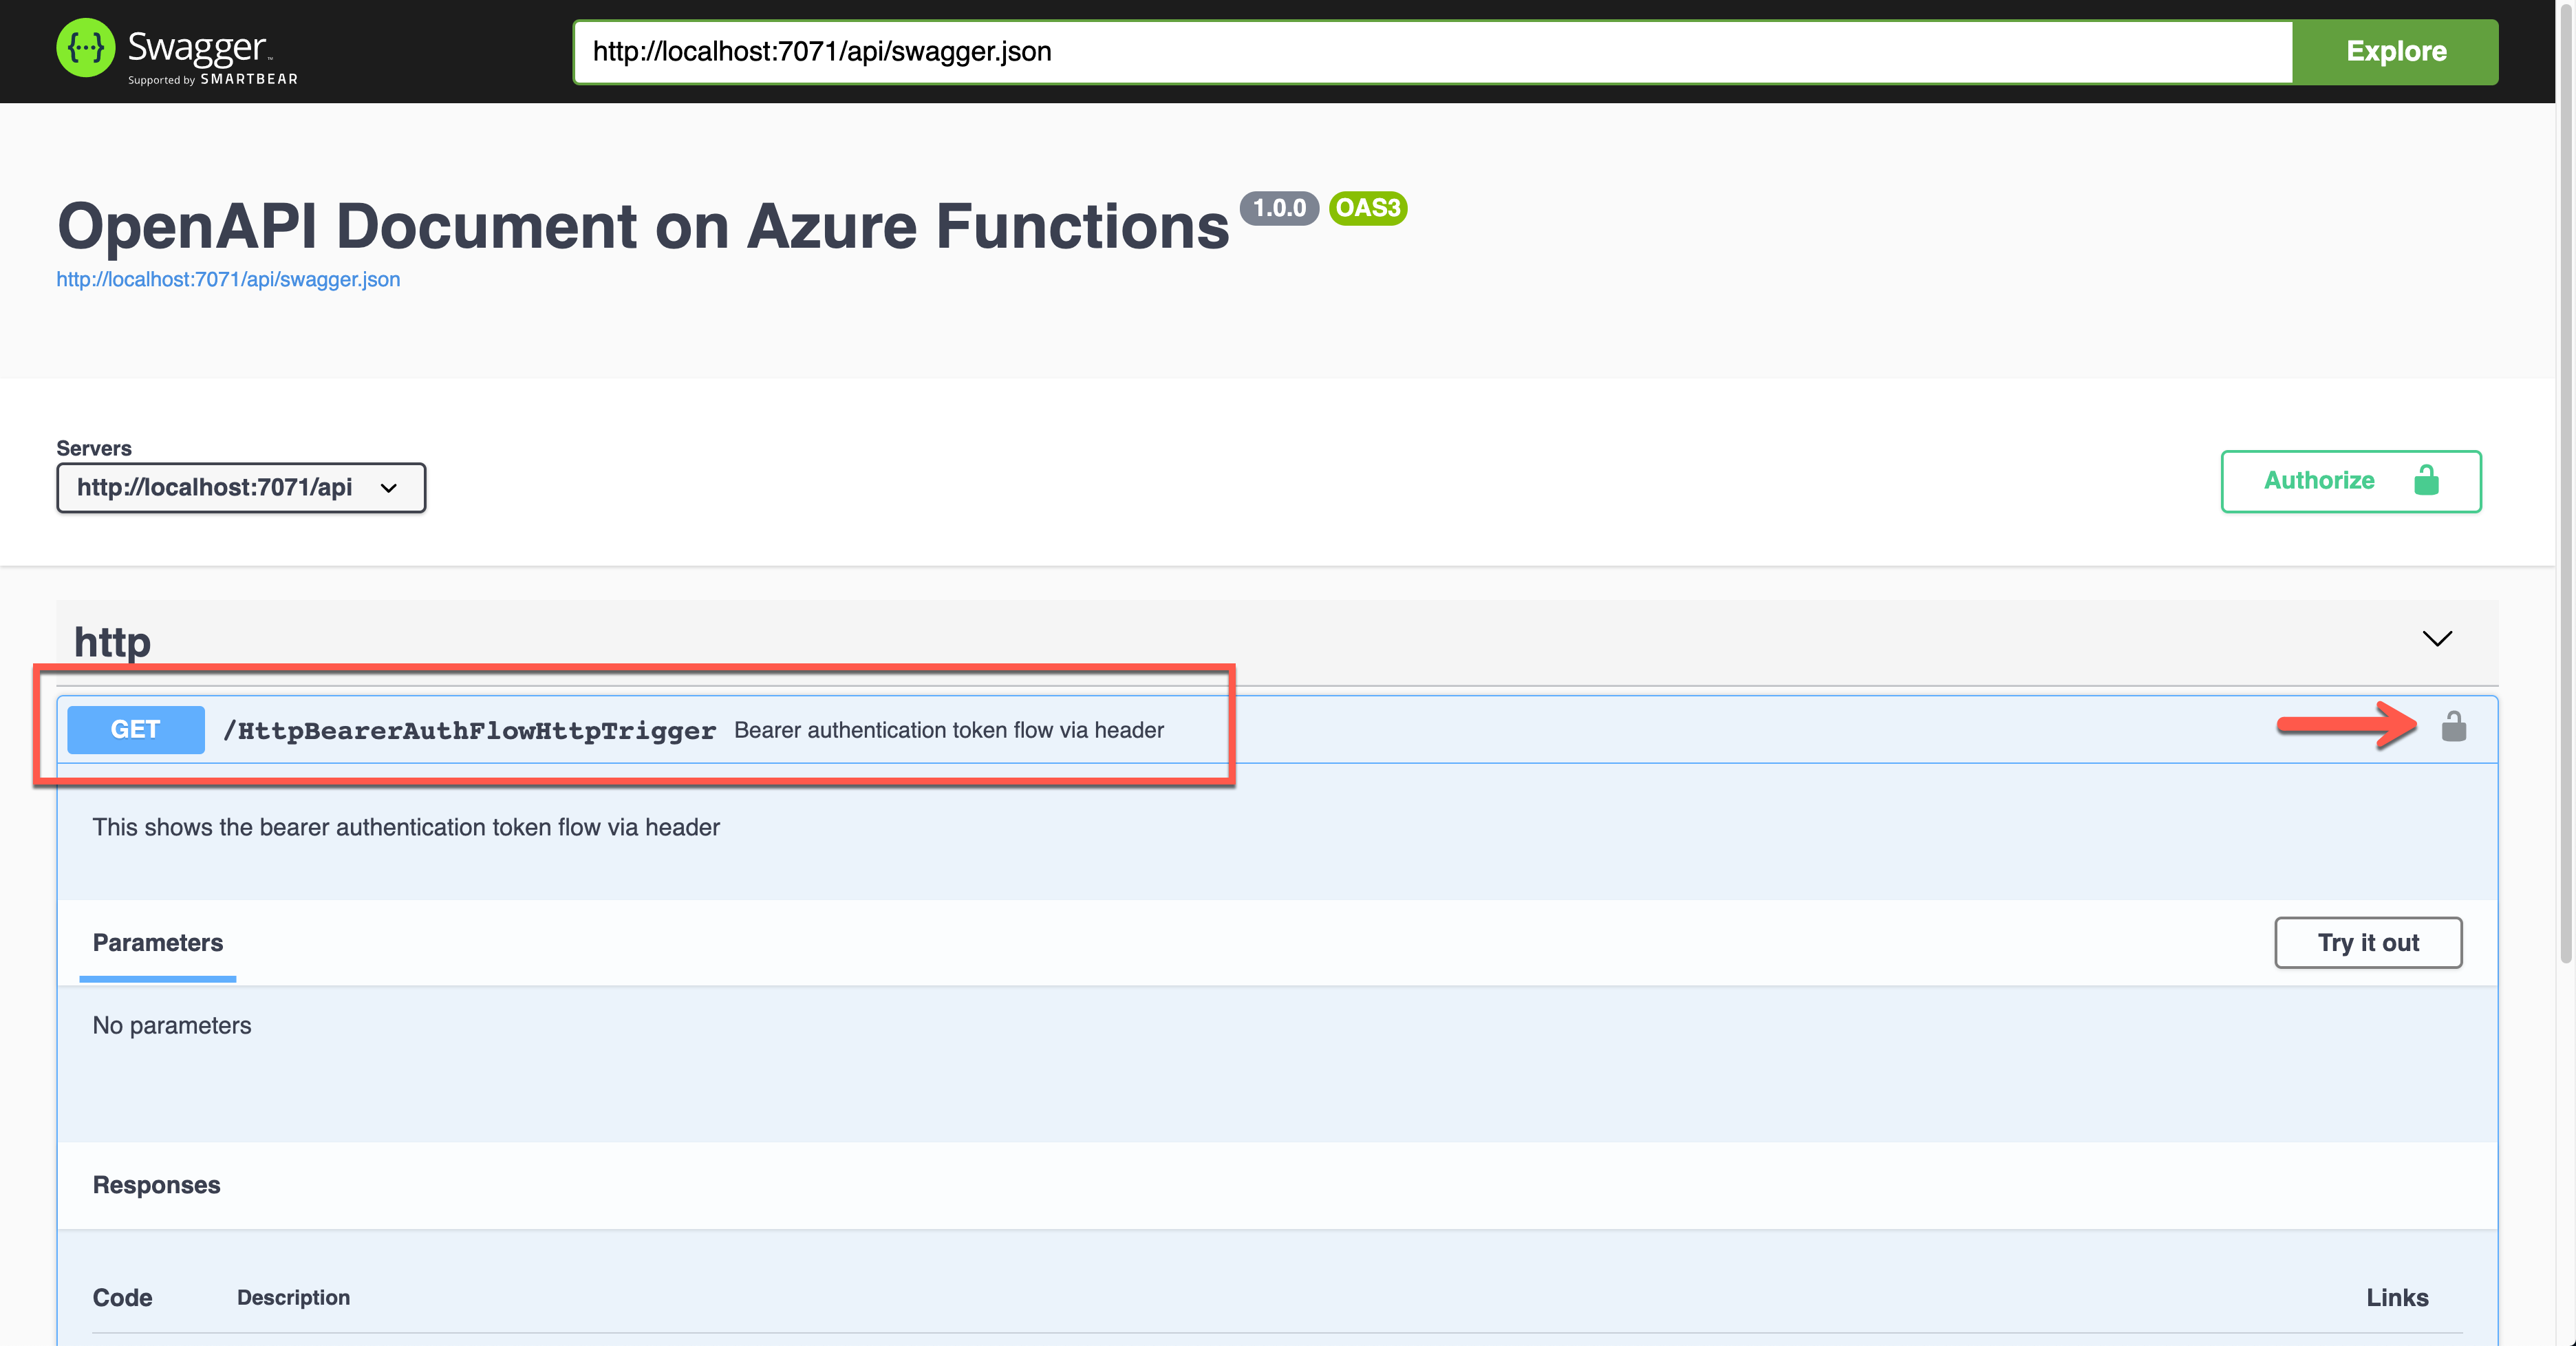
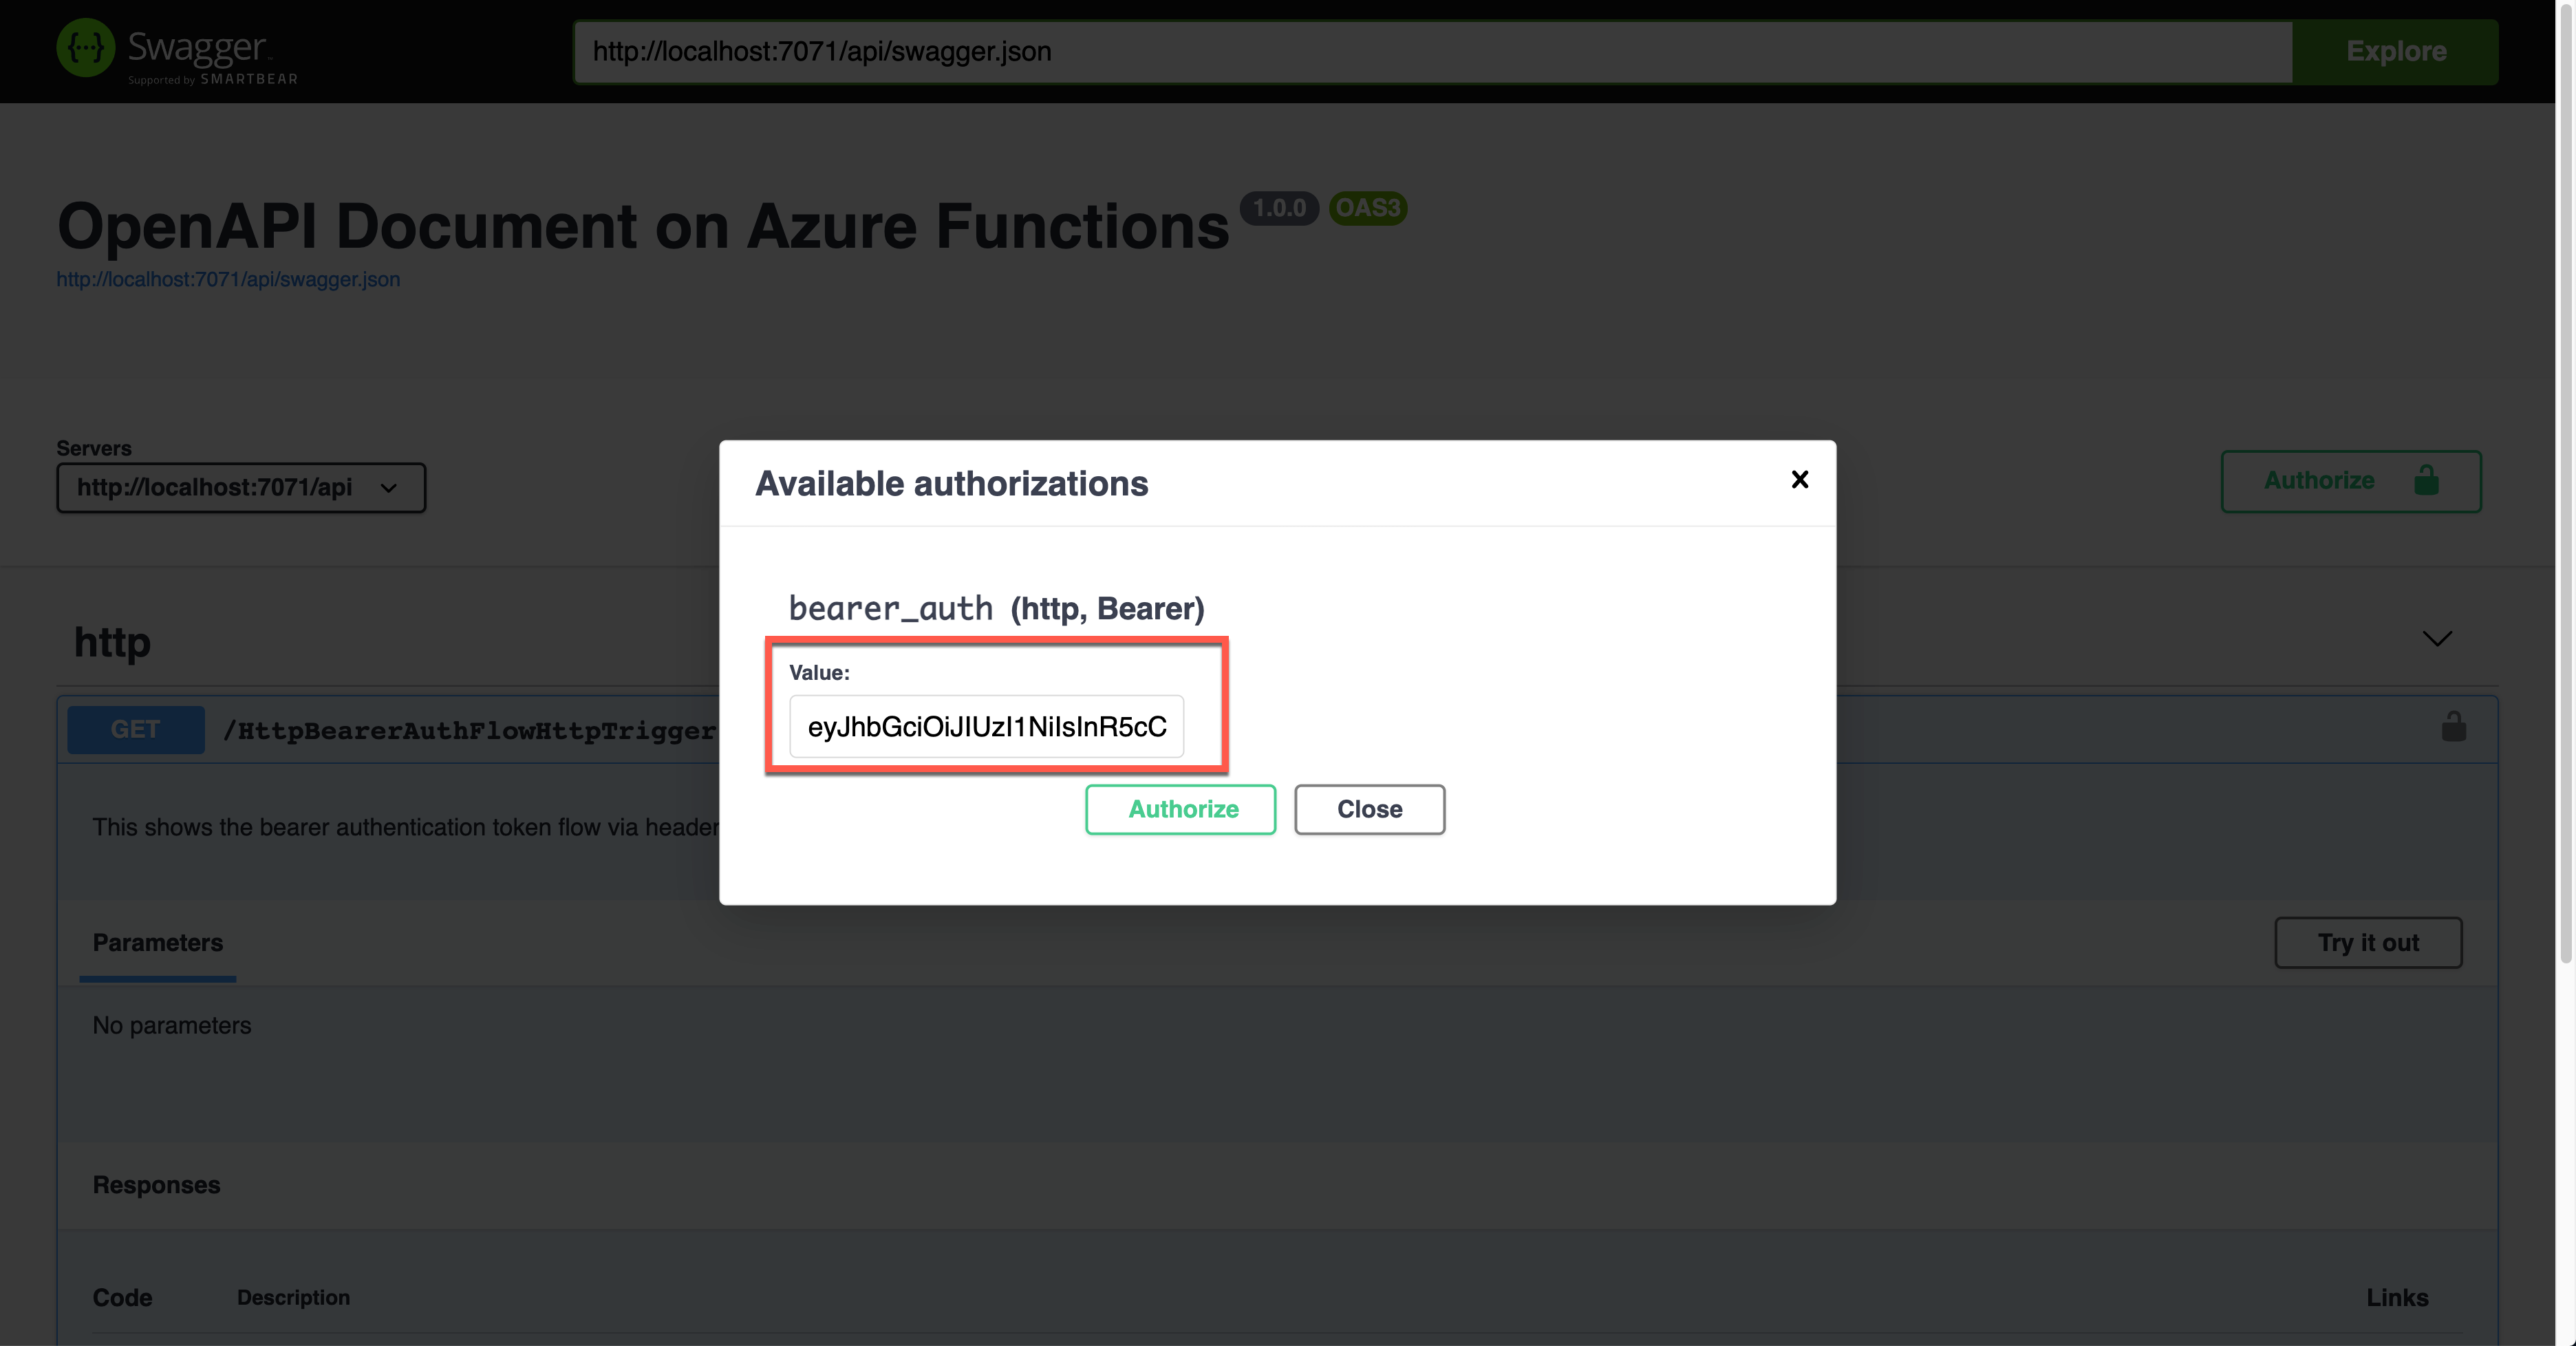
위 그림에서 자물쇠 모양을 클릭하면 아래와 같이 Bearer 토큰 값을 입력하는 화면이 나오는데, 이 값은 향후 Authorization 헤더에 추가된다.
실제로 앱을 실행시키면 아래와 같이 요청 헤더를 통해 Authorization 헤더에 인증토큰 값이 JWT 형태로 보내진다.
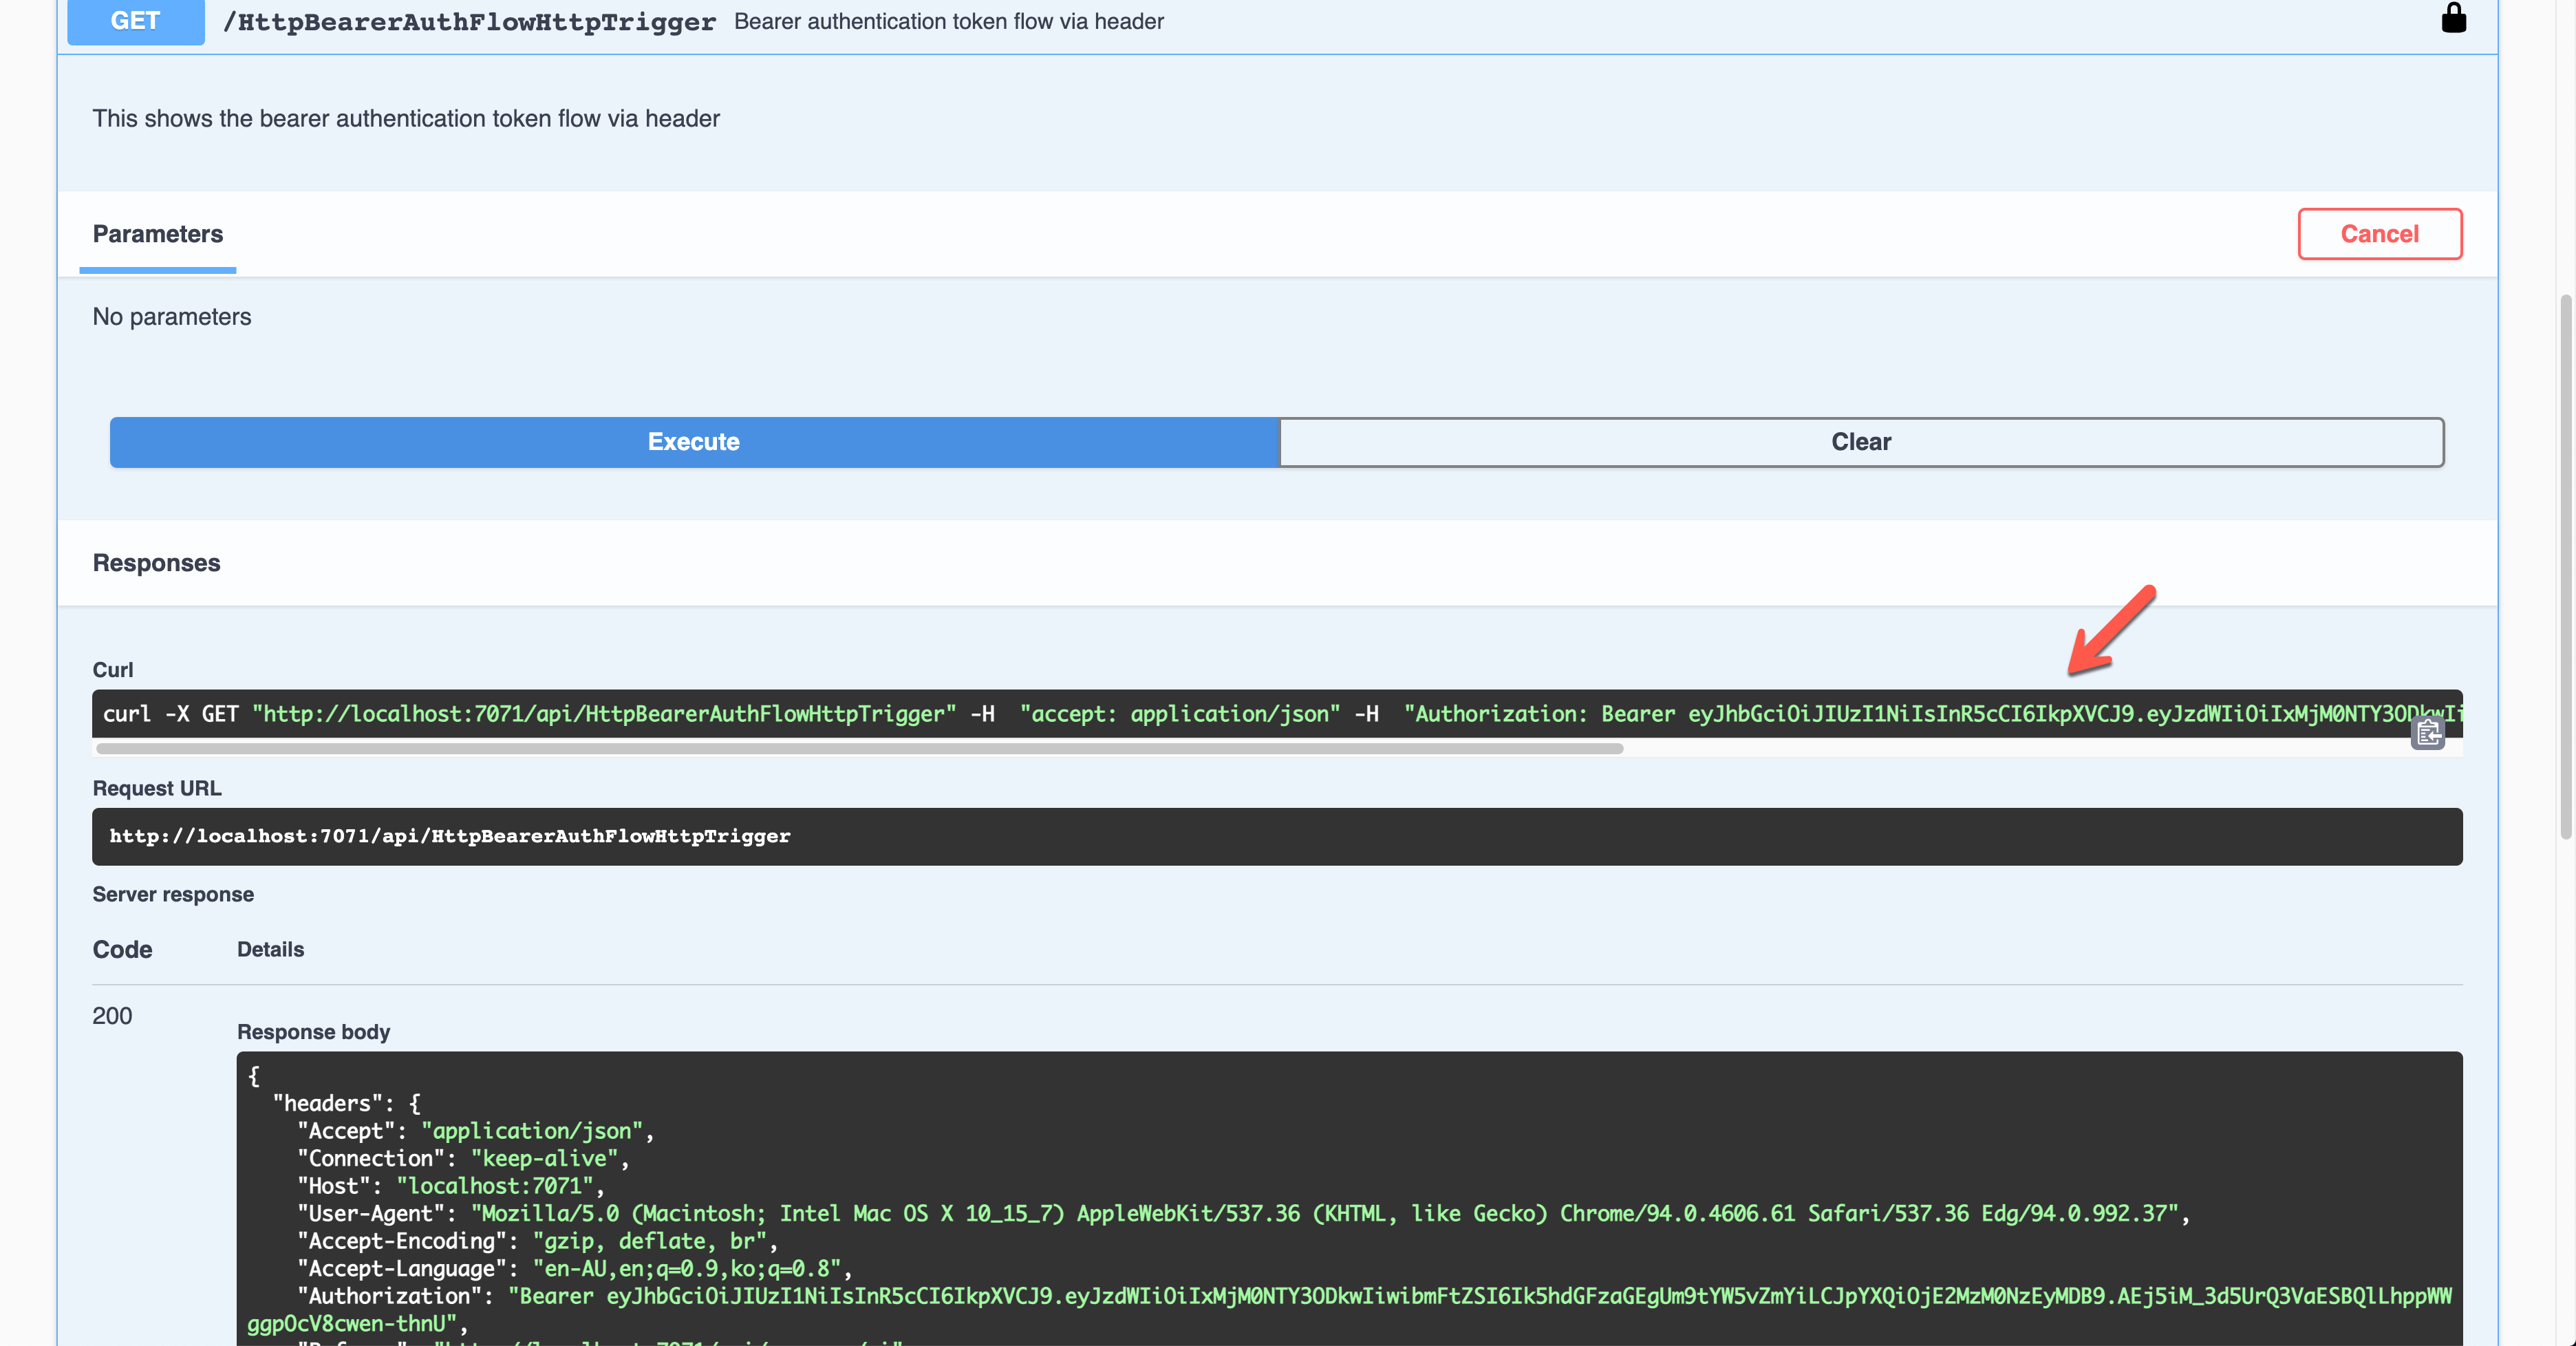
이 JWT 형태의 토큰을 복호화해서 클레임을 찾아낸 후 이를 활용해서 유효성 처리를 하면 된다.
OAuth2 암시적 인증 플로우 사용
OAuth2 인증 플로우는 굉장히 다양한데, 이번에는 OAuth2의 암시적 인증 플로우를 구현해 보자. OpenApiSecurityAttribute(...) 데코레이터를 아래와 같이 지정한다 (line #6-8).
Type:SecuritySchemeType.OAuth2Flows:ImplicitAuthFlow
마찬가지로 AuthLevel 값을 Anonymous로 지정했다 (line #12).
| public static class OAuthImplicitAuthFlowHttpTrigger | |
| { | |
| [FunctionName(nameof(OAuthImplicitAuthFlowHttpTrigger))] | |
| [OpenApiOperation(operationId: "oauth.flows.implicit", tags: new[] { "oauth" }, Summary = "OAuth implicit flows", Description = "This shows the OAuth implicit flows", Visibility = OpenApiVisibilityType.Important)] | |
| [OpenApiSecurity("implicit_auth", | |
| SecuritySchemeType.OAuth2, | |
| Flows = typeof(ImplicitAuthFlow))] | |
| [OpenApiResponseWithBody(statusCode: HttpStatusCode.OK, contentType: "application/json", bodyType: typeof(IEnumerable<string>), Summary = "successful operation", Description = "successful operation")] | |
| public static async Task<IActionResult> Run( | |
| [HttpTrigger(AuthorizationLevel.Anonymous, "GET", Route = null)] HttpRequest req, | |
| ILogger log) | |
| { | |
| log.LogInformation("C# HTTP trigger function processed a request."); | |
| var headers = req.Headers.ToDictionary(p => p.Key, p => (string) p.Value); | |
| var handler = new JwtSecurityTokenHandler(); | |
| var token = handler.ReadJwtToken(headers["Authorization"].Split(' ').Last()); | |
| var claims = token.Claims.Select(p => p.ToString()); | |
| var result = new OkObjectResult(claims); | |
| return await Task.FromResult(result).ConfigureAwait(false); | |
| } | |
| } |
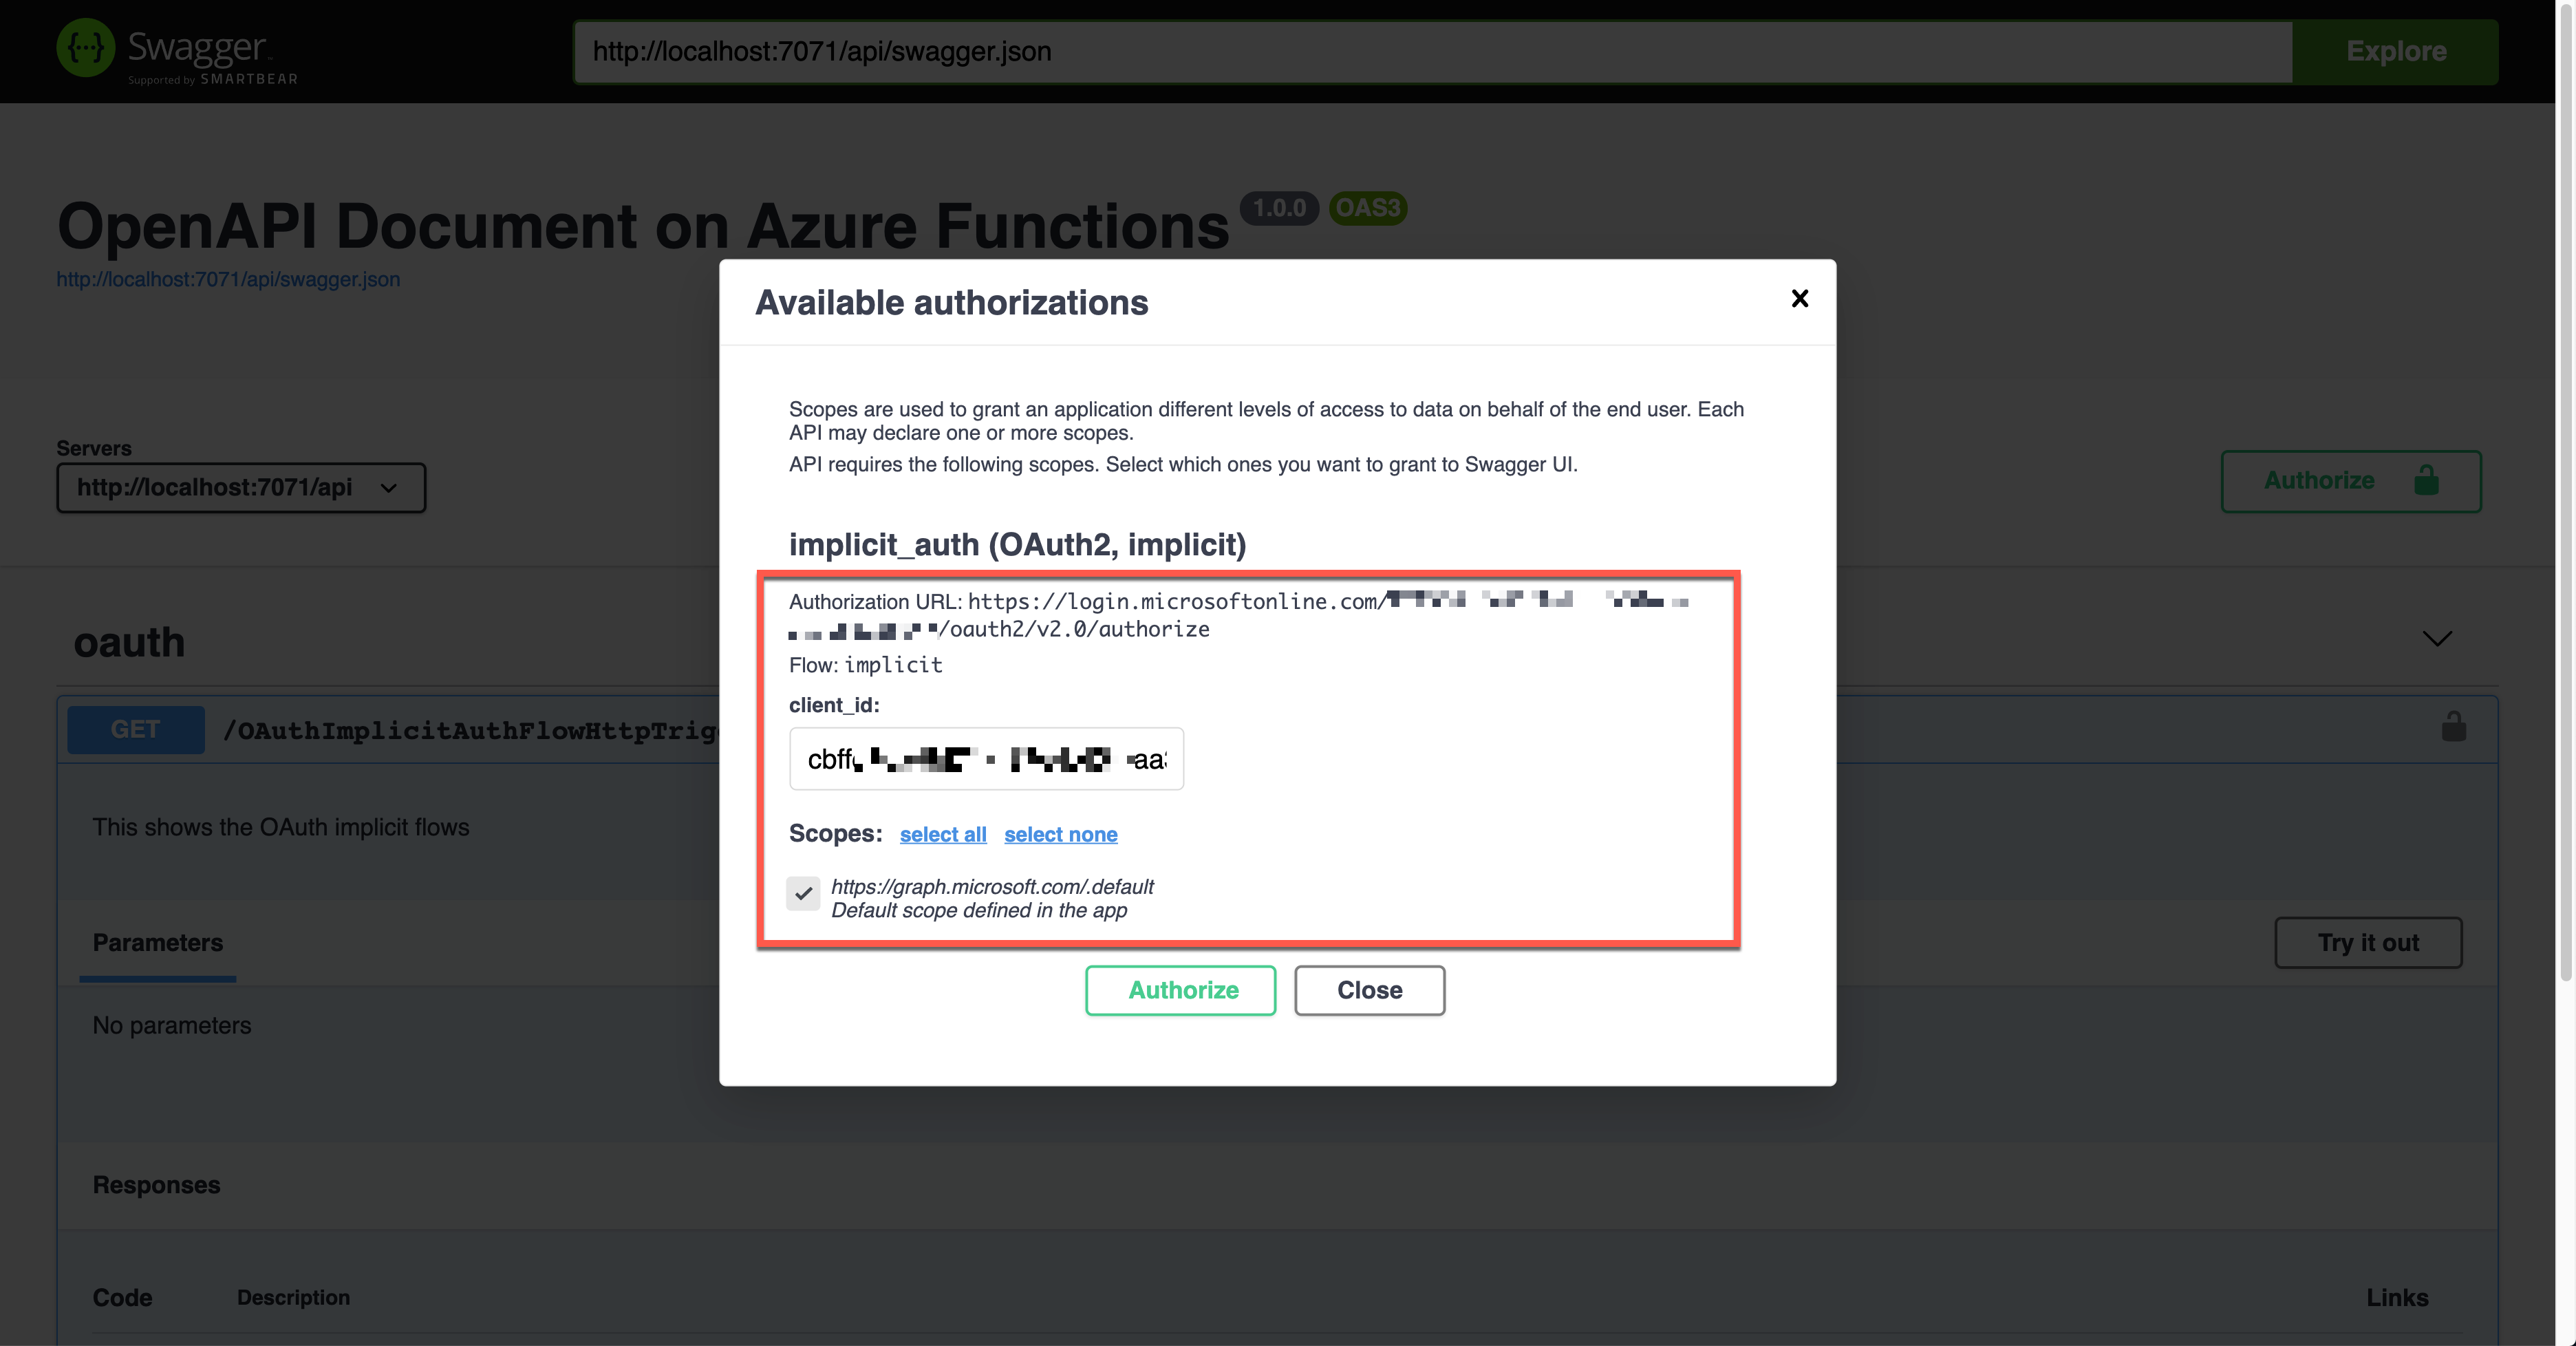
위의 암시적 OAuth2 인증 플로우에 적용한 ImplicitAuthFlow 클라스를 한 번 들여다 보자. 내부적으로 애저 액티브 디렉토리에 특화된 AuthorizationUrl 값과 RefreshUrl, Scopes를 지정해 줬는데, 여기서는 싱글 테넌트 형식으로 인증 플로우를 운영하기 때문에 테넌트 ID 값을 별도로 구성했다 (line #3-6, 10, 14-15). Scopes 값은 기본값으로 지정했다 (line #17).
| public class ImplicitAuthFlow : OpenApiOAuthSecurityFlows | |
| { | |
| private const string AuthorisationUrl = | |
| "https://login.microsoftonline.com/{0}/oauth2/v2.0/authorize"; | |
| private const string RefreshUrl = | |
| "https://login.microsoftonline.com/{0}/oauth2/v2.0/token"; | |
| public ImplicitAuthFlow() | |
| { | |
| var tenantId = Environment.GetEnvironmentVariable("OpenApi__Auth__TenantId"); | |
| this.Implicit = new OpenApiOAuthFlow() | |
| { | |
| AuthorizationUrl = new Uri(string.Format(AuthorisationUrl, tenantId)), | |
| RefreshUrl = new Uri(string.Format(RefreshUrl, tenantId)), | |
| Scopes = { { "https://graph.microsoft.com/.default", "Default scope defined in the app" } } | |
| }; | |
| } | |
| } |
이 상태에서 애저 펑션 앱을 실행하면 아래와 같은 Swagger UI 화면이 나타난다.
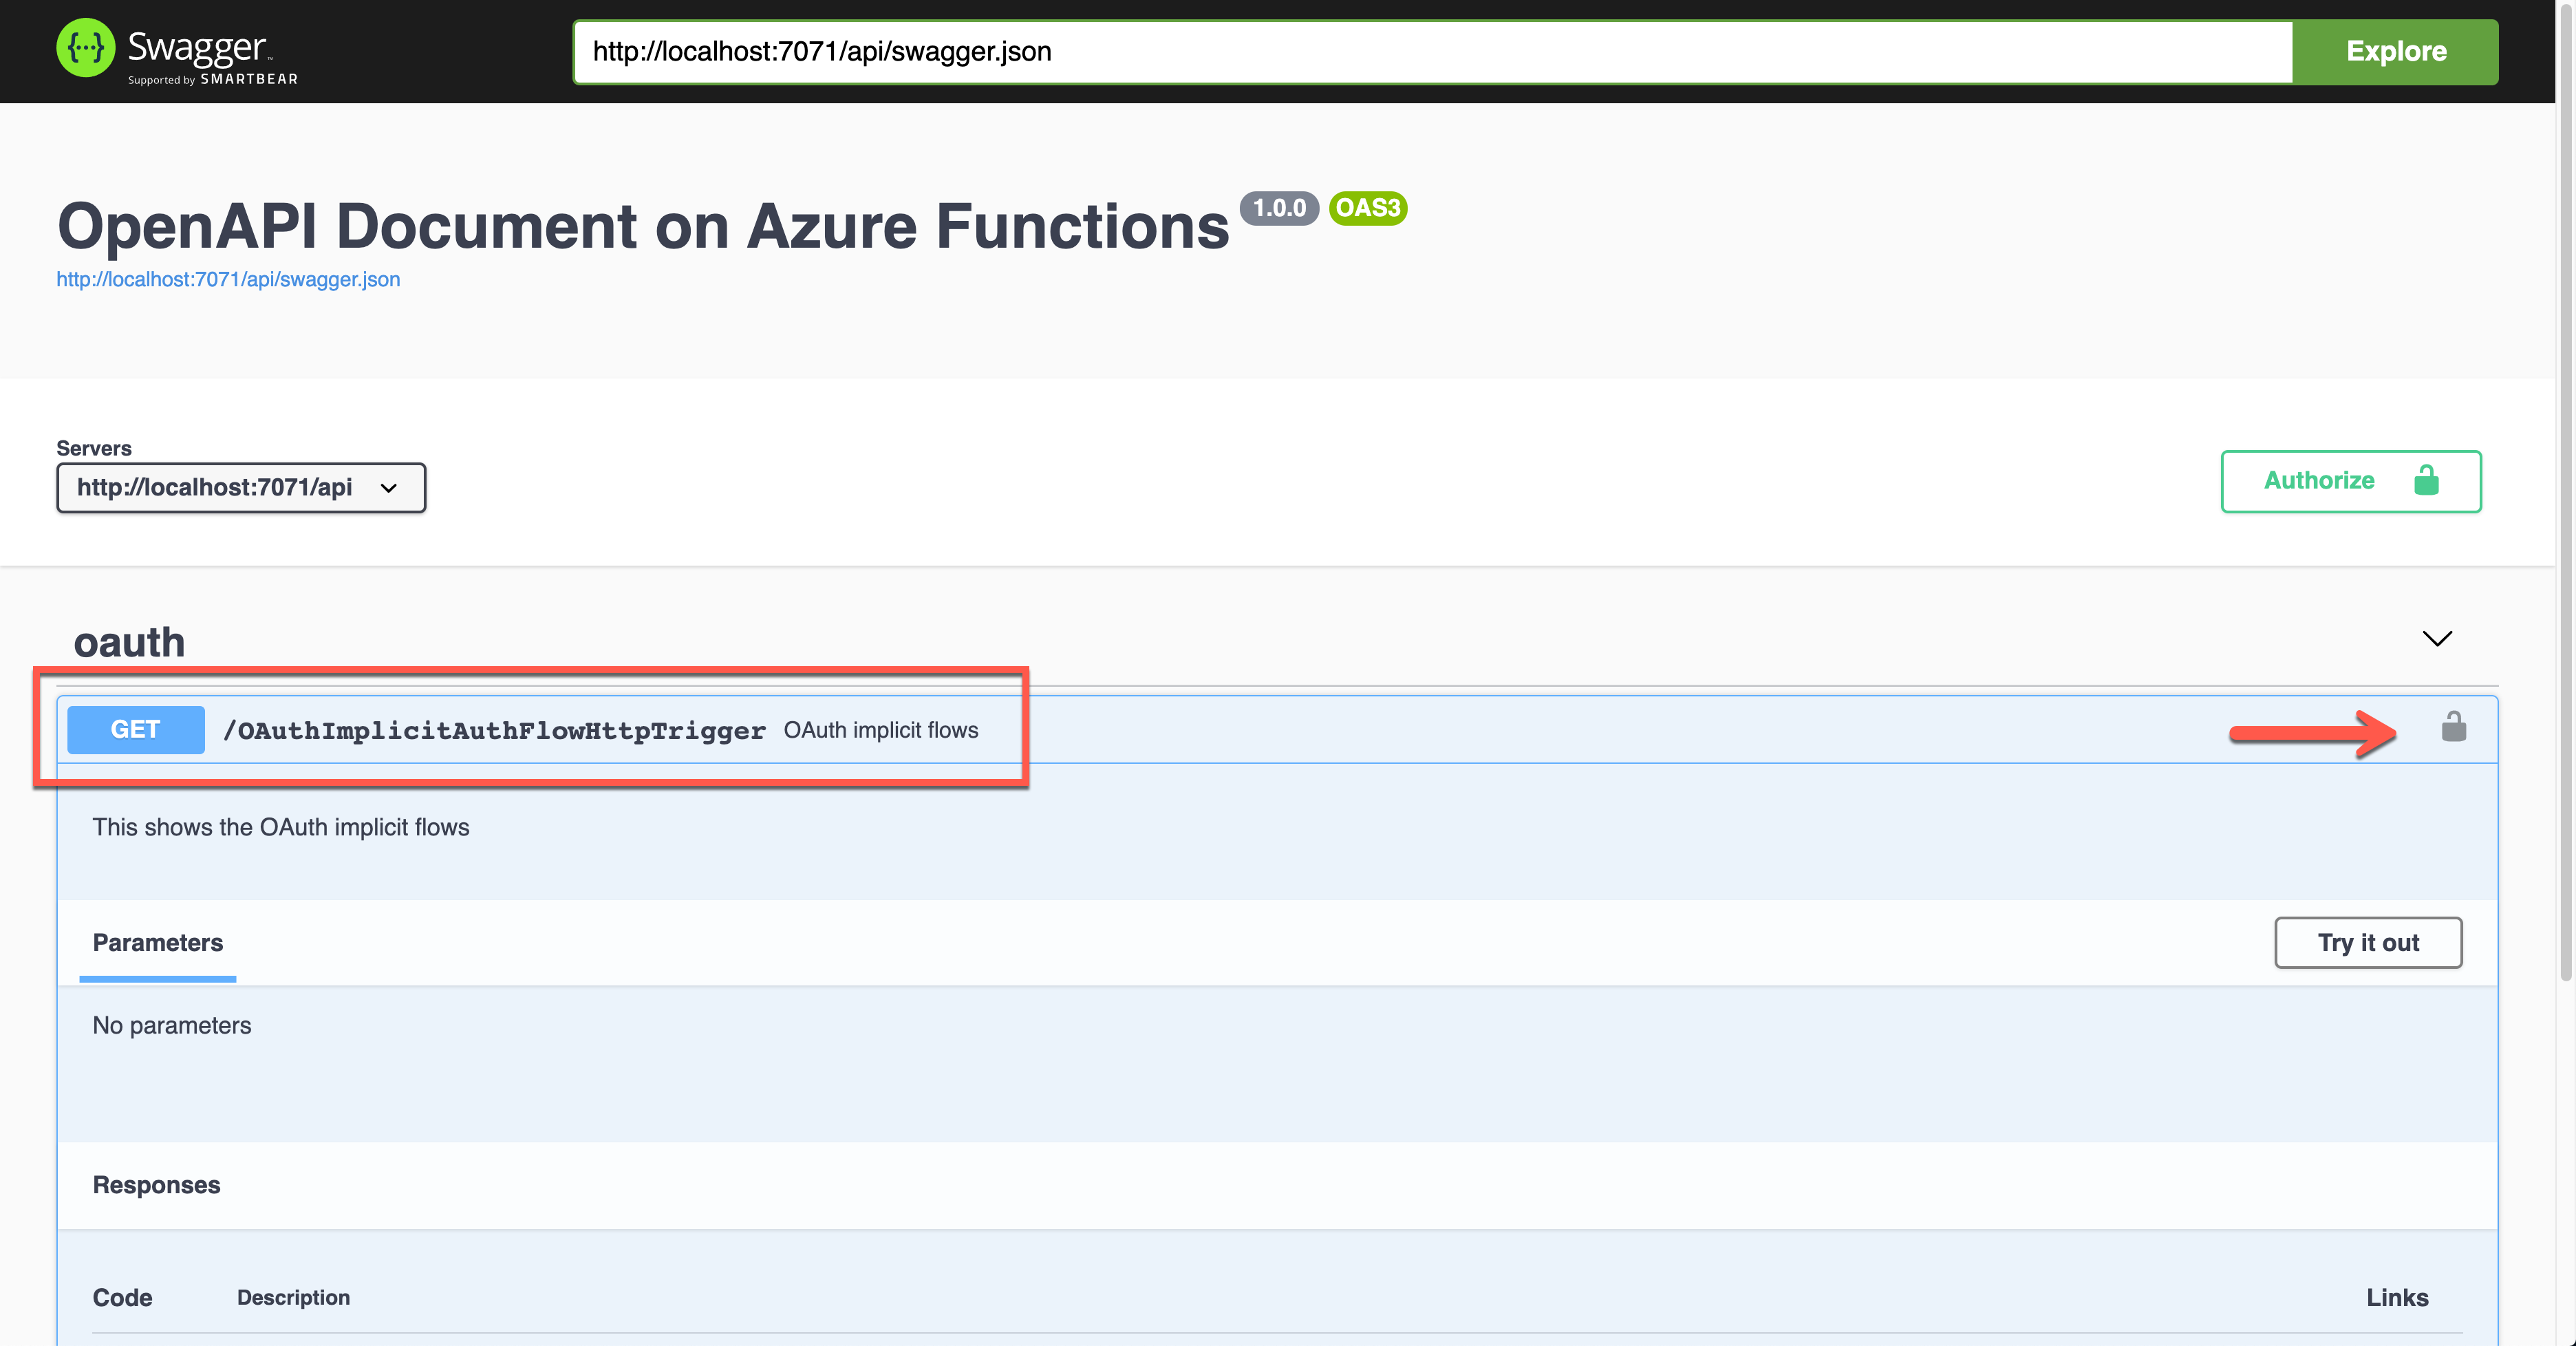
위 그림에서 자물쇠 모양을 클릭하면 아래와 같이 Client ID 값을 입력하는 화면이 나오는데, 이 값을 이용해 애저 액티브 디렉토리에 로그인한 후 액세스 토큰을 발급받는다.
실제로 앱을 실행시키면 아래와 같이 요청 헤더를 통해 Authorization 헤더에 발급 받은 액세스 토큰 값이 JWT 형태로 보내진다.
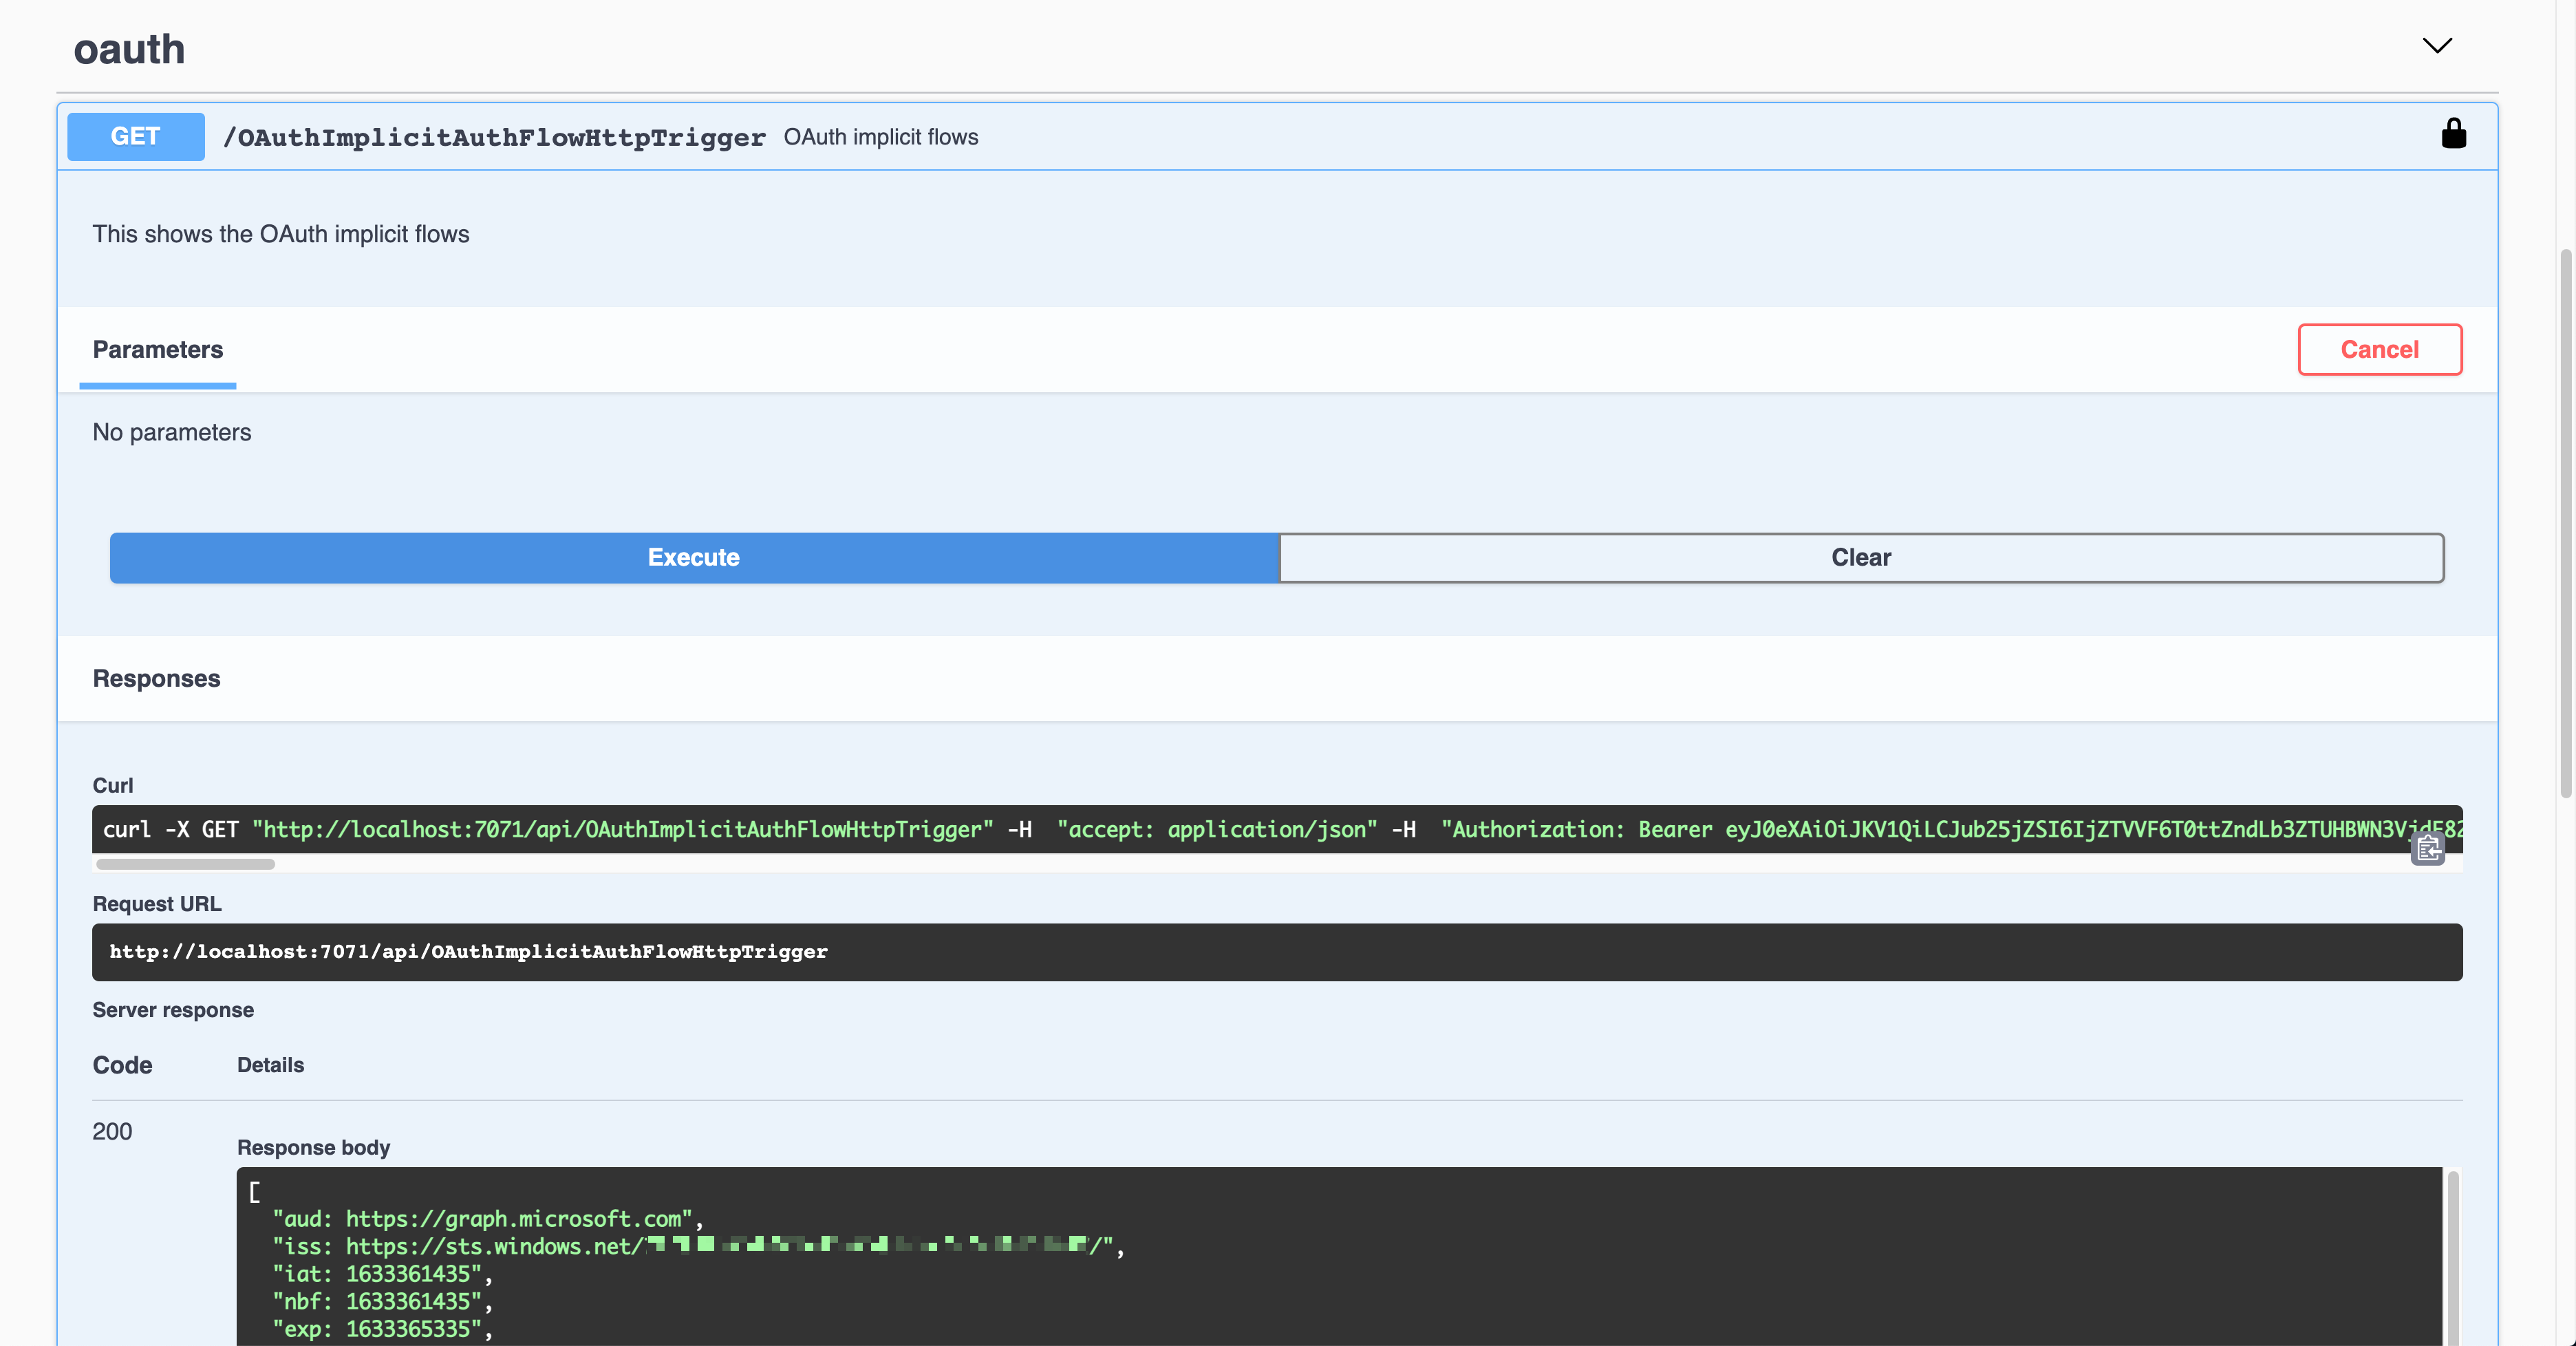
이 JWT 형태의 토큰을 복호화해서 클레임을 찾아낸 후 이를 활용해서 유효성 처리를 하면 된다.
OpenID Connect 인증 플로우 사용
마지막으로 OpenID Connect 인증 플로우를 이용해 보자. OpenApiSecurityAttribute(...) 데코레이터를 아래와 같이 지정한다 (line #6-9)
Type:SecuritySchemeType.OpenIdConnectOpenIdConnectUrl:https://login.microsoftonline.com/{tenant_id}/v2.0/.well-known/openid-configurationOpenIdConnectScopes:openid,profile
물론 {tenant_id} 값은 실제 테넌트 ID 값으로 바꿔줘야 한다. 이렇게 하면 자동으로 OAuth2 인증 플로우를 찾아주게 된다. 마찬가지로 AuthLevel 값을 Anonymous로 지정했다 (line #12).
| public static class OpenIDConnectAuthFlowHttpTrigger | |
| { | |
| [FunctionName(nameof(OpenIDConnectAuthFlowHttpTrigger))] | |
| [OpenApiOperation(operationId: "openidconnect", tags: new[] { "oidc" }, Summary = "OpenID Connect auth flows", Description = "This shows the OpenID Connect auth flows", Visibility = OpenApiVisibilityType.Important)] | |
| [OpenApiSecurity("oidc_auth", | |
| SecuritySchemeType.OpenIdConnect, | |
| OpenIdConnectUrl = "https://login.microsoftonline.com/{tenant_id}/v2.0/.well-known/openid-configuration", | |
| OpenIdConnectScopes = "openid,profile")] | |
| [OpenApiResponseWithBody(statusCode: HttpStatusCode.OK, contentType: "application/json", bodyType: typeof(IEnumerable<string>), Summary = "successful operation", Description = "successful operation")] | |
| public static async Task<IActionResult> Run( | |
| [HttpTrigger(AuthorizationLevel.Anonymous, "GET", Route = null)] HttpRequest req, | |
| ILogger log) | |
| { | |
| log.LogInformation("C# HTTP trigger function processed a request."); | |
| var headers = req.Headers.ToDictionary(p => p.Key, p => (string) p.Value); | |
| var handler = new JwtSecurityTokenHandler(); | |
| var token = handler.ReadJwtToken(headers["Authorization"].Split(' ').Last()); | |
| var claims = token.Claims.Select(p => p.ToString()); | |
| var content = new { headers = headers, claims = claims }; | |
| var result = new OkObjectResult(content); | |
| return await Task.FromResult(result).ConfigureAwait(false); | |
| } | |
| } |
이 상태에서 애저 펑션 앱을 실행하면 아래와 같은 Swagger UI 화면이 나타난다.
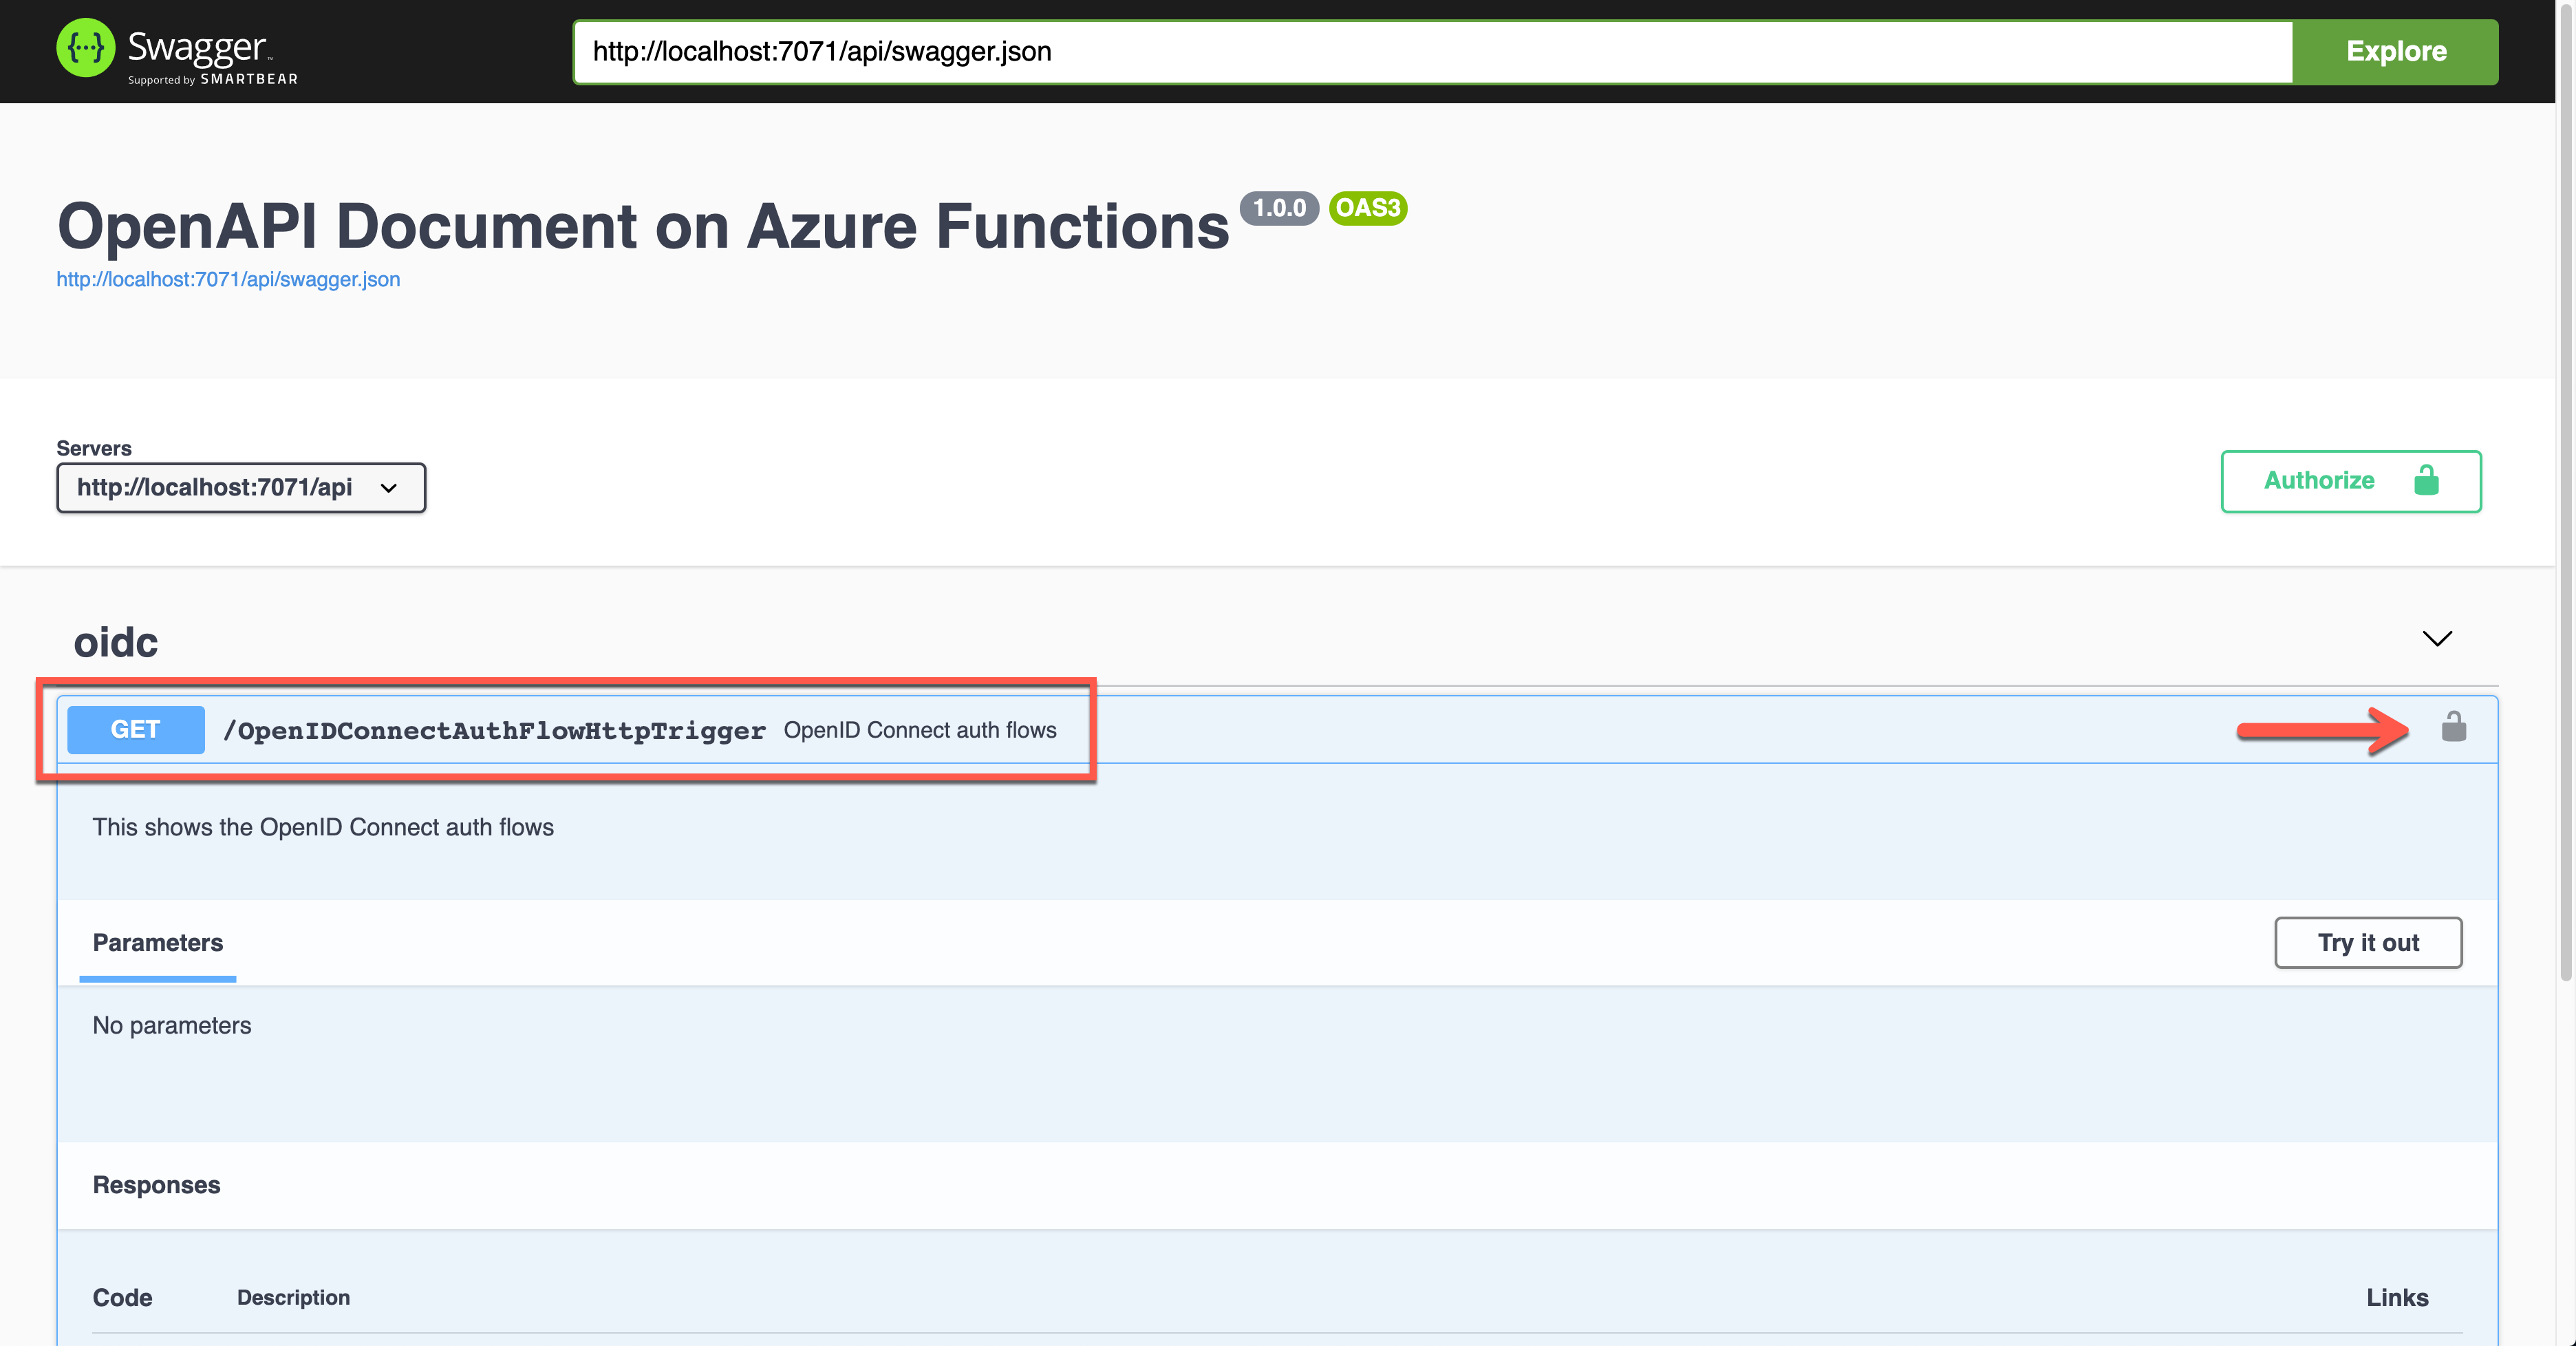
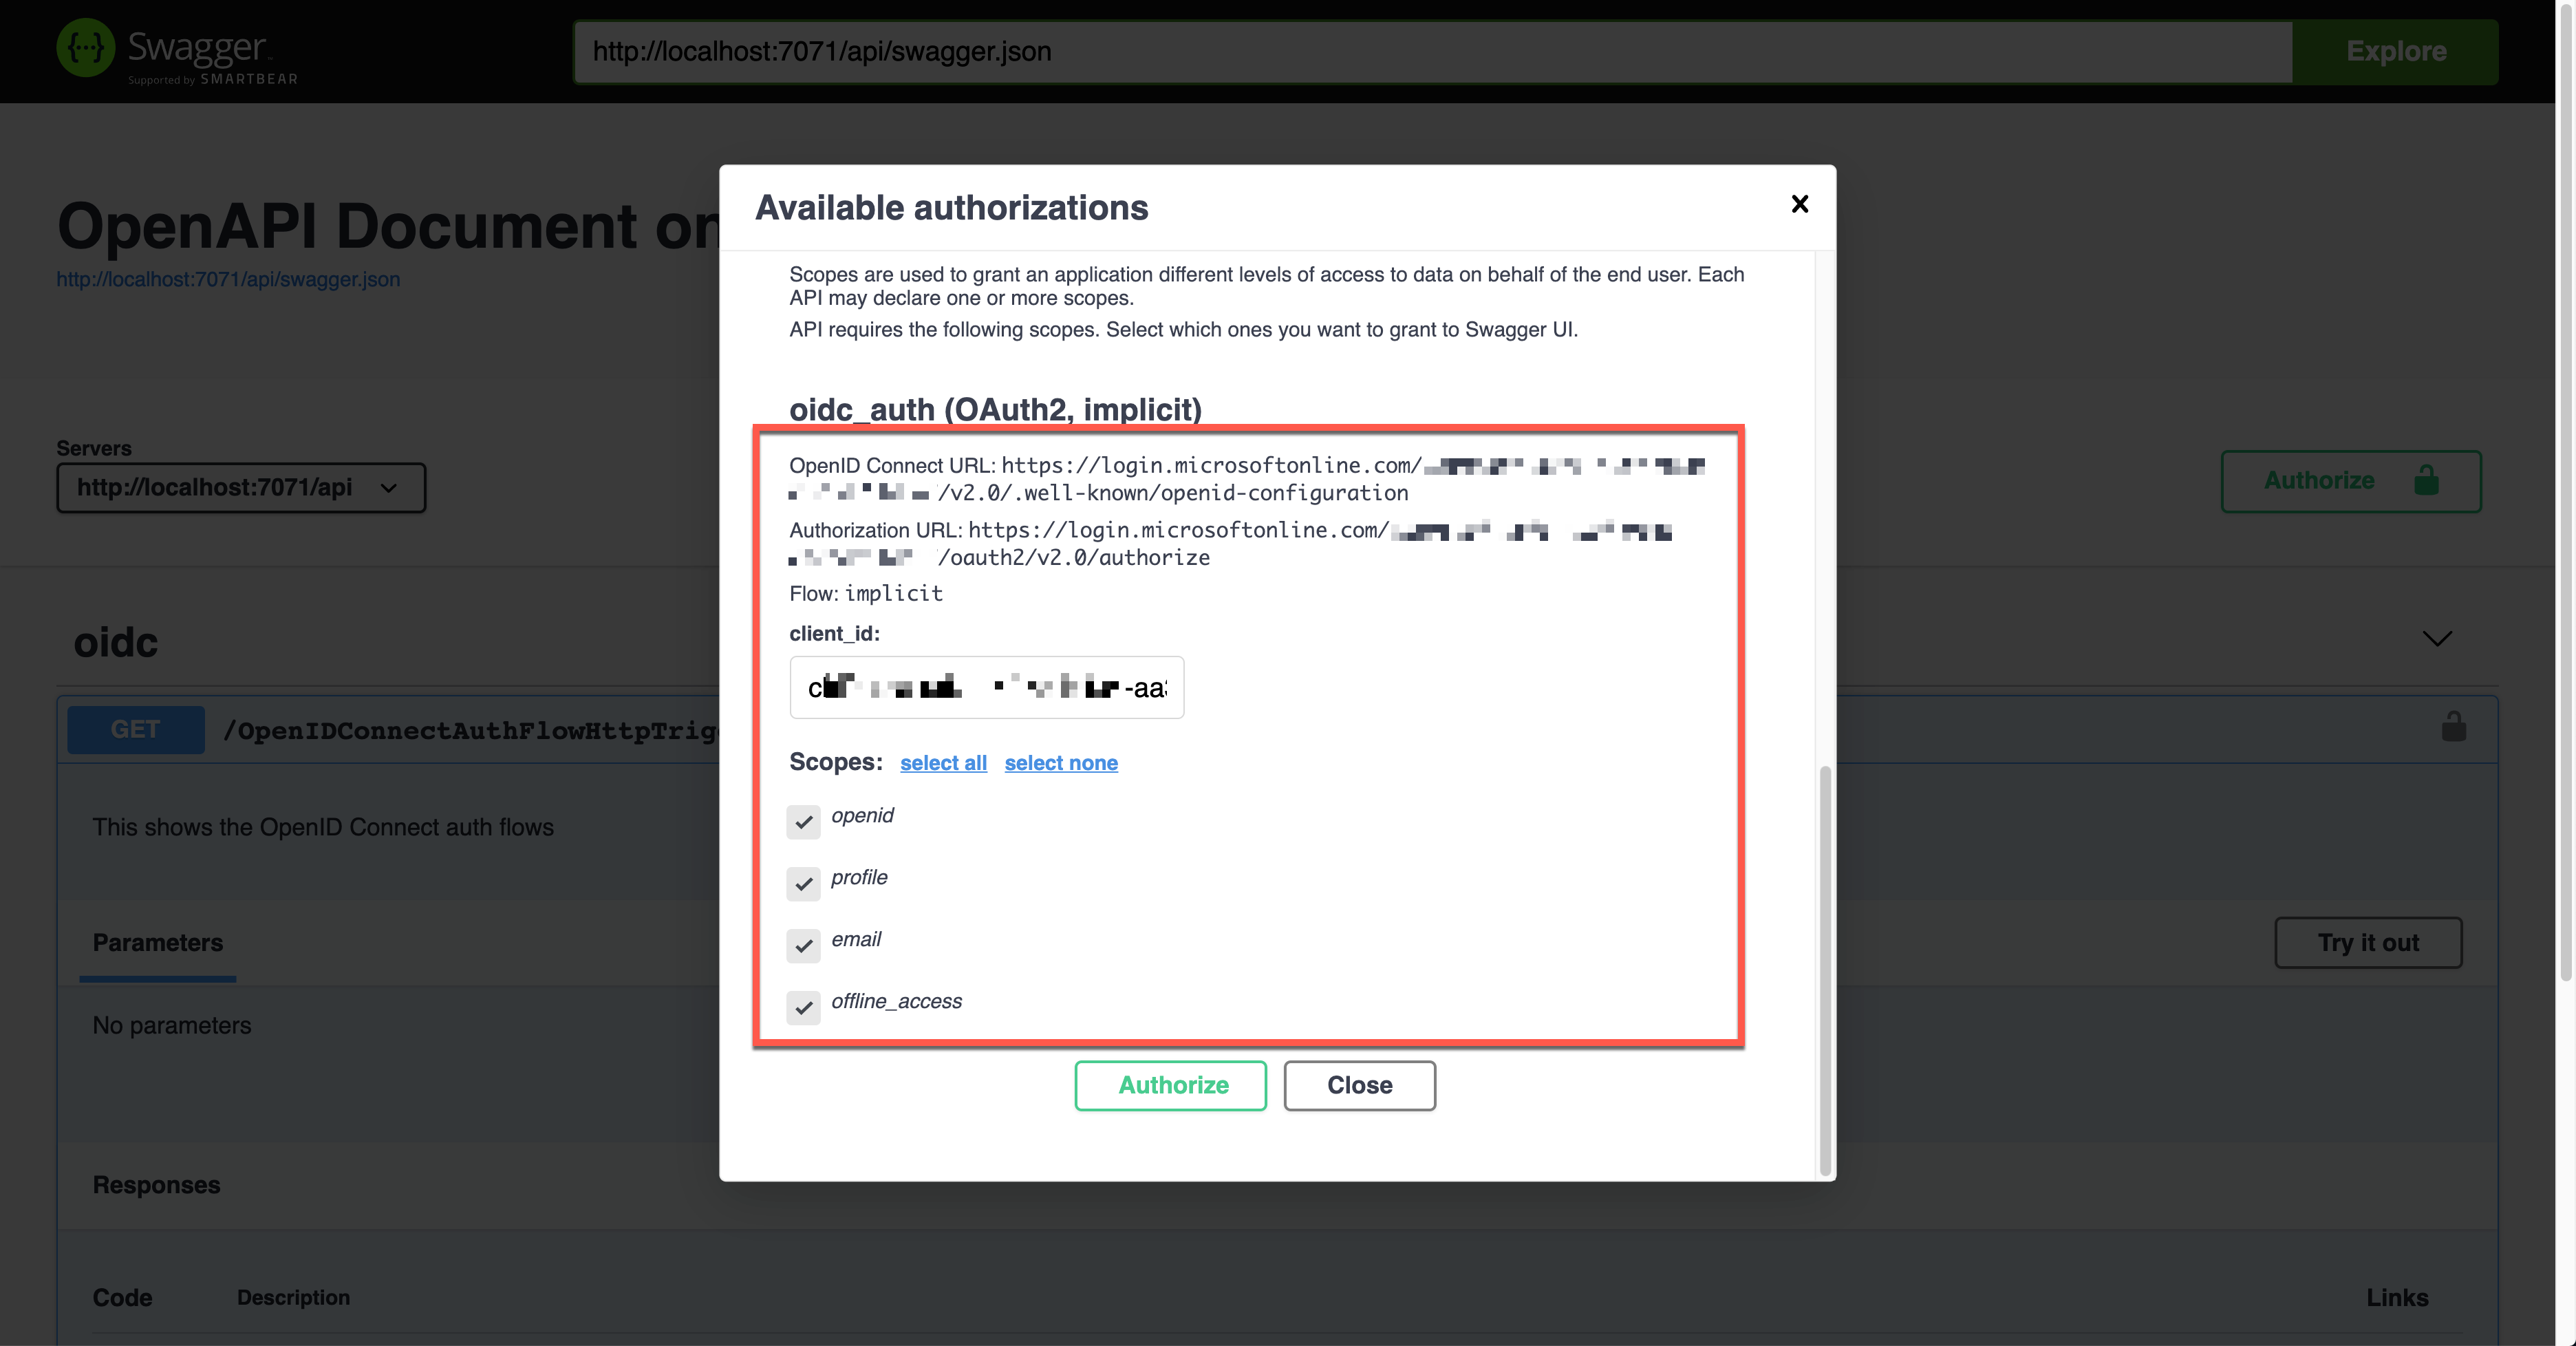
위 그림에서 자물쇠 모양을 클릭하면 아래와 같은 화면이 나타나는데, 상황에 따라 둘 중 하나를 선택해서 인증하면 된다. 여기서는 아래의 암시적 인증 플로우를 선택해서 Client ID 값을 입력한 후 애저 액티브 디렉토리에 로그인해서 액세스 토큰을 발급받는다.
실제로 앱을 실행시키면 아래와 같이 요청 헤더를 통해 Authorization 헤더에 발급 받은 액세스 토큰 값이 JWT 형태로 보내진다.
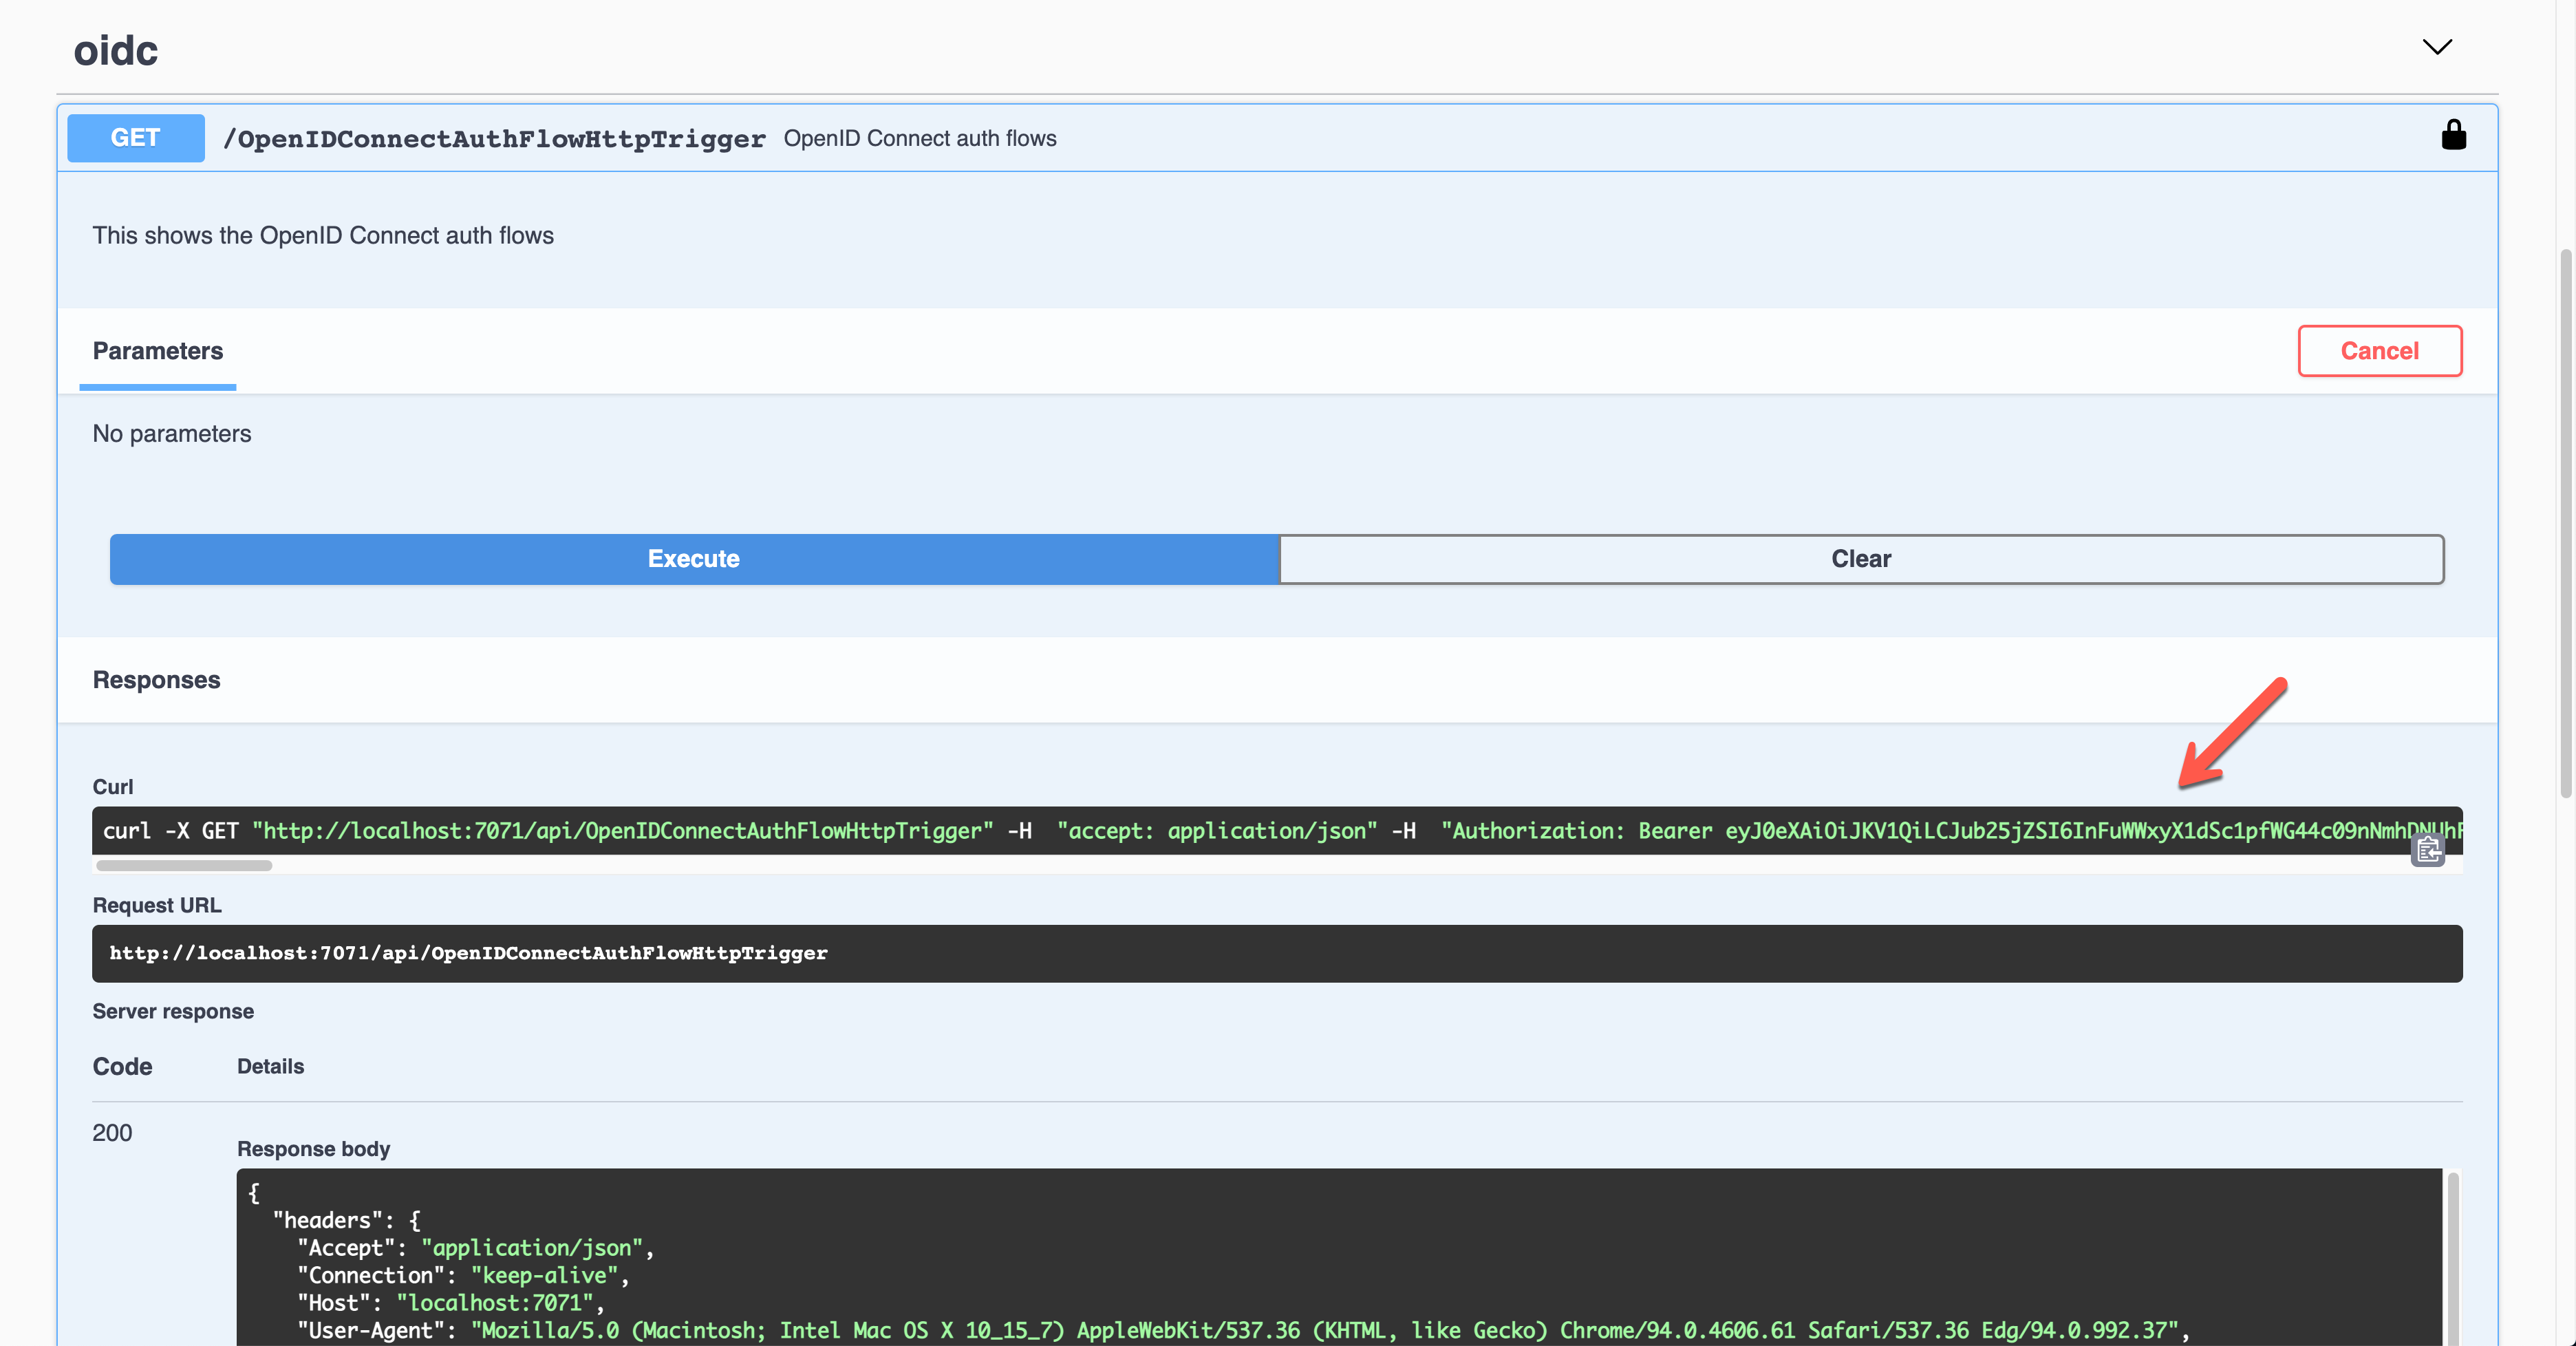
이 JWT 형태의 토큰을 복호화해서 클레임을 찾아낸 후 이를 활용해서 유효성 처리를 하면 된다.
지금까지 애저 펑션으로 API를 사용할 때 OpenAPI와 연동해서 자주 사용하는 인증 방식에 대해 알아보았다. 이외에도 OAuth2 방식의 인증 플로우에 몇가지 더 있긴 하지만, 가장 자주 사용하는 방식이 바로 이 여섯 가지이니만큼 잘 알아두면 애저 펑션에서 기본적으로 제공하는 인증 이외에 추가적인 인증을 구현해서 연동시킬 수 있을 것이다.